<?xml version="1.0" encoding="utf-8"?><feed xmlns="http://www.w3.org/2005/Atom" ><generator uri="https://jekyllrb.com/" version="4.4.1">Jekyll</generator><link href="http://nickapos.oncrete.uk/feed.xml" rel="self" type="application/atom+xml" /><link href="http://nickapos.oncrete.uk/" rel="alternate" type="text/html" /><updated>2026-04-11T06:22:46+01:00</updated><id>http://nickapos.oncrete.uk/feed.xml</id><title type="html">nickapos@home:~$</title><subtitle>Welcome to the personal web site of Nick Apostolakis</subtitle><entry><title type="html">SRE and predictive analysis</title><link href="http://nickapos.oncrete.uk/2026/04/06/sre-predictive-analysis.html" rel="alternate" type="text/html" title="SRE and predictive analysis" /><published>2026-04-06T06:00:00+01:00</published><updated>2026-04-06T06:00:00+01:00</updated><id>http://nickapos.oncrete.uk/2026/04/06/sre-predictive-analysis</id><content type="html" xml:base="http://nickapos.oncrete.uk/2026/04/06/sre-predictive-analysis.html"><![CDATA[<p><strong>Table of contents</strong></p>

<ul id="markdown-toc">
  <li><a href="#introduction" id="markdown-toc-introduction">Introduction</a></li>
  <li><a href="#predictive-analysis" id="markdown-toc-predictive-analysis">Predictive Analysis</a></li>
  <li><a href="#what-is-our-goal" id="markdown-toc-what-is-our-goal">What is our goal</a></li>
  <li><a href="#analysis" id="markdown-toc-analysis">Analysis</a>    <ul>
      <li><a href="#collecting-data" id="markdown-toc-collecting-data">Collecting data</a></li>
      <li><a href="#aggregating-our-data" id="markdown-toc-aggregating-our-data">Aggregating our data</a></li>
      <li><a href="#fitting-our-data" id="markdown-toc-fitting-our-data">Fitting our data</a></li>
      <li><a href="#dangers-of-overfitting" id="markdown-toc-dangers-of-overfitting">Dangers of overfitting</a></li>
      <li><a href="#using-our-model" id="markdown-toc-using-our-model">Using our model</a></li>
    </ul>
  </li>
  <li><a href="#putting-everything-into-practice" id="markdown-toc-putting-everything-into-practice">Putting everything into practice</a>    <ul>
      <li><a href="#presenting-the-error-histogram" id="markdown-toc-presenting-the-error-histogram">Presenting the error histogram</a></li>
      <li><a href="#trying-the-trigonometric-family" id="markdown-toc-trying-the-trigonometric-family">Trying the trigonometric family</a>        <ul>
          <li><a href="#24h-period" id="markdown-toc-24h-period">24h period</a></li>
          <li><a href="#7-day-168h-period" id="markdown-toc-7-day-168h-period">7-day (168h) period</a></li>
        </ul>
      </li>
      <li><a href="#comparing-different-model-families" id="markdown-toc-comparing-different-model-families">Comparing different model families</a></li>
      <li><a href="#validating-our-ets-model" id="markdown-toc-validating-our-ets-model">Validating our ETS model</a></li>
      <li><a href="#keeping-things-up-to-date" id="markdown-toc-keeping-things-up-to-date">Keeping things up to date</a></li>
    </ul>
  </li>
  <li><a href="#linking-predictive-analysis-with-sre" id="markdown-toc-linking-predictive-analysis-with-sre">Linking predictive analysis with SRE</a></li>
</ul>

<h1 id="introduction">Introduction</h1>

<p>Site Reliability Engineering (SRE) as a practice has enabled us to consistently and reliably detect and react to significant events affecting our services over the years. However, as a process, SRE is largely reactive. Even though its value cannot be overstated, there is always room for improvement.</p>

<p>The best way to prevent an outage is to anticipate it — and to never allow it to happen in the first place.</p>

<p>This transforms SRE from a reactive process to a predictive one.</p>

<p>Even if we cannot predict with 100% certainty when a problem will occur, being able to estimate it approximately — within a reasonable level of confidence — is still valuable. It allows us to raise awareness in advance, so that the person on call can anticipate potential issues, remain alert, and intervene early to mitigate or even prevent the problem before it escalates.</p>

<p>This is what we will explore in this article: building a bridge between traditional Site Reliability Engineering and the scientific discipline of predictive analysis.</p>

<h1 id="predictive-analysis">Predictive Analysis</h1>

<p>Predictive analysis is the process of using statistical methods to analyse data related to a specific product, market, service, or phenomenon, and then applying those insights to predict future events. It employs a range of techniques that have been extensively documented across various industries.</p>

<p>One of the best resources available online is the <a href="https://www.itl.nist.gov/div898/handbook/">NIST/SEMATECH e‑Handbook of Statistical Methods</a>, which provides a solid overview of these techniques and includes step‑by‑step guidance on how to evaluate and fine‑tune each method in order to identify the most appropriate one for a given case.</p>

<h1 id="what-is-our-goal">What is our goal</h1>

<p>Our goal is to use the data produced by our service to create a predictive model that allows us to extrapolate from past behaviour and forecast future outcomes.</p>

<p>This can be achieved in several ways. In this article, we will focus on one approach, with alternative methods to be discussed in future articles.</p>

<h1 id="analysis">Analysis</h1>

<h2 id="collecting-data">Collecting data</h2>

<p>To perform this analysis, we need a dataset capturing the past behaviour of a specific aspect of our service. This dataset can take many forms — for example, logs or metrics.</p>

<p>Generally speaking, we need to divide our dataset into two parts: good or acceptable events versus bad or unacceptable events.</p>

<p>For instance, let’s say we want to focus on the latency of an interface. Latency is a continuous metric; it is not a binary one that easily allows us to assign a value of 0 to “bad” and 1 to “good” and split our dataset accordingly. However, we can simulate this binary behaviour by defining a threshold and classifying any value above it as “bad” and any value below it as “good.”</p>

<p>This approach allows us to isolate all the bad events, including their corresponding timestamps.</p>

<h2 id="aggregating-our-data">Aggregating our data</h2>

<p>After filtering out the bad events over time, we now need to transform the data further to determine their frequency within a specific period. This step effectively groups and counts the bad events over defined intervals, giving us a rate — for example, events per second, per minute, per hour, and so on.</p>

<p>We can think of these periods as “buckets” that collect all events occurring within their duration.</p>

<p>This process allows us to produce a histogram showing the distribution of these events over time.</p>

<h2 id="fitting-our-data">Fitting our data</h2>

<p>Now we come to the core of the methodology. We have our event histogram — is there a way to find a mathematical function that fits our dataset and can be used for forecasting?</p>

<p>This is where regression methods and curve fitting come into play. We use these techniques to find a mathematical function or numerical model that expresses the behaviour of our service, either mathematically or numerically.</p>

<p>This task is not new; there are well‑established methods for performing it. Several well‑known regression techniques can help us find the best match for our dataset across a variety of mathematical function families. This functionality even exists in some calculators, which can perform curve fitting and determine the best match across seven or eight categories of mathematical functions.</p>

<p>Modern mathematical and statistical software is even more powerful. We can perform extensive curve fitting using MATLAB, R, SageMath, or even plain Python with libraries such as Pandas, SciPy, or Scilab.</p>

<h2 id="dangers-of-overfitting">Dangers of overfitting</h2>

<p>Whenever performing curve fitting, there is always a risk of overfitting the data. When this happens, the model hugs the dataset too closely, matching precisely all the variations in the histogram. While this might look impressive visually, it is not useful for forecasting. Such a model captures all the noise and fails to allow for natural variation, leading to poor generalisation, misleading conclusions, and unstable behaviour.</p>

<p>The <a href="https://www.itl.nist.gov/div898/handbook/">NIST Engineering Statistics Handbook</a> warns about the dangers of overfitting. It recommends testing residuals to ensure they do not follow recognisable patterns, and validating the model by using it to predict future values before rolling it out to production.</p>

<p>In our example, we will test several models and compare their fit using the following criteria:</p>

<ul>
  <li><strong>\(R^2\)</strong> — <em>coefficient of determination.</em> The fraction of variance in our observed values that the model explains. It ranges from 0 to 1 (or 0–100%). A higher \(R^2\) indicates a better in‑sample fit but does not guarantee accurate predictions or freedom from overfitting.</li>
  <li><strong>RMSE (Root Mean Square Error)</strong> — The square root of the average squared error; effectively the standard deviation of the residuals. Lower is better.</li>
  <li><strong>MAE (Mean Absolute Error)</strong> — The average of the absolute differences between actual and predicted values. Lower is better.</li>
  <li><strong>AIC (Akaike Information Criterion)</strong> — A model selection score that trades off fit and complexity. It is based on likelihood with a penalty for the number of parameters. When two models fit similarly, AIC tends to favour the simpler one, helping to avoid overfitting compared to relying solely on \(R^2\) or RMSE.</li>
  <li><strong>BIC (Bayesian Information Criterion)</strong> — Similar to AIC but with a stronger penalty for model complexity (the penalty scales with the logarithm of the sample size). It tends to favour models with lower complexity.</li>
</ul>

<h2 id="using-our-model">Using our model</h2>

<p>Now that we have a working model that fits our data to a certain extent, we can use it for two purposes.</p>

<p>First, we can determine which part of the cycle we are currently in, and second, we can predict spikes of unwanted events within a certain level of confidence. Depending on the nature of the model, we may have more than one solution. If our model is periodic, this means that recurring cycles exist.</p>

<p>This can be tricky because, depending on the situation, our period may be too long; if we do not have sufficient data to feed into the model, we may be unable to detect it. For example, if our dataset spans one month but the period is six months, there is no way to extrapolate meaningful predictions from such limited data.</p>

<p>On the other hand, if the data exhibit a shorter period of a few days, then a one‑month dataset is usually more than enough to establish a clear pattern.</p>

<p>If we end up with a functional model that includes timestamps, we can use it to determine exactly where we are in the periodic cycle — which means we can easily predict when the next spike or spikes will occur and remain extra vigilant.</p>

<p>Alternatively, if we do not have timestamps, we can rely on pattern matching. We can collect a small number of samples, group them into buckets, and then use the model to identify which part of the cycle we are currently in through pattern comparison.</p>

<h1 id="putting-everything-into-practice">Putting everything into practice</h1>

<p>After describing the methodology, it makes sense to provide an example. We will apply the methodology to analyse one of my personal services — a GoToSocial instance with a single user.</p>

<p>For those unfamiliar with it, <a href="https://gotosocial.org">GoToSocial</a> is an ActivityPub social networking server. It is written in Go and is lightweight enough to be hosted even on a Raspberry Pi. Despite the small size of the service, it is quite active and federates with hundreds of other ActivityPub instances, making it a realistic example of a small‑scale, real‑world application.</p>

<p>The data used are real, not synthetic. We will work with logs spanning the period from the 25th of February 2026 to the 1st of April 2026.</p>

<h2 id="presenting-the-error-histogram">Presenting the error histogram</h2>

<p>After collecting our logs for the above period, we apply the first step: identifying the errors and splitting our data into hourly buckets. This yields a dataset of 886 buckets.</p>

<p>We can see these buckets presented in the following histogram:</p>

<p><img src="/assets/sre-predictive-analysis/error_histogram.jpg" alt="GoToSocial error histogram" width="800" /></p>

<p>
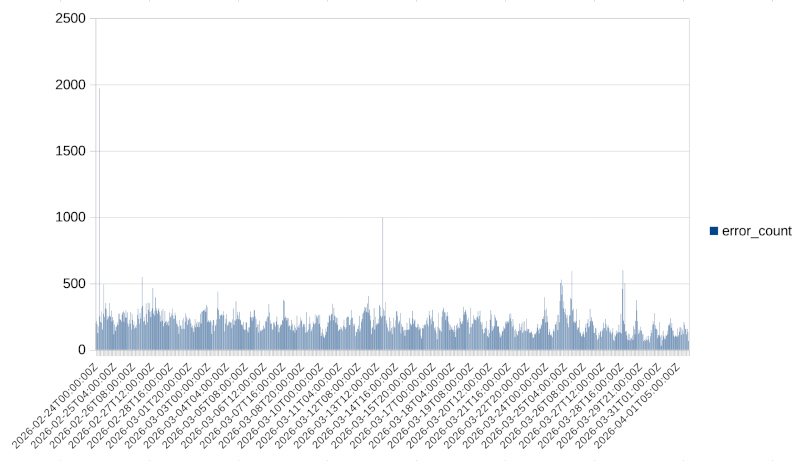
Even without any further processing, we can see macroscopically that there is some periodicity. So we expect our model to reflect that in some way.</p>

<p>The challenge now is to determine which category of functions is best for our model and, after selecting a family, what kind of fine-tuning we can perform to improve the fit even further.</p>

<h2 id="trying-the-trigonometric-family">Trying the trigonometric family</h2>

<p>We can see that the dataset has a periodicity that appears to be daily, and it could potentially be fitted nicely with trigonometric functions. So this is what we will attempt first. For the curve fitting in this case, we use the <a href="https://numpy.org/">NumPy</a> library and, specifically, the <a href="https://numpy.org/devdocs/reference/generated/numpy.linalg.lstsq.html">linalg.lstsq</a> function.</p>

<h3 id="24h-period">24h period</h3>

<p>So this is what we will attempt first. Let’s try fitting a trigonometric function with four harmonics and a period of 24 hours. This gives us a fit with the following properties:</p>

<div class="language-plaintext highlighter-rouge"><div class="highlight"><pre class="highlight"><code>Period hours: 24.0
Harmonics: 4
R^2: 0.11478812632316349
Coefficients:
c0=206.5702885675613
c1=-45.11000222890022
c2=1.6343756945694634
c3=-2.0343489352492035
c4=-6.241474170882098
c5=-10.811558832427124
c6=-1.6575425592831072
c7=1.5152724170962195
c8=-0.8161734650591257
</code></pre></div></div>

<p>and the following fit:</p>

<p><img src="/assets/sre-predictive-analysis/error_histogram_trig_24h_fit.jpg" alt="GoToSocial error histogram with 24h trigonometric fit" width="800" /></p>

<p>We can verify both visually and from the fairly low \(R^2\) value that the fit is not great — we are only capturing 11% of the observed values.</p>

<h3 id="7-day-168h-period">7-day (168h) period</h3>

<p>Repeating the experiment with a 7-day period (168 hours):</p>

<div class="language-plaintext highlighter-rouge"><div class="highlight"><pre class="highlight"><code>Period hours: 168.0
Harmonics: 4
R^2: 0.03184541598545587
Coefficients:
c0=205.8633790794272
c1=16.795771629288875
c2=-8.342650759251661
c3=12.435800671861827
c4=8.168719034649968
c5=5.798148151755778
c6=3.0422911601659615
c7=-2.686076356710398
c8=1.0882103037176767
</code></pre></div></div>

<p>and the following fit:</p>

<p><img src="/assets/sre-predictive-analysis/error_histogram_trig_168h_fit.jpg" alt="GoToSocial error histogram with 168h trigonometric fit" width="800" /></p>

<p>We can see that even though  \(R^2\) is much better than the previous fit, a visual inspection reveals that the fit is actually worse. The projection misses much of the variability in our data.</p>

<h2 id="comparing-different-model-families">Comparing different model families</h2>

<p>After presenting the two trigonometric options, one may wonder what else we can do.</p>

<p>The answer is that we can create a script that compares many different model families and many different configurations within each family. I have done a test run with 43 different models from different families; here are the best performers:</p>

<div class="language-plaintext highlighter-rouge"><div class="highlight"><pre class="highlight"><code>Tested models: 43
Valid models: 43

Ranked valid models
===================
1. spline_s_auto
   R^2: 0.999896
   RMSE: 0.999504
   MAE: 0.435485
   AIC: 7.121179
   BIC: 26.263530
   Parameters: {'smoothing_factor': None}

2. spline_s_885
   R^2: 0.999896
   RMSE: 0.999504
   MAE: 0.435485
   AIC: 7.121179
   BIC: 26.263530
   Parameters: {'smoothing_factor': 885}

3. spline_s_850623.5396610169
   R^2: 0.900018
   RMSE: 30.999789
   MAE: 24.508399
   AIC: 6086.145327
   BIC: 6105.287677
   Parameters: {'smoothing_factor': np.float64(850623.5396610169)}

4. ets_add_add_s168
   R^2: 0.363532
   RMSE: 78.214129
   MAE: 41.467808
   AIC: 7736.227036
   BIC: 7784.082912
   Parameters: {'trend': 'add', 'seasonal': 'add', 'seasonal_periods': 168}
</code></pre></div></div>
<p>As we can see, the top three models belong to the same category but with different smoothing factors. The best performers belong to the spline category. The <a href="https://en.wikipedia.org/wiki/Spline_(mathematics)">spline</a> family of equations can be used for curve fitting, but these results are a textbook example of overfitting.</p>

<p>
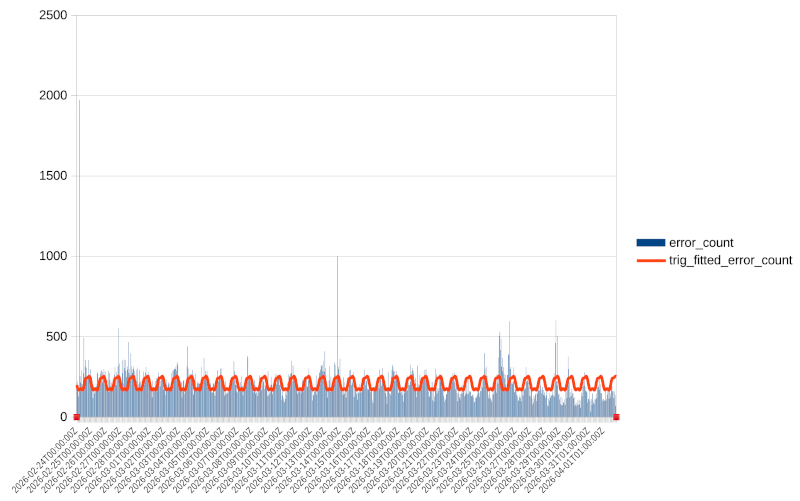
We can see that these models capture 99.98% of our dataset. If we graph one of these fits, it looks like this:</p>

<p><img src="/assets/sre-predictive-analysis/error_histogram_with_spline_fit.png" alt="GoToSocial error histogram with spline fit" width="800" /></p>

<p>
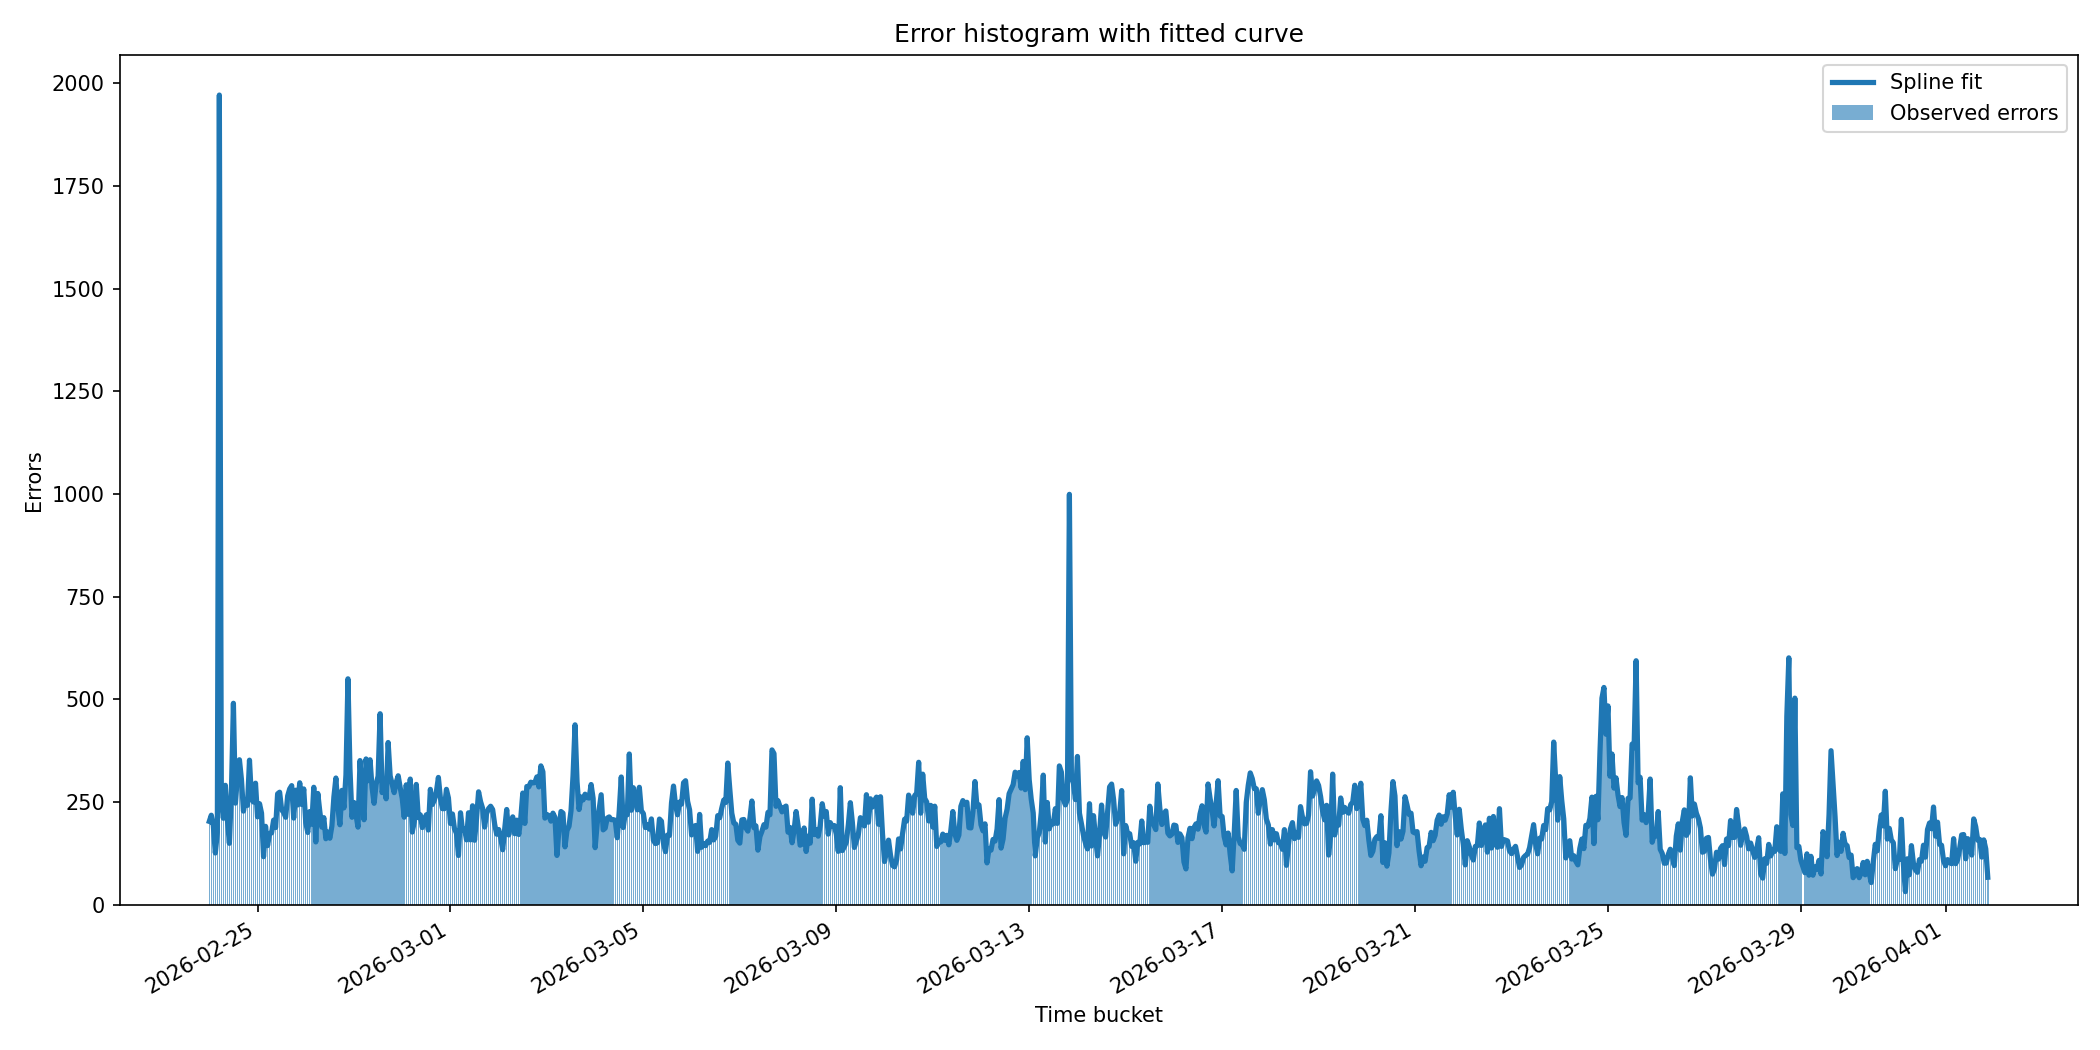
We can see that the spline fits even random noisy spikes. If we plot the residuals, they look like this:</p>

<p><img src="/assets/sre-predictive-analysis/spline_residuals.png" alt="Spline residuals" width="800" /></p>

<p>
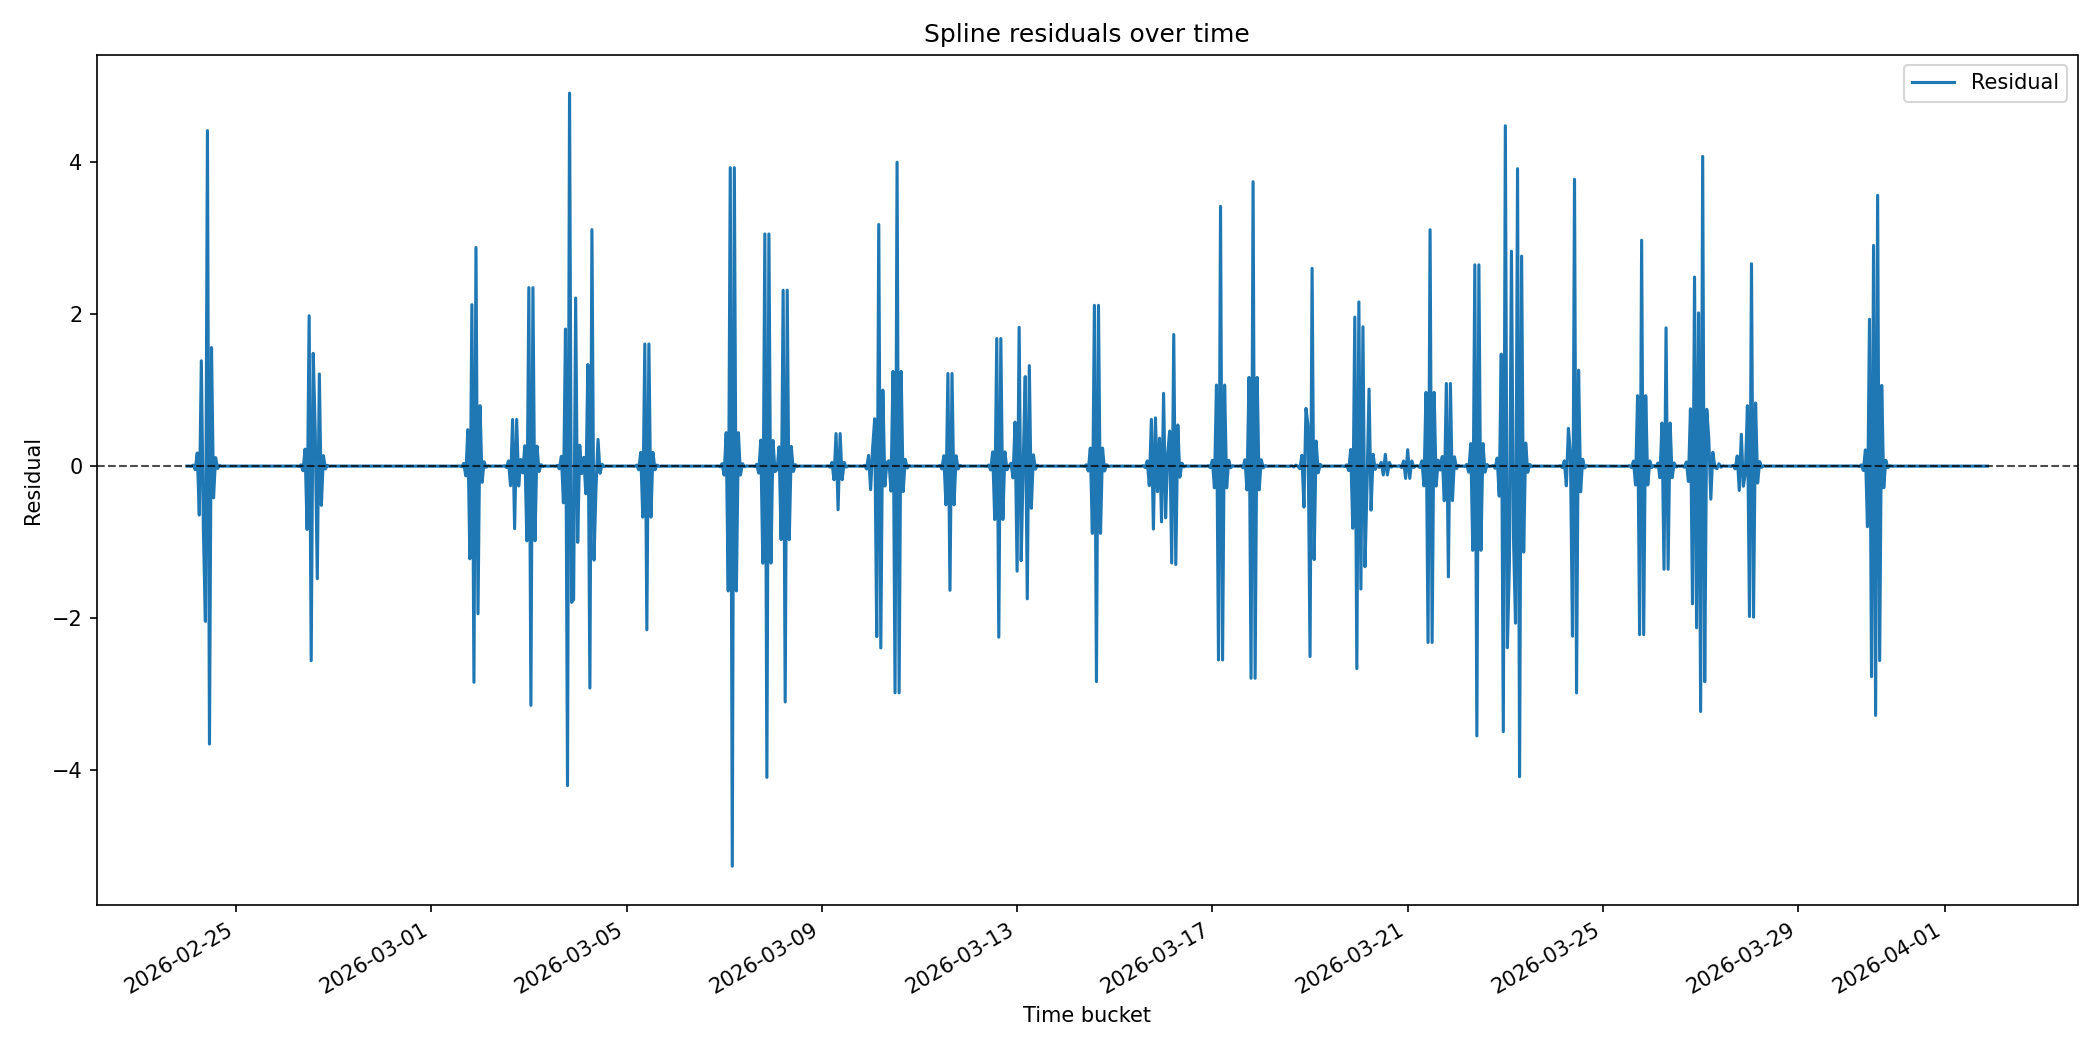
We can see that for the majority of our samples, the residuals are zero. This is exactly what the guidance in the NIST Engineering Statistics Handbook warns against, and something we must avoid. Splines are useful as visualisation tools — especially with a smoothing factor — but they are not great for forecasting.</p>

<p>
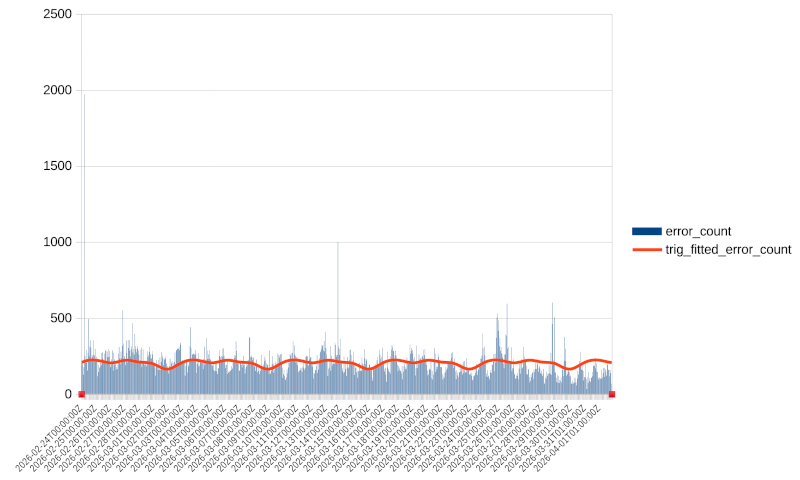
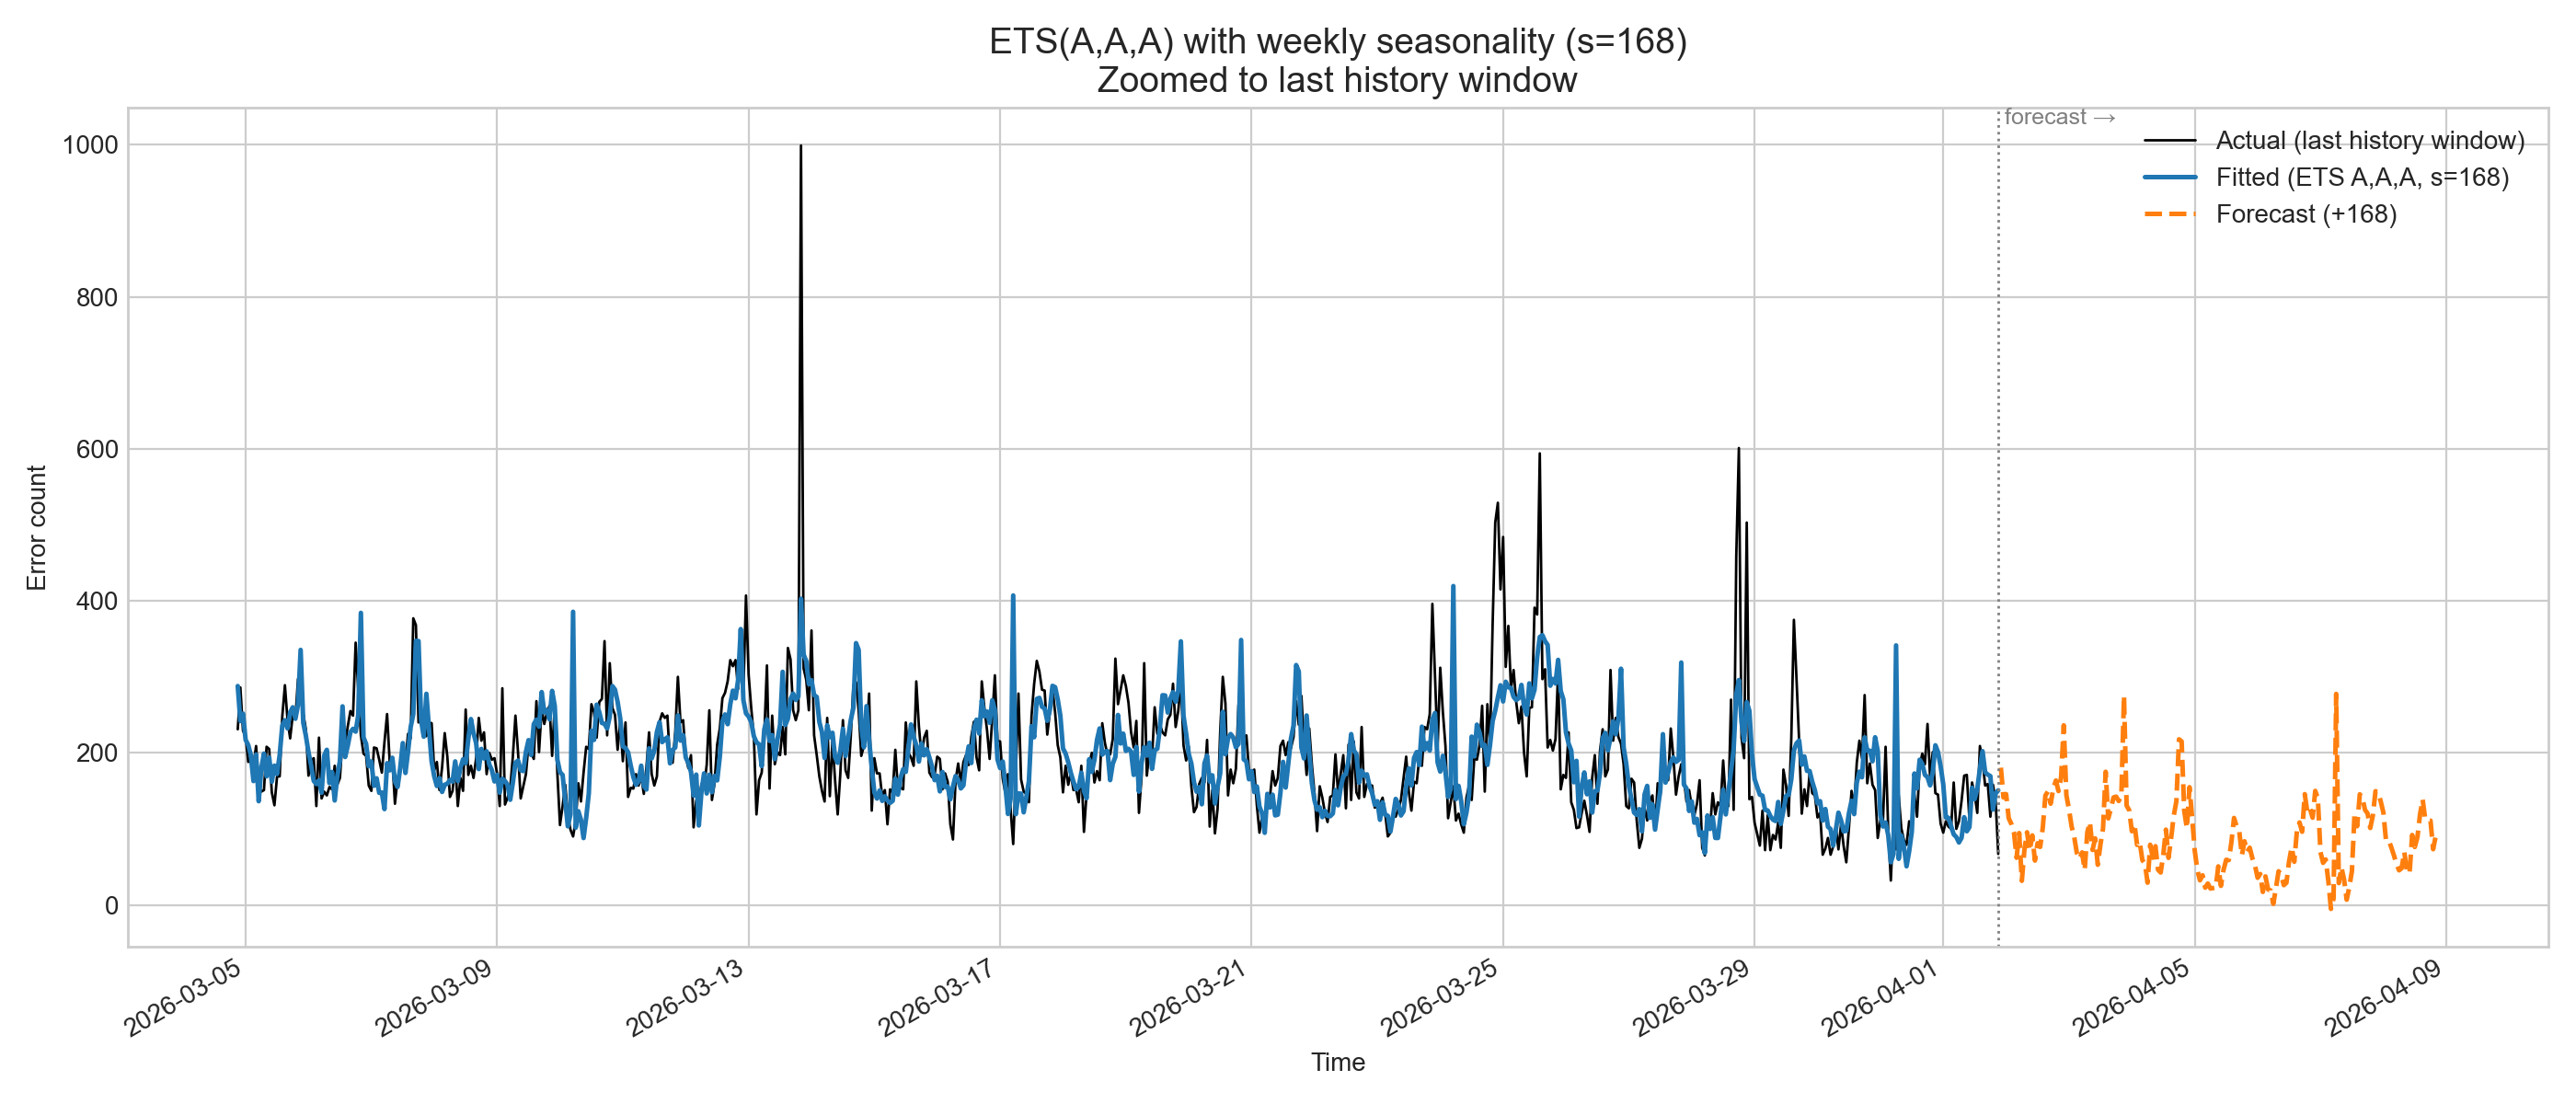
This is why the best fit is really model no. 4, which belongs to a family of functions called ETS (Error-Trend-Seasonality). This family of models is best described in <a href="https://openforecast.org/adam/ETSTaxonomy.html">this OpenForecast link</a> by <a href="https://ivan.svetunkov.com/en/about-me/">Ivan Svetunkov</a>, a Senior Lecturer in Lancaster University Management School, who has written an <a href="https://openforecast.org/adam/">excellent monograph</a> on the topic — not only for ETS models but for forecasting in general.</p>

<p>In this case, the ETS model with the best match has a seasonality of 168 hours (7 days or 1 week). If we plot this model, it looks like this:</p>

<p><img src="/assets/sre-predictive-analysis/ets_weekly.png" alt="GoToSocial ETS weekly model" width="800" /></p>

<h2 id="validating-our-ets-model">Validating our ETS model</h2>

<p>After selecting our model, we can now perform validation using data from our service that were <strong>not part of the training set</strong> and collected during a random period of the week. When we apply the model to this dataset, we get the following results:</p>

<table>
  <thead>
    <tr>
      <th>Metric</th>
      <th>Training</th>
      <th>Validation</th>
      <th>Status</th>
    </tr>
  </thead>
  <tbody>
    <tr>
      <td>Rows</td>
      <td>885</td>
      <td>30</td>
      <td>✅ Good split</td>
    </tr>
    <tr>
      <td>RMSE</td>
      <td>~78.21</td>
      <td>41.01</td>
      <td>✅ 50% improvement</td>
    </tr>
    <tr>
      <td>MAE</td>
      <td>~41.47</td>
      <td>30.41</td>
      <td>✅ 26% improvement</td>
    </tr>
  </tbody>
</table>

<p>And if we plot it, we get the following:</p>

<p><img src="/assets/sre-predictive-analysis/ets_validation_plot.png" alt="GoToSocial ETS weekly model validation" width="800" /></p>

<p>
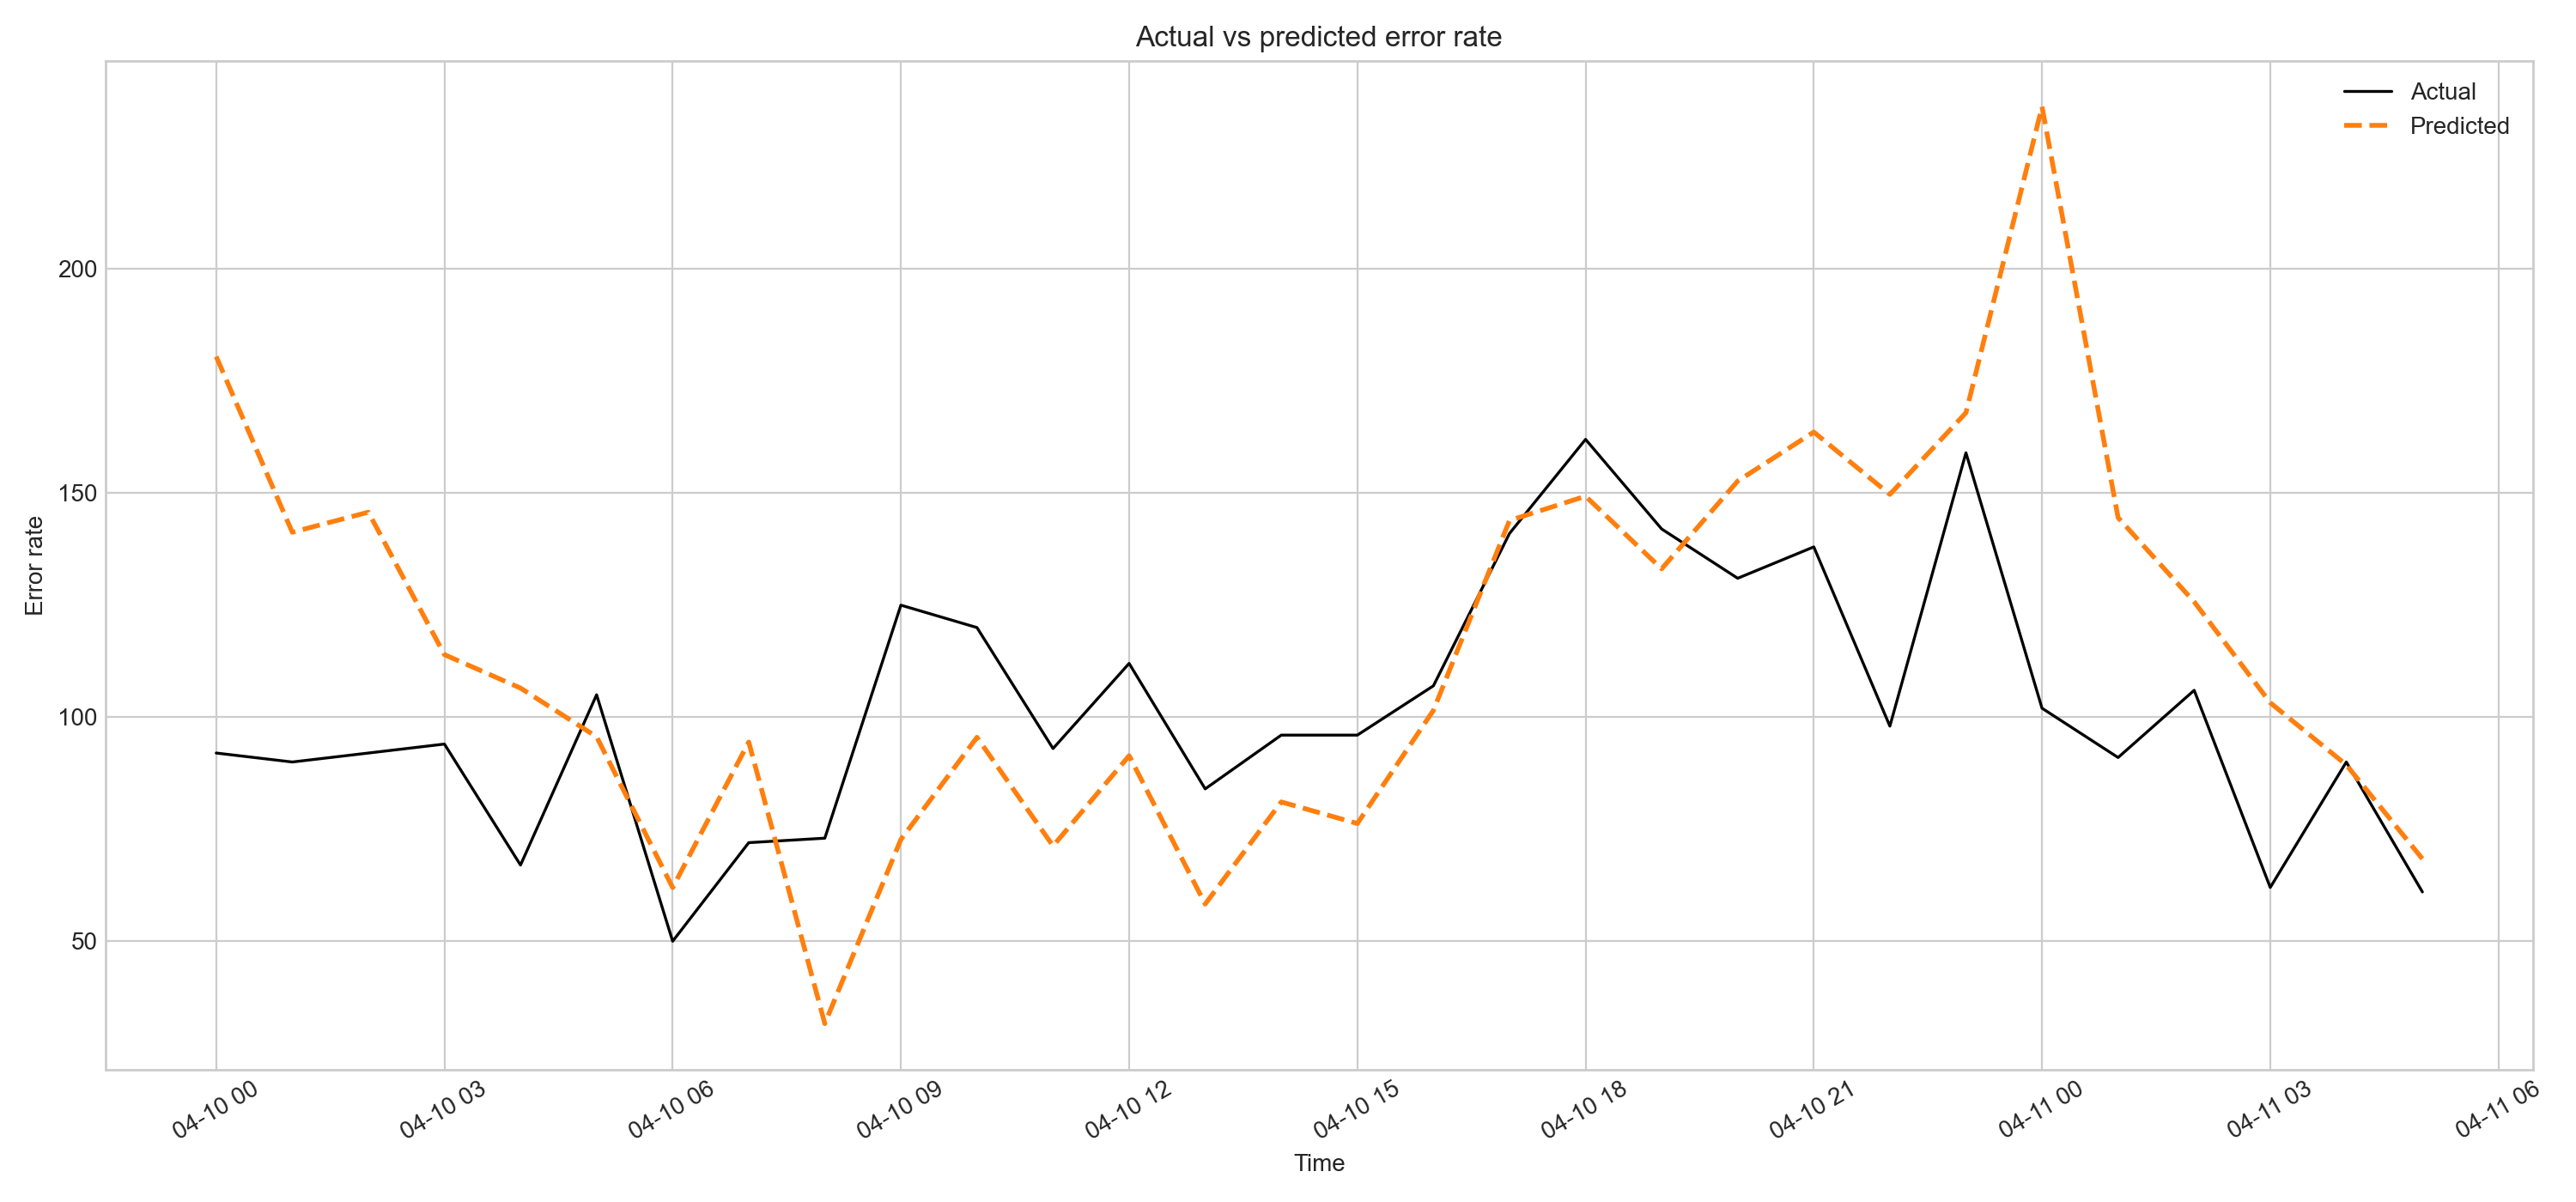
As we can see visually, our predictions — though not perfect — follow the trend of the actual data and can be used for forecasting.</p>

<h2 id="keeping-things-up-to-date">Keeping things up to date</h2>

<p>After creating a model that can be <strong>used</strong> for forecasting successfully, we need to ensure it is regularly refreshed with new incoming training data. This will keep our model reflecting current reality and ensure it can be relied upon for forecasting.</p>

<h1 id="linking-predictive-analysis-with-sre">Linking predictive analysis with SRE</h1>

<p>We now have a model that we can use to predict future events. In SRE, we define significant events as those with a high burn rate. A burn rate, by definition, is an error rate.</p>

<p>We can expand the use of burn rate from a tool used to detect significant events happening right now, to a tool that forecasts when significant events will occur. This is the crucial link between SRE and predictive analysis.</p>

<p>We can now use our model to predict when an event with a specific burn rate will happen and be on high alert, or alternatively perform proactive actions such as scaling up our clusters in advance.</p>]]></content><author><name></name></author><category term="technology" /><category term="sre" /><category term="english" /><summary type="html"><![CDATA[Table of contents]]></summary></entry><entry><title type="html">Layers of monitoring and logging</title><link href="http://nickapos.oncrete.uk/2026/02/20/layers-of-monitoring.html" rel="alternate" type="text/html" title="Layers of monitoring and logging" /><published>2026-02-20T17:00:00+00:00</published><updated>2026-02-20T17:00:00+00:00</updated><id>http://nickapos.oncrete.uk/2026/02/20/layers-of-monitoring</id><content type="html" xml:base="http://nickapos.oncrete.uk/2026/02/20/layers-of-monitoring.html"><![CDATA[<p><strong>Table of contents</strong></p>

<ul id="markdown-toc">
  <li><a href="#introduction" id="markdown-toc-introduction">Introduction</a></li>
  <li><a href="#three-ways-of-devops-refresher" id="markdown-toc-three-ways-of-devops-refresher">Three Ways of DevOps Refresher</a></li>
  <li><a href="#layers-of-automation-refresher" id="markdown-toc-layers-of-automation-refresher">Layers of Automation Refresher</a></li>
  <li><a href="#mutipledimensions" id="markdown-toc-mutipledimensions">Multidimensionality of Monitoring</a></li>
  <li><a href="#aligning-the-layers-of-automation-with-the-layers-of-monitoring" id="markdown-toc-aligning-the-layers-of-automation-with-the-layers-of-monitoring">Aligning the layers of automation with the layers of monitoring</a>    <ul>
      <li><a href="#monitoring-the-automation-layers" id="markdown-toc-monitoring-the-automation-layers">Monitoring the automation layers</a></li>
      <li><a href="#monitoring-application-layer" id="markdown-toc-monitoring-application-layer">Monitoring application layer</a></li>
    </ul>
  </li>
  <li><a href="#logging" id="markdown-toc-logging">Logging</a>    <ul>
      <li><a href="#log-dimensional-analysis" id="markdown-toc-log-dimensional-analysis">Log dimensional analysis</a></li>
      <li><a href="#using-ai-with-logs" id="markdown-toc-using-ai-with-logs">Using AI with logs</a></li>
      <li><a href="#where-logs-meet-monitoring" id="markdown-toc-where-logs-meet-monitoring">Where logs meet monitoring</a></li>
    </ul>
  </li>
  <li><a href="#networkmonitoring" id="markdown-toc-networkmonitoring">Network monitoring</a></li>
</ul>

<h1 id="introduction">Introduction</h1>

<p>A few months ago, I published an article about the various <a href="https://nickapos.oncrete.uk/2025/12/10/layers-of-automation.html">Layers of Automation</a> we can find in a modern environment.</p>

<p>In reality, this article did not start its life a few months ago; it started several years ago, and I have presented it in various shapes and forms both internally in the various companies I have worked for and also at various events in order to highlight the hidden complexity of a modern tech stack.</p>

<p>There is something missing from this article—or, to be precise, not exactly missing but implied. As I have presented in another article, <a href="https://nickapos.oncrete.uk/2025/12/12/three-ways-of-devop-presentation.html#the-second-way">The Three Ways of DevOps</a>, the second way is about feedback loops. It is really about monitoring and alerting.</p>

<p>So how could I ever present the various layers of automation without having a companion article about the various layers of monitoring?</p>

<p>In reality, these two concepts are closely related. In the same way I have presented the various layers of automation in the past in various forums and circumstances, I have also presented the various layers of monitoring, although I did not call them that.</p>

<p>Often I would present this concept using the “right tool for the job,” where I would explain why Tool A may be good for infrastructure monitoring but not necessarily ideal for application monitoring, which implies the existence of an infrastructure layer and an application layer.</p>

<p>This is the focus of this article, where we will continue the discussion from where it was left in the Layers of Automation article and expand it to cover the layers of monitoring.</p>

<h1 id="three-ways-of-devops-refresher">Three Ways of DevOps Refresher</h1>

<ol>
  <li>The first way: Systems thinking. Promotes system-wide design and ultimately automation.</li>
  <li>The second way: Amplifying feedback loops. Introduces telemetry to all stages of the system.</li>
  <li>The third way: Continuous experimentation and improvement.</li>
</ol>

<h1 id="layers-of-automation-refresher">Layers of Automation Refresher</h1>

<p>The Layers of Automation article is a consequence of the first way of DevOps. We need to think systemically.</p>

<p>This also applies to how SRE should be done. We should not be optimizing for our part of the system but for the whole system.</p>

<p>This means building horizontal collaborations across teams that include product, project management, security and trust, and infrastructure people.</p>

<p>When we think systemically, we can identify that modern services can be analyzed across multiple layers, and each layer needs its own automation.</p>

<p>We can see this represented in the following diagram.</p>

<p><img src="/assets/layers-of-automation/layers-of-automation.jpg" alt="Layers of automation representation" width="500" /></p>

<p>We can see that we can slice our infrastructure into major horizontal layers that may contain additional layers themselves.</p>

<p>This means that monitoring is a multidimensional space. We will come back to this <a href="#mutipledimensions">later</a>.</p>

<p>We also see that there are vertical layers that can span multiple horizontal layers, and in this I have included monitoring and alerting automation.</p>

<p>The vertical layers represent common needs that span all horizontal layers, such as monitoring and service discovery.</p>

<p>This means that there is a need for these things (monitoring and service discovery) for each and every one of the horizontal layers.</p>

<p>The major horizontal layers we can identify are:</p>

<ul>
  <li><strong>Infrastructure layer</strong> (e.g., creating a virtual machine or a virtual private cloud, a kubernetes cluster, <a href="#networkmonitoring">networking</a><sup id="fnref1"><a href="#fn1">1</a></sup>)</li>
  <li><strong>OS layer</strong> (e.g., a Linux VM)</li>
  <li><strong>Service layer</strong> (e.g., a database, a Docker engine, a Tomcat server)</li>
  <li><strong>Application layer</strong> (e.g., the actual service deployed in the Docker engine or Tomcat)</li>
</ul>

<p>We can see that some of these layers can be broken down into additional layers. For example, a Kubernetes cluster has itself multiple layers—again an example of multidimensionality.</p>

<ol class="footnotes">
<li id="fn1"><a href="#fnref1">↩</a> Networking is a very special case; we will come back to this as well.</li>
</ol>

<h1 id="mutipledimensions">Multidimensionality of Monitoring</h1>

<p>Before we move on to the alignment of automation and monitoring layers, let’s discuss briefly the concept of multidimensionality, since it will be needed later in the article to define relationships between layers.</p>

<p>According to <a href="https://en.wikipedia.org/wiki/Dimension">Wikipedia</a>, the dimension of a mathematical space (or object) is informally defined as the minimum number of coordinates needed to specify any point within it.</p>

<p>Another useful concept here is the definition of a <a href="https://en.wikipedia.org/wiki/Hypercube">hypercube</a>. In its most simple form, a hypercube is a cube that contains nested cubes.</p>

<p>In this case, we have an n-dimensional cube, and we need n coordinates to specify properly any point within it.</p>

<p>The reason why this is important is that this concept is analogous to object composability and encapsulation in software engineering.</p>

<p>This means that we can treat objects within objects as hypercubes and use the coordinates concept to navigate this hierarchy.</p>

<p>A good example of this is an LDAP traverse path such as <code class="language-plaintext highlighter-rouge">CN=John Doe,OU=Sales,DC=example,DC=com</code>, where we need 4 dimensions in order to reach the <code class="language-plaintext highlighter-rouge">John Doe</code> object.</p>

<p>The same thing can be done with programming language packages, where in sales <code class="language-plaintext highlighter-rouge">com.example.sales.UserManager</code>, the class <code class="language-plaintext highlighter-rouge">UserManager</code> can be reached using 4 dimensions.</p>

<p>This is useful when we are designing the architecture of a service, but it is also very useful when we want to analyze the architecture of this service for monitoring purposes. Our monitoring effectively needs to match closely the design of the service.</p>

<p>This is the reason why seemingly simple questions such as “Is this service healthy?” often do not have a simple answer.</p>

<p>In order to answer this question, we need to take into account both the external dependencies of the service and the internal dimensions of the service.</p>

<h1 id="aligning-the-layers-of-automation-with-the-layers-of-monitoring">Aligning the layers of automation with the layers of monitoring</h1>

<p>After explaining the multidimensionality of monitoring we are ready to discuss about the alignment between layers of automation and monitoring.</p>

<h2 id="monitoring-the-automation-layers">Monitoring the automation layers</h2>

<p>It goes without saying that we need monitoring for the automation itself. This comes from the second way of DevOps. We need to know what our automation is doing; if we have observability without monitoring, then we are in for a world of pain.</p>

<p>When things go wrong with automated systems, we usually experience disruption on a massive scale, because automation allows us to make changes at massive scale. Therefore, we need robust testing, monitoring, and alerting systems in place to catch any issues early.</p>

<p>This means that we need to have at least one layer of monitoring for each layer of automation.</p>

<p>For each of these layers, we have one dimension — time — and then, depending on which layer we are talking about, several other secondary dimensions.</p>

<p>We can arrange these dimensions in different ways. For example, at the infrastructure layer, if we have a fleet of virtual machines, we can represent these in several ways. Here are two examples:</p>

<ul>
  <li>As a fleet of systems, where the hierarchy is <code class="language-plaintext highlighter-rouge">region -&gt; cluster -&gt; system -&gt; metric</code>, which we can then expand to reach an individual machine (please note the analogy with an LDAP traversal path).</li>
  <li>As a collection of metrics that have the system properties encoded as labels. For example, in Prometheus we have<br />
<code class="language-plaintext highlighter-rouge">node_load15{region="us-east-1",vpc="vpc-12345678",instance="node1.example.com:9100",job="node-exporter"} 0.27</code>.<br />
We need four dimensions plus time to reach the metric for this particular node. Again, please note the analogy with the LDAP traversal path. The multiple dimensions and the fact that Prometheus needs to keep a separate timeseries for each value of each label results to issues when we have high cardinality metrics and why we need to be extra careful to restructure our metrics to avoid this situation.</li>
</ul>

<p>The difference is that in the first case, the root is the hierarchy of systems, whereas in the second example, the root is the metric, and we use the additional dimensions to locate the specific system we need.</p>

<h2 id="monitoring-application-layer">Monitoring application layer</h2>

<p>The application layer has all the complexities described in the previous section, but it also introduces some additional dimensions that do not usually exist when we are monitoring third-party infrastructure or services.</p>

<p>In these cases, we usually do not have first-party visibility into what is happening inside the service itself. For example, when using a managed database, we typically do not have full visibility into its internal state.</p>

<p>This is not the case for home-grown applications, where we have full control over the source code, the testing suite, the CI/CD pipeline, and the deployment automation.</p>

<p>These are all additional layers within the application layer. We need to monitor each of them to define quality gates, ensure that our application is fully tested before it reaches production, and maintain a paper trail of all test results for quality assurance and audit purposes.</p>

<p>After deployment, we need to have application telemetry in place to track the health and state of the application.</p>

<p>By instrumenting our application with one of the libraries provided by major monitoring solutions, we gain a wealth of information about the internal state of the service. Once again, we can see that the application itself behaves as an n-dimensional space.</p>

<p>So far, we have focused only on monitoring, but what applies to monitoring largely applies to logging as well. If we configure our log aggregation properly, logging becomes the second most valuable source of telemetry for our services and infrastructure.</p>

<h1 id="logging">Logging</h1>

<p>In a very similar manner to the layers of monitoring, we can also have layers of logging. We have our log aggregators connected to all components of our infrastructure, services, and applications, and they are continuously shipping their logs to a centralised location where we can process them.</p>

<p>Even though the logging layers closely follow the monitoring layers, there are some notable differences.</p>

<p>First of all, in the majority of systems, we have first-party logging. While most services may not have a native integration with our monitoring system of choice, they do provide logging, which we can hook into our log forwarder.</p>

<p>This makes logging extremely valuable because, in many cases, it is the only source of first-party telemetry we have for a system.</p>

<p>Secondly, there is a difference in the dimensional analysis of the logs.</p>

<h2 id="log-dimensional-analysis">Log dimensional analysis</h2>

<p>While monitoring is largely structured — with a well-defined format that allows us to locate specific metrics — logging is mostly unstructured.</p>

<p>Most of the time, logs are free‑form strings, and we need to use query languages to filter log messages and find those related to the service we are interested in.</p>

<p>Depending on the log aggregation system we use, we may be able to add some structure to the logs by classifying them according to severity, application, and subsystem.</p>

<p>By doing so, we add three dimensions in addition to the time dimension, making a total of four.</p>

<p>The complexity of logging, compared to monitoring metrics, shifts from the hierarchy of data to the contents of the logs themselves.</p>

<p>In practice, we often end up using regular expressions or query languages such as <a href="https://en.wikipedia.org/wiki/Apache_Lucene">Lucene</a>.</p>

<p>Because of their unstructured nature, most people use logs primarily during debugging to see what happened with a service, while relying on monitoring metrics to detect issues in the first place.</p>

<p>This is a valid use of logs, but we can do much more with them.</p>

<p>Having a data lake containing the logs of all your services is a gold mine. There are many ways to query this data lake for insights about your applications — but first, let’s discuss how we can convert unstructured data into semi‑structured data for easier processing.</p>

<h2 id="using-ai-with-logs">Using AI with logs</h2>

<p>First and foremost, we need to realise that we do not necessarily have to deal with unstructured logs. If we are talking about first‑party logs produced by our own services, then we can agree on a format that can be parsed relatively easily.</p>

<p>However, this will not solve every issue. We will still be using third‑party libraries that produce logs in a variety of formats, so we will not be able to create a single filter capable of extracting all the value from our logs.</p>

<p>Additionally, we will likely encounter the issue of misclassification — when useful information that should appear at a higher severity level is classified as <code class="language-plaintext highlighter-rouge">DEBUG</code> by the developer, without realising that this data will be filtered out in a production environment where only <code class="language-plaintext highlighter-rouge">ERROR</code> and above are forwarded to the log aggregator.</p>

<p>Furthermore, if we have a system with a relatively small deviation from a known format (e.g., Nginx or Apache logs), we can create regular expressions to target and extract the relevant data.</p>

<p>We can use AI for all these use cases — first, to detect misclassifications, and second, to identify log patterns.</p>

<p>After detecting misclassifications, we can either notify the developers who own the service so they can correct the classification, or, if the logs come from a third‑party service, create filters that ensure valuable operational data is not excluded.</p>

<h2 id="where-logs-meet-monitoring">Where logs meet monitoring</h2>

<p>It is fair to ask — why are we doing this? The answer is that if we apply these filters, we can extract information from the logs and convert it into metrics.</p>

<p>Then we can feed those metrics into our monitoring solution and combine them with native monitoring data to create powerful queries.</p>

<p>Of course, these derived metrics will not be as timely as real‑time monitoring metrics, but as I mentioned previously, sometimes logging is the only source of first‑party telemetry we have.</p>

<p>In addition to this, the content of logs can have an arbitrary number of dimensions. This means that a single log message can contain one or more valuable fields of information, and this number is not fixed.</p>

<p>Performing an analysis to determine how many dimensions we can extract from each log message that can be converted to metrics and eventually provide valuable insights about the state of our service.</p>

<p>Again AI can be a valuable assistant in detecting these patterns.</p>

<h1 id="networkmonitoring">Network monitoring</h1>

<p>Network equipment monitoring can be approached in two ways.</p>

<p>We can either treat it like regular infrastructure monitoring — tracking standard metrics from each network device such as memory usage, CPU load, and packet counts in/out — or as network tracing, where we focus on tracking interactions rather than device metrics.</p>

<p>Both of these approaches are valuable. Tracing, in particular, can reveal previously unknown relationships between services, misconfigurations, or even security issues.</p>

<p>We can also combine tracing with logging to better understand how services interact with one another and the state they were in at the time.</p>]]></content><author><name></name></author><category term="technology" /><category term="ai" /><category term="sre" /><category term="english" /><summary type="html"><![CDATA[Table of contents]]></summary></entry><entry><title type="html">Cooking with Lui AI: An Intro to Retrieval-Augmented Generation</title><link href="http://nickapos.oncrete.uk/2026/02/14/cooking-with-lui-ai-an-intro-to-rag.html" rel="alternate" type="text/html" title="Cooking with Lui AI: An Intro to Retrieval-Augmented Generation" /><published>2026-02-14T02:00:00+00:00</published><updated>2026-02-14T02:00:00+00:00</updated><id>http://nickapos.oncrete.uk/2026/02/14/cooking-with-lui-ai-an-intro-to-rag</id><content type="html" xml:base="http://nickapos.oncrete.uk/2026/02/14/cooking-with-lui-ai-an-intro-to-rag.html"><![CDATA[<p><strong>Table of contents</strong></p>

<ul id="markdown-toc">
  <li><a href="#introduction" id="markdown-toc-introduction">Introduction</a></li>
  <li><a href="#what-is-rag---a-refresher" id="markdown-toc-what-is-rag---a-refresher">What is RAG - A refresher</a></li>
  <li><a href="#the-moving-parts" id="markdown-toc-the-moving-parts">The moving parts</a>    <ul>
      <li><a href="#the-model" id="markdown-toc-the-model">The model</a></li>
      <li><a href="#the-frontend" id="markdown-toc-the-frontend">The frontend</a>        <ul>
          <li><a href="#streamlit" id="markdown-toc-streamlit">Streamlit</a></li>
          <li><a href="#langchain" id="markdown-toc-langchain">Langchain</a></li>
          <li><a href="#fais" id="markdown-toc-fais">FAIS</a></li>
        </ul>
      </li>
    </ul>
  </li>
  <li><a href="#the-code" id="markdown-toc-the-code">The code</a></li>
  <li><a href="#running-the-app" id="markdown-toc-running-the-app">Running the app</a></li>
  <li><a href="#conclusion" id="markdown-toc-conclusion">Conclusion</a></li>
  <li><a href="#references" id="markdown-toc-references">References</a></li>
</ul>

<h1 id="introduction">Introduction</h1>

<p>In my previous article, I mentioned Retrieval-Augmented Generation (RAG) briefly. RAG is one of the most important technologies we can use today to customize an LLM without having to retrain it. It helps us provide additional knowledge to a model, and we can use local LLM models in combination with RAG to query and process private documents.</p>

<p>In this article, we will present the equivalent of a very simple AI “hello world” agent using RAG. This code is mostly boilerplate and nothing special but will help us present and discuss about all the moving parts that go into creating a custom AI-enabled bot with extended context using RAG.</p>

<p>We will introduce you to Lui, a very cute AI-driven mouse chef that has read <em><a href="https://www.gutenberg.org/ebooks/65061">The Boston Cooking-School Cookbook by Fannie Merritt Farmer</a></em> and is happy to help us with our cooking adventures.</p>

<p><img src="/assets/lui-ai/lui-with-cookbook.png" alt="lui the AI mouse chef" width="400" /></p>

<h1 id="what-is-rag---a-refresher">What is RAG - A refresher</h1>

<p>As mentioned in my previous article <a href="https://nickapos.oncrete.uk/2026/02/08/finetuning-an-llm-for-local-execution.html#rag">RAG</a>, RAG is a method used by language models to retrieve relevant information from an external knowledge source and then use that to generate its answer. But what does that mean exactly?</p>

<p>Let’s analyze it.</p>

<p>Usually, the input of RAG is a document of some form. Depending on the complexity of your model and the interface you are using, it may support multiple formats as input or just one.</p>

<p>In its most simple form, it is just a text file that is read and then converted to a suitable format that will then be parsed by the model.</p>

<p>This text is read and then split into small chunks with a small overlap between them so no data is lost.</p>

<p>Then the whole dataset is used to create a vector store that will be used as an index for our model input.</p>

<p>When a query is submitted, the whole dataset is traversed, and the most appropriate chunks are passed to the model alongside our query. Then the model uses this input to generate an answer.</p>

<p>Please notice that all of these steps are independent from the actual model itself, which can be any model, local or cloud-based.</p>

<h1 id="the-moving-parts">The moving parts</h1>

<h2 id="the-model">The model</h2>

<p>First of all, we need to have an LLM model. It can be local or cloud-based, and it has to support some form of API.</p>

<p>In our example, we will use LM Studio in server mode as our backend, with Ministral loaded as our model.</p>

<p>LM Studio supports the OpenAI API, so we need to use some kind of client-side tool that also supports the OpenAI API.</p>

<h2 id="the-frontend">The frontend</h2>

<h3 id="streamlit">Streamlit</h3>

<p>Any OpenAI-compatible framework is suitable for this kind of thing, and indeed there are several types for several programming languages.</p>

<p>You can build CLI tools using CLI frameworks or web-based tools using web-based frameworks in various languages.</p>

<p>In our example, we will use the <a href="https://streamlit.io">Streamlit</a> framework and Python.</p>

<p>Streamlit is open source and can be installed as a Python pip package:</p>

<div class="language-bash highlighter-rouge"><div class="highlight"><pre class="highlight"><code>pip <span class="nb">install </span>streamlit
</code></pre></div></div>

<h3 id="langchain">Langchain</h3>

<p>Another technology we need is the framework that will allow us to do the vectorization of our external document and create the necessary embeddings the model needs. We will use <a href="https://www.langchain.com">LangChain</a> for this, an open-source project that will allow us to split the external document, do the vectorization, and create the embeddings.</p>

<p><a href="https://huggingface.co/blog/getting-started-with-embeddings">Embeddings</a> in this case is a method to represent the segments of our external document in a way that captures their meaning. Then our model can use these embeddings to compare them with others and determine how well the meaning of two segments matches.</p>

<p>Embeddings can be used for all sorts of things, not only in AI but also in search engines, social graphs, and generally to search, sort, group, and compare data.</p>

<p>LangChain also requires the sentence-transformers framework.</p>

<p>To install all of these, all we need to do is:</p>

<div class="language-bash highlighter-rouge"><div class="highlight"><pre class="highlight"><code>pip <span class="nb">install </span>langchain langchain-community langchain-openai langchain-huggingface sentence-transformers
</code></pre></div></div>

<h3 id="fais">FAIS</h3>

<p>We also need the <a href="https://github.com/facebookresearch/faiss">FAISS</a> library, which allows us to do searches on dense vectors. It is also open-source and being developed by the Facebook team.</p>

<p>We can install all of the above with one command:</p>

<div class="language-shell highlighter-rouge"><div class="highlight"><pre class="highlight"><code>pip <span class="nb">install </span>langchain langchain-community langchain-openai langchain-huggingface streamlit faiss-cpu sentence-transformers
</code></pre></div></div>

<p>One word of warning: these libraries and frameworks have a lot of dependencies, and because the command above does not specify any versions, it may end up installing incompatible versions.</p>

<p>Instead of running the command above, I would suggest cloning the <a href="https://github.com/nickapos/lui-ai">lui-ai</a> repo, installing <a href="https://github.com/pyenv/pyenv">pyenv</a>, and running:</p>

<div class="language-shell highlighter-rouge"><div class="highlight"><pre class="highlight"><code>pyenv virtualenv lui-ai
<span class="nb">source</span> ~/.pyenv/versions/lui-ai/bin/activate
pip <span class="nb">install</span> <span class="nt">-r</span> requirements.txt
</code></pre></div></div>

<h1 id="the-code">The code</h1>

<p>We can see all of the above combined in the <code class="language-plaintext highlighter-rouge">app.py</code>.</p>

<p>Specifically, we can see all the libraries imported in the first 7 lines:</p>

<div class="language-python highlighter-rouge"><div class="highlight"><pre class="highlight"><code><span class="kn">import</span> <span class="n">streamlit</span> <span class="k">as</span> <span class="n">st</span>
<span class="kn">from</span> <span class="n">langchain_openai</span> <span class="kn">import</span> <span class="n">ChatOpenAI</span>
<span class="kn">from</span> <span class="n">langchain.text_splitter</span> <span class="kn">import</span> <span class="n">CharacterTextSplitter</span>
<span class="kn">from</span> <span class="n">langchain_huggingface</span> <span class="kn">import</span> <span class="n">HuggingFaceEmbeddings</span>
<span class="kn">from</span> <span class="n">langchain_community.vectorstores</span> <span class="kn">import</span> <span class="n">FAISS</span>
<span class="kn">from</span> <span class="n">langchain.chains</span> <span class="kn">import</span> <span class="n">RetrievalQA</span>
<span class="kn">from</span> <span class="n">pathlib</span> <span class="kn">import</span> <span class="n">Path</span>
</code></pre></div></div>

<p>We can see a function that sets up RAG and the backend LLM in lines 14–59.</p>

<div class="language-python highlighter-rouge"><div class="highlight"><pre class="highlight"><code><span class="c1"># Function that loads the document and creates the RAG pipeline
</span><span class="k">def</span> <span class="nf">create_rag_chain</span><span class="p">(</span><span class="n">document_path</span><span class="p">):</span>
    <span class="c1"># Load the document
</span>    <span class="k">with</span> <span class="nf">open</span><span class="p">(</span><span class="n">document_path</span><span class="p">,</span> <span class="sh">"</span><span class="s">r</span><span class="sh">"</span><span class="p">,</span> <span class="n">encoding</span><span class="o">=</span><span class="sh">"</span><span class="s">utf-8</span><span class="sh">"</span><span class="p">)</span> <span class="k">as</span> <span class="n">f</span><span class="p">:</span>
        <span class="n">document_text</span> <span class="o">=</span> <span class="n">f</span><span class="p">.</span><span class="nf">read</span><span class="p">()</span>

    <span class="c1"># 1. Split the document into small "chunks"
</span>    <span class="c1"># This makes it easier for the model to find relevant information.
</span>    <span class="n">text_splitter</span> <span class="o">=</span> <span class="nc">CharacterTextSplitter</span><span class="p">(</span>
        <span class="n">separator</span><span class="o">=</span><span class="sh">"</span><span class="se">\n</span><span class="sh">"</span><span class="p">,</span>
        <span class="n">chunk_size</span><span class="o">=</span><span class="mi">200</span><span class="p">,</span>  <span class="c1"># Chunk size (in characters)
</span>        <span class="n">chunk_overlap</span><span class="o">=</span><span class="mi">50</span><span class="p">,</span>  <span class="c1"># Overlap between chunks
</span>        <span class="n">length_function</span><span class="o">=</span><span class="nb">len</span><span class="p">,</span>
    <span class="p">)</span>
    <span class="n">docs</span> <span class="o">=</span> <span class="n">text_splitter</span><span class="p">.</span><span class="nf">split_text</span><span class="p">(</span><span class="n">document_text</span><span class="p">)</span>

    <span class="c1"># 2. Create "embedding vectors" for each chunk
</span>    <span class="c1"># Embeddings convert text into numerical vectors that computers can understand semantically.
</span>    <span class="c1"># all-MiniLM-L6-v2 is a small, fast model specialized in converting text into vectors.
</span>    <span class="n">embeddings</span> <span class="o">=</span> <span class="nc">HuggingFaceEmbeddings</span><span class="p">(</span><span class="n">model_name</span><span class="o">=</span><span class="sh">"</span><span class="s">all-MiniLM-L6-v2</span><span class="sh">"</span><span class="p">)</span>

    <span class="c1"># 3. Create a vector store (FAISS) to save and search embeddings
</span>    <span class="c1"># This is like creating a searchable index for our "textbook."
</span>    <span class="n">db</span> <span class="o">=</span> <span class="n">FAISS</span><span class="p">.</span><span class="nf">from_texts</span><span class="p">(</span><span class="n">docs</span><span class="p">,</span> <span class="n">embeddings</span><span class="p">)</span>

    <span class="c1"># 4. Configure connection to the local LLM server (LM Studio)
</span>    <span class="n">llm</span> <span class="o">=</span> <span class="nc">ChatOpenAI</span><span class="p">(</span>
        <span class="c1"># ↓↓↓ Paste LM Studio's "API Identifier" here ↓↓↓
</span>        <span class="n">model_name</span><span class="o">=</span><span class="sh">"</span><span class="s">local-model</span><span class="sh">"</span><span class="p">,</span>  <span class="c1"># Specify to use the local model
</span>        <span class="n">base_url</span><span class="o">=</span><span class="sh">"</span><span class="s">http://p52:8001/v1</span><span class="sh">"</span><span class="p">,</span>  <span class="c1"># Address of the LM Studio server
</span>        <span class="n">api_key</span><span class="o">=</span><span class="sh">"</span><span class="s">not-needed</span><span class="sh">"</span><span class="p">,</span>  <span class="c1"># No API key needed for a local server
</span>        <span class="n">temperature</span><span class="o">=</span><span class="mf">0.1</span><span class="p">,</span>  <span class="c1"># Low temperature to stick to reference text for reliable answers
</span>    <span class="p">)</span>

    <span class="c1"># 5. Create the RetrievalQA chain
</span>    <span class="c1"># This chain combines a retriever (FAISS index) with the LLM.
</span>    <span class="c1"># When given a query, it first finds the most relevant text chunks,
</span>    <span class="c1"># then passes them along with the query to the LLM to generate an answer.
</span>    <span class="n">retriever</span> <span class="o">=</span> <span class="n">db</span><span class="p">.</span><span class="nf">as_retriever</span><span class="p">()</span>
    <span class="n">qa_chain</span> <span class="o">=</span> <span class="n">RetrievalQA</span><span class="p">.</span><span class="nf">from_chain_type</span><span class="p">(</span>
        <span class="n">llm</span><span class="o">=</span><span class="n">llm</span><span class="p">,</span>
        <span class="n">chain_type</span><span class="o">=</span><span class="sh">"</span><span class="s">stuff</span><span class="sh">"</span><span class="p">,</span>  <span class="c1"># "stuff" means stuffing all relevant chunks into the prompt
</span>        <span class="n">retriever</span><span class="o">=</span><span class="n">retriever</span><span class="p">,</span>
        <span class="n">return_source_documents</span><span class="o">=</span><span class="bp">True</span><span class="p">,</span>
    <span class="p">)</span>
    <span class="k">return</span> <span class="n">qa_chain</span>
</code></pre></div></div>

<p>Finally, we can see all of the above initialized and called in lines 62–98:</p>

<div class="language-python highlighter-rouge"><div class="highlight"><pre class="highlight"><code><span class="c1"># Create the RAG chain using knowledge.txt
</span><span class="n">rag_chain</span> <span class="o">=</span> <span class="nf">create_rag_chain</span><span class="p">(</span><span class="sh">"</span><span class="s">the-boston-cooking-school-cookbook.txt</span><span class="sh">"</span><span class="p">)</span>

<span class="c1"># =============================
# --- Streamlit UI ---
# =============================
</span>
<span class="n">st</span><span class="p">.</span><span class="nf">title</span><span class="p">(</span><span class="sh">"</span><span class="s">Lui AI</span><span class="sh">"</span><span class="p">)</span>
<span class="n">st</span><span class="p">.</span><span class="nf">write</span><span class="p">(</span><span class="sh">"</span><span class="s">Lets get gooking</span><span class="sh">"</span><span class="p">)</span>
<span class="n">logo_path</span> <span class="o">=</span> <span class="nc">Path</span><span class="p">()</span> <span class="o">/</span> <span class="sh">"</span><span class="s">lui-logo.jpg</span><span class="sh">"</span>

<span class="c1"># Initialize chat history
</span><span class="k">if</span> <span class="sh">"</span><span class="s">messages</span><span class="sh">"</span> <span class="ow">not</span> <span class="ow">in</span> <span class="n">st</span><span class="p">.</span><span class="n">session_state</span><span class="p">:</span>
    <span class="n">st</span><span class="p">.</span><span class="n">session_state</span><span class="p">.</span><span class="n">messages</span> <span class="o">=</span> <span class="p">[]</span>

<span class="c1"># Redisplay messages from history
</span><span class="k">for</span> <span class="n">message</span> <span class="ow">in</span> <span class="n">st</span><span class="p">.</span><span class="n">session_state</span><span class="p">.</span><span class="n">messages</span><span class="p">:</span>
    <span class="k">with</span> <span class="n">st</span><span class="p">.</span><span class="nf">chat_message</span><span class="p">(</span><span class="n">message</span><span class="p">[</span><span class="sh">"</span><span class="s">role</span><span class="sh">"</span><span class="p">]):</span>
        <span class="n">st</span><span class="p">.</span><span class="nf">markdown</span><span class="p">(</span><span class="n">message</span><span class="p">[</span><span class="sh">"</span><span class="s">content</span><span class="sh">"</span><span class="p">])</span>

<span class="c1"># Respond to the user's input
</span><span class="k">if</span> <span class="n">prompt</span> <span class="p">:</span><span class="o">=</span> <span class="n">st</span><span class="p">.</span><span class="nf">chat_input</span><span class="p">(</span><span class="sh">"</span><span class="s">Enter your question</span><span class="sh">"</span><span class="p">):</span>
    <span class="c1"># Display the user's message
</span>    <span class="k">with</span> <span class="n">st</span><span class="p">.</span><span class="nf">chat_message</span><span class="p">(</span><span class="sh">"</span><span class="s">user</span><span class="sh">"</span><span class="p">):</span>
        <span class="n">st</span><span class="p">.</span><span class="nf">markdown</span><span class="p">(</span><span class="n">prompt</span><span class="p">)</span>
    <span class="c1"># Add the user's message to history
</span>    <span class="n">st</span><span class="p">.</span><span class="n">session_state</span><span class="p">.</span><span class="n">messages</span><span class="p">.</span><span class="nf">append</span><span class="p">({</span><span class="sh">"</span><span class="s">role</span><span class="sh">"</span><span class="p">:</span> <span class="sh">"</span><span class="s">user</span><span class="sh">"</span><span class="p">,</span> <span class="sh">"</span><span class="s">content</span><span class="sh">"</span><span class="p">:</span> <span class="n">prompt</span><span class="p">})</span>

    <span class="c1"># Get the LLM's response
</span>    <span class="n">response</span> <span class="o">=</span> <span class="n">rag_chain</span><span class="p">.</span><span class="nf">invoke</span><span class="p">({</span><span class="sh">"</span><span class="s">query</span><span class="sh">"</span><span class="p">:</span> <span class="n">prompt</span><span class="p">})</span>
    <span class="n">answer</span> <span class="o">=</span> <span class="n">response</span><span class="p">[</span><span class="sh">"</span><span class="s">result</span><span class="sh">"</span><span class="p">]</span>

    <span class="c1"># Display the assistant's response
</span>    <span class="k">with</span> <span class="n">st</span><span class="p">.</span><span class="nf">chat_message</span><span class="p">(</span><span class="sh">"</span><span class="s">assistant</span><span class="sh">"</span><span class="p">):</span>
        <span class="n">st</span><span class="p">.</span><span class="nf">markdown</span><span class="p">(</span><span class="n">answer</span><span class="p">)</span>
    <span class="c1"># Add the assistant's response to history
</span>    <span class="n">st</span><span class="p">.</span><span class="n">session_state</span><span class="p">.</span><span class="n">messages</span><span class="p">.</span><span class="nf">append</span><span class="p">({</span><span class="sh">"</span><span class="s">role</span><span class="sh">"</span><span class="p">:</span> <span class="sh">"</span><span class="s">assistant</span><span class="sh">"</span><span class="p">,</span> <span class="sh">"</span><span class="s">content</span><span class="sh">"</span><span class="p">:</span> <span class="n">answer</span><span class="p">})</span>
</code></pre></div></div>

<h1 id="running-the-app">Running the app</h1>

<p>After everything is installed, we can run the app using:</p>

<div class="language-shell highlighter-rouge"><div class="highlight"><pre class="highlight"><code>streamlit run app.py
</code></pre></div></div>

<p>Which opens a port where Lui is ready to answer our questions about cooking:</p>

<p><img src="/assets/lui-ai/first-page.png" alt="lui welcome page" width="600" /></p>

<p>So I asked Lui for his favorite coffee cake recipe:</p>

<p><img src="/assets/lui-ai/coffee-cake-recipe.png" alt="lui responding with his favourite coffee cake recipe" width="600" /></p>

<h1 id="conclusion">Conclusion</h1>

<p>It is important to remember here that whatever additional context we provide does not replace the fundamental training of the model. So Lui is quite happy to answer questions about Git and Python as well as cooking.</p>

<p>Choose your model carefully. Some understand code, others are good with maths, others with reasoning, some support vision and so on and so forth.</p>

<p>As you can see, we can add multiple documents per chatbot and even have different chatbots with different types of contexts, all directing their questions to the same backend model.</p>

<p>This allows us to deploy specialized apps that will run for us as expert systems against the same LLM depending on our needs.</p>

<p>Also, please remember that in my previous article, I mentioned that the OpenAI API allows us to take the answer of a previous question, add it to our context, and feed it to the LLM alongside our new question using the assistant/user roles.</p>

<p>This is a very powerful concept, and we can use it to create pipelines that will combine different models with different specialized contexts for different things that can implement advanced workflows.</p>

<h1 id="references">References</h1>
<ul>
  <li><a href="https://github.com/nickapos/lui-ai">Lui AI repo</a></li>
  <li><a href="https://streamlit.io">Streamlit</a></li>
  <li><a href="https://www.langchain.com">Langchain</a></li>
  <li><a href="https://huggingface.co/blog/getting-started-with-embeddings">Embeddings</a></li>
  <li><a href="https://github.com/facebookresearch/faiss">FAIS</a></li>
  <li><a href="https://github.com/pyenv/pyenv">Pyenv</a></li>
</ul>]]></content><author><name></name></author><category term="technology" /><category term="ai" /><category term="english" /><summary type="html"><![CDATA[Table of contents]]></summary></entry><entry><title type="html">Finetuning an LLM for local execution</title><link href="http://nickapos.oncrete.uk/2026/02/08/finetuning-an-llm-for-local-execution.html" rel="alternate" type="text/html" title="Finetuning an LLM for local execution" /><published>2026-02-08T05:00:00+00:00</published><updated>2026-02-08T05:00:00+00:00</updated><id>http://nickapos.oncrete.uk/2026/02/08/finetuning-an-llm-for-local-execution</id><content type="html" xml:base="http://nickapos.oncrete.uk/2026/02/08/finetuning-an-llm-for-local-execution.html"><![CDATA[<p><strong>Table of contents</strong></p>
<ul id="markdown-toc">
  <li><a href="#introduction" id="markdown-toc-introduction">Introduction</a></li>
  <li><a href="#terminology" id="markdown-toc-terminology">Terminology</a>    <ul>
      <li><a href="#context-length" id="markdown-toc-context-length">Context Length</a>        <ul>
          <li><a href="#memory" id="markdown-toc-memory">Memory</a>            <ul>
              <li><a href="#comparison-table" id="markdown-toc-comparison-table">Comparison Table</a></li>
            </ul>
          </li>
        </ul>
      </li>
      <li><a href="#capacity" id="markdown-toc-capacity">Capacity</a></li>
      <li><a href="#quantization" id="markdown-toc-quantization">Quantization</a></li>
      <li><a href="#putting-everything-together" id="markdown-toc-putting-everything-together">Putting everything together</a></li>
    </ul>
  </li>
  <li><a href="#openai-api" id="markdown-toc-openai-api">OpenAI API</a></li>
  <li><a href="#lm-studio-ui" id="markdown-toc-lm-studio-ui">LM Studio UI</a></li>
  <li><a href="#rag" id="markdown-toc-rag">RAG</a>    <ul>
      <li><a href="#what-it-does" id="markdown-toc-what-it-does">What It Does</a></li>
      <li><a href="#how-it-works-typical-flow" id="markdown-toc-how-it-works-typical-flow">How It Works (Typical Flow)</a></li>
      <li><a href="#why-people-use-it" id="markdown-toc-why-people-use-it">Why People Use It</a></li>
      <li><a href="#availability" id="markdown-toc-availability">Availability</a></li>
    </ul>
  </li>
  <li><a href="#mcp" id="markdown-toc-mcp">MCP</a></li>
  <li><a href="#conclusion" id="markdown-toc-conclusion">Conclusion</a></li>
</ul>

<h1 id="introduction">Introduction</h1>

<p>In my previous article, I referred to LLMs specifically optimized for local execution.</p>

<p>One would naturally wonder how this can be achieved and, if it is possible, what are the most common pitfalls I need to be aware of?</p>

<p>What are the pros and cons of local execution, and how does it compare against the major models?</p>

<p>These are the questions I will attempt to answer in this article.</p>

<h1 id="terminology">Terminology</h1>

<p>Before we begin our journey to local execution LLM fine-tuning, first we need to define a few concepts and why it is imperative to understand how they affect performance and accuracy in our results. The first concept to analyze is the context length.</p>

<h2 id="context-length">Context Length</h2>

<p>Context length, or context window, is the maximum number of tokens (roughly words or subwords) a large language model (LLM) can process in a single input prompt, including conversation history.</p>

<p>But what does this mean? What happens if we have a context length of 4096 tokens and we run over the limit?</p>

<h3 id="memory">Memory</h3>

<p>Context length is basically how much of our discussion an LLM can remember. If we go over it, there are a number of options for how to handle this exception.</p>

<p>For LM Studio, we have the following options:</p>

<table>
  <thead>
    <tr>
      <th>Policy</th>
      <th>Behavior</th>
      <th>Best for</th>
    </tr>
  </thead>
  <tbody>
    <tr>
      <td><strong>Stop at Limit</strong></td>
      <td>Halts generation when full (reason: <code class="language-plaintext highlighter-rouge">contextLengthReached</code>).</td>
      <td>Strict limits; avoids bad outputs.</td>
    </tr>
    <tr>
      <td><strong>Truncate Middle</strong></td>
      <td>Drops middle conversation; keeps system prompt, first user message, and recent end. Can loop infinitely if not capped.</td>
      <td>Tasks needing early + recent info.</td>
    </tr>
    <tr>
      <td><strong>Rolling Window</strong></td>
      <td>Drops oldest messages; prioritizes recency. Safest for most chats.</td>
      <td>Long conversations; forgets irrelevant history.</td>
    </tr>
  </tbody>
</table>

<p>It is important to understand that everything we inject into a discussion—e.g., copying and pasting a script—becomes part of the discussion context.</p>

<p>If we are asking questions about a script or document we pasted earlier and we have a small context length, then after a while the actual script or document will be forgotten, and any answers we receive will most likely be hallucinations.</p>

<p>Models that are optimized for local execution tend to have much smaller context length capabilities than the major cloud-based LLMs.</p>

<p>Here is how Mistral AI’s Ministral model compares against several major cloud-based LLMs:</p>

<h4 id="comparison-table">Comparison Table</h4>

<table>
  <thead>
    <tr>
      <th>Model</th>
      <th>Provider</th>
      <th>Context Length (tokens)</th>
    </tr>
  </thead>
  <tbody>
    <tr>
      <td>Ministral 3/8B/14B</td>
      <td>Mistral</td>
      <td>128k (up to 256k)</td>
    </tr>
    <tr>
      <td>GPT-4.1 Turbo</td>
      <td>OpenAI</td>
      <td>128k–1M</td>
    </tr>
    <tr>
      <td>Claude Sonnet 4</td>
      <td>Anthropic</td>
      <td>1M</td>
    </tr>
    <tr>
      <td>Gemini 3 Pro</td>
      <td>Google</td>
      <td>1M–2M</td>
    </tr>
    <tr>
      <td>Llama 4 Scout</td>
      <td>Meta</td>
      <td>10M</td>
    </tr>
    <tr>
      <td>Sonar Large</td>
      <td>Perplexity</td>
      <td>128k–200k</td>
    </tr>
    <tr>
      <td>Grok 4.1</td>
      <td>xAI</td>
      <td>128k–2M</td>
    </tr>
    <tr>
      <td>Magic LTM-2</td>
      <td>Various</td>
      <td>100M</td>
    </tr>
  </tbody>
</table>

<p>Ministral is one of the most capable local models when it comes to context length, and its maximum context length is actually quite sufficient for document analysis or long conversations. But even it cannot really compete against the major online models, which can handle contexts of hundreds of thousands of tokens without an issue.</p>

<p>However, when LM Studio starts, it loads the model with a default value of 4096, even though it can go up to 256k.</p>

<p>It is natural to wonder why.</p>

<p>Context length is directly linked to performance and resources consumed. If you have a large context length, then for every question asked, the model has to take the whole previous discussion into account and use it for its new answer.</p>

<p>If you add a document and the context length is big enough, then the whole document is added to the context and is scanned every time a question is asked.</p>

<p>This impacts performance and also the resources consumed.</p>

<h2 id="capacity">Capacity</h2>

<p>When we are increasing the context window, we are increasing how much the model can remember in each session. This means that the model needs more memory.</p>

<p>This memory can either be GPU or CPU memory. There is a way to choose how much of each will be consumed. This technique is called gpu-offloading and it is a way to have some of the processing done in the GPU and some of the processing done in the CPU.</p>

<p>This also affect the execution speed.</p>

<p>If you have a system that has large enough GPU memory so that it can load the whole of your model plus the context window, then this is the most performant scenario, otherwise you need to choose how much of the execution has to be offloaded to the CPU.</p>

<h2 id="quantization">Quantization</h2>

<p>Quantization is a technique to reduce the computational and memory costs of running inference by representing the weights and activations with low-precision data types like 8-bit integer (int8) instead of the usual 32-bit floating point (float32).</p>

<p>Reducing the number of bits means the resulting model requires less memory storage, consumes less energy (in theory), and operations like matrix multiplication can be performed much faster with integer arithmetic. It allows us to run models on embedded devices, which sometimes only support integer data types.</p>

<p>It also means that any results we have might be less accurate. Many LLMs that are optimised for local execution are quantized.</p>

<p><a href="https://huggingface.co/mistralai/Ministral-3-14B-Reasoning-2512">Ministral AI model</a> used in this article as example is not quantized although quantized versions of it exist.</p>

<h2 id="putting-everything-together">Putting everything together</h2>

<p>LM Studio has been moving toward a direction where it can be used without its user interface. After installation, it provides a command called <em>lms</em>. With <em>lms</em>, we can start LM Studio as a service and, while doing so, configure a number of parameters.</p>

<p>If your system does not have resources and you try to load LM Studio, it might crash. So <em>lms</em> has a dry-run flag that does not load a model with the specified parameters—it just tells you if it thinks this is possible or not:</p>

<div class="language-plaintext highlighter-rouge"><div class="highlight"><pre class="highlight"><code>lms load --estimate-only mistralai/ministral-3-14b-reasoning --context-length 120000
</code></pre></div></div>

<p>But even this method is not bulletproof. You need to start small and perform many experiments:</p>

<div class="language-plaintext highlighter-rouge"><div class="highlight"><pre class="highlight"><code>lms load mistralai/ministral-3-14b-reasoning --context-length 12000 --gpu=0.2
</code></pre></div></div>

<p>This command offloads 20% of the operations to the GPU. If your GPU does not have much memory, then it won’t allow you to define a context window larger than this—of course, this is system-dependent.</p>

<p>If you have enough memory in the system, you can try doing everything on the CPU and increase the context length as much as you can:</p>

<div class="language-plaintext highlighter-rouge"><div class="highlight"><pre class="highlight"><code>lms load mistralai/ministral-3-14b-reasoning --context-length 15000 --gpu=0.0
</code></pre></div></div>

<p>In my test system with 76GB RAM and 4GB GPU memory, these two options allowed me to execute the same simple query of explaining a very small shell script in 1 minute and 1 second with GPU offloading at 20%, and 1 minute and 4 seconds with 0% GPU offloading.</p>

<p>Disabling the GPU offloading allowed me to go way higher in context length. It allowed me to extend the context length to 120,000 tokens, load a PDF of 600 pages, and ask the AI to summarize it. It took 1 hour and 30 minutes to do it at the breakneck speed of 0.4 tokens per second, but it worked.</p>

<h1 id="openai-api">OpenAI API</h1>

<p>After loading the model, you can start the server. By default, LM Studio listens only to localhost IP 127.0.0.1 and port 1234. This can be modified in order to allow for external connections.</p>

<p>Of course, one must be careful and not expose their LLM to the world, so normal precautions apply.</p>

<p>This can be done both from the LM Studio UI and from the command line with the following command:</p>

<div class="language-plaintext highlighter-rouge"><div class="highlight"><pre class="highlight"><code>lms server start --bind 0.0.0.0 --port 1234
</code></pre></div></div>

<p>Now our server is up and running and can accept connections from other systems. We can verify its state by using:</p>

<div class="language-plaintext highlighter-rouge"><div class="highlight"><pre class="highlight"><code>lms status
</code></pre></div></div>

<div class="language-plaintext highlighter-rouge"><div class="highlight"><pre class="highlight"><code>Server: ON (port: 1234)

Loaded Models
  · mistralai/ministral-3-14b-reasoning:2 - 9.12 GB
</code></pre></div></div>

<p>Please note that you do not need to do this in order to use the LM Studio CLI. You can use it without starting LM Studio in server mode.</p>

<p>The reason why you need to do this is because the LM Studio CLI is quite restrictive. It does not support certain extensions that are available only via its UI. We will cover that in the next section.</p>

<p>If you just want to have a quick chat with the AI, all you need to run is:</p>

<div class="language-plaintext highlighter-rouge"><div class="highlight"><pre class="highlight"><code>lms chat
</code></pre></div></div>

<p><img src="/assets/lm-studio/lms-chat.png" alt="lms chat" width="800" /></p>

<p>When the LM Studio server is running, it allows us to execute commands against it using an OpenAI-compatible API.</p>

<p>This is very important and very powerful because we can use it with any of the already available tools that are compatible with the OpenAI API.</p>

<p>We will analyze this even further in later sections, but for now, all you need to know is that at minimum you can use any HTTP-enabled library to submit queries to the AI.</p>

<p>We can see an example of a very minimalistic interaction below:</p>

<div class="language-plaintext highlighter-rouge"><div class="highlight"><pre class="highlight"><code>curl http://localhost:1234/v1/chat/completions \
  -H "Content-Type: application/json" \
  -d '{
    "model": "local-model",
    "messages": [
      {"role": "system", "content": "You are an expert developer."},
      {"role": "user", "content": "Is Rust better than Python?"}
    ]
  }' | jq '.choices[0].message.content'
</code></pre></div></div>

<p>In this interaction, it is important to highlight that the JSON we are submitting to the AI server consists of an array with several entries. These entries identify a role and content for that role.</p>

<p>The OpenAI API supports three roles:</p>
<ul>
  <li><strong>System role</strong>: This is the role where we give the AI its basic instructions (e.g., “You are an expert in Python”).</li>
  <li><strong>User role</strong>: This is where our questions come in. Any user interactions are done via the user role.</li>
  <li><strong>Assistant role</strong>: This is the role used for any responses from the AI to our questions.</li>
</ul>

<p>This array is the context of our chat; it is saved in the context window alongside anything else we want to inject into it.</p>

<p>We can take this JSON array and transfer it between different AI chats, taking the output of specialized models for specific tasks and using it as input to other AI models, thus creating AI pipelines.</p>

<p>This is a very powerful concept where we can combine AI models/agents of different specializations and gradually build our context, taking the responses from one step of the pipeline and feeding it to the next.</p>

<p>Using this approach, we can optimize for skills and for cost. We can start an AI pipeline using local models that do not cost anything beyond the actual computational resources they use, and when it comes to doing something beyond their abilities, use one of the expensive major cloud-based models only for that specific step.</p>

<h1 id="lm-studio-ui">LM Studio UI</h1>

<p>As mentioned in the previous section, LM Studio started its life as an application with a graphical user interface. Its headless operation is a recent addition.</p>

<p>As such, its GUI supports all the bells and whistles—even some things that are not supported via its CLI yet.</p>

<p>Via the UI, we can tweak the details of the model: its context size, its GPU offloading, how creative it can be, the port and IP the server will listen on. We can browse the available models and load one or more.</p>

<p>We can also have a collection of chat sessions that can be preserved between restarts of the application.</p>

<p>This is something that is not supported by the CLI. Under the hood, what the UI saves is our context JSON array, and the next time we interact with a chat, it loads the whole thing into the context.</p>

<p>The UI also has some unique features that are not supported by the CLI yet. It can allow us to mount several files in our context using RAG. We will explain what RAG is in the next section.</p>

<p>The UI allows us to use RAG by attaching up to 5 files with a maximum of 30MB total.</p>

<p>It also allows the model to execute JavaScript scripts in a sandboxed environment.</p>

<p>This is very important because, alongside RAG, it improves the precision of the responses and reduces the chances of hallucinations.</p>

<p>Here is an example of such a case:</p>

<p><img src="/assets/lm-studio/ministral-mortgage-hallucination.png" alt="ministral mortgate answer" width="800" />
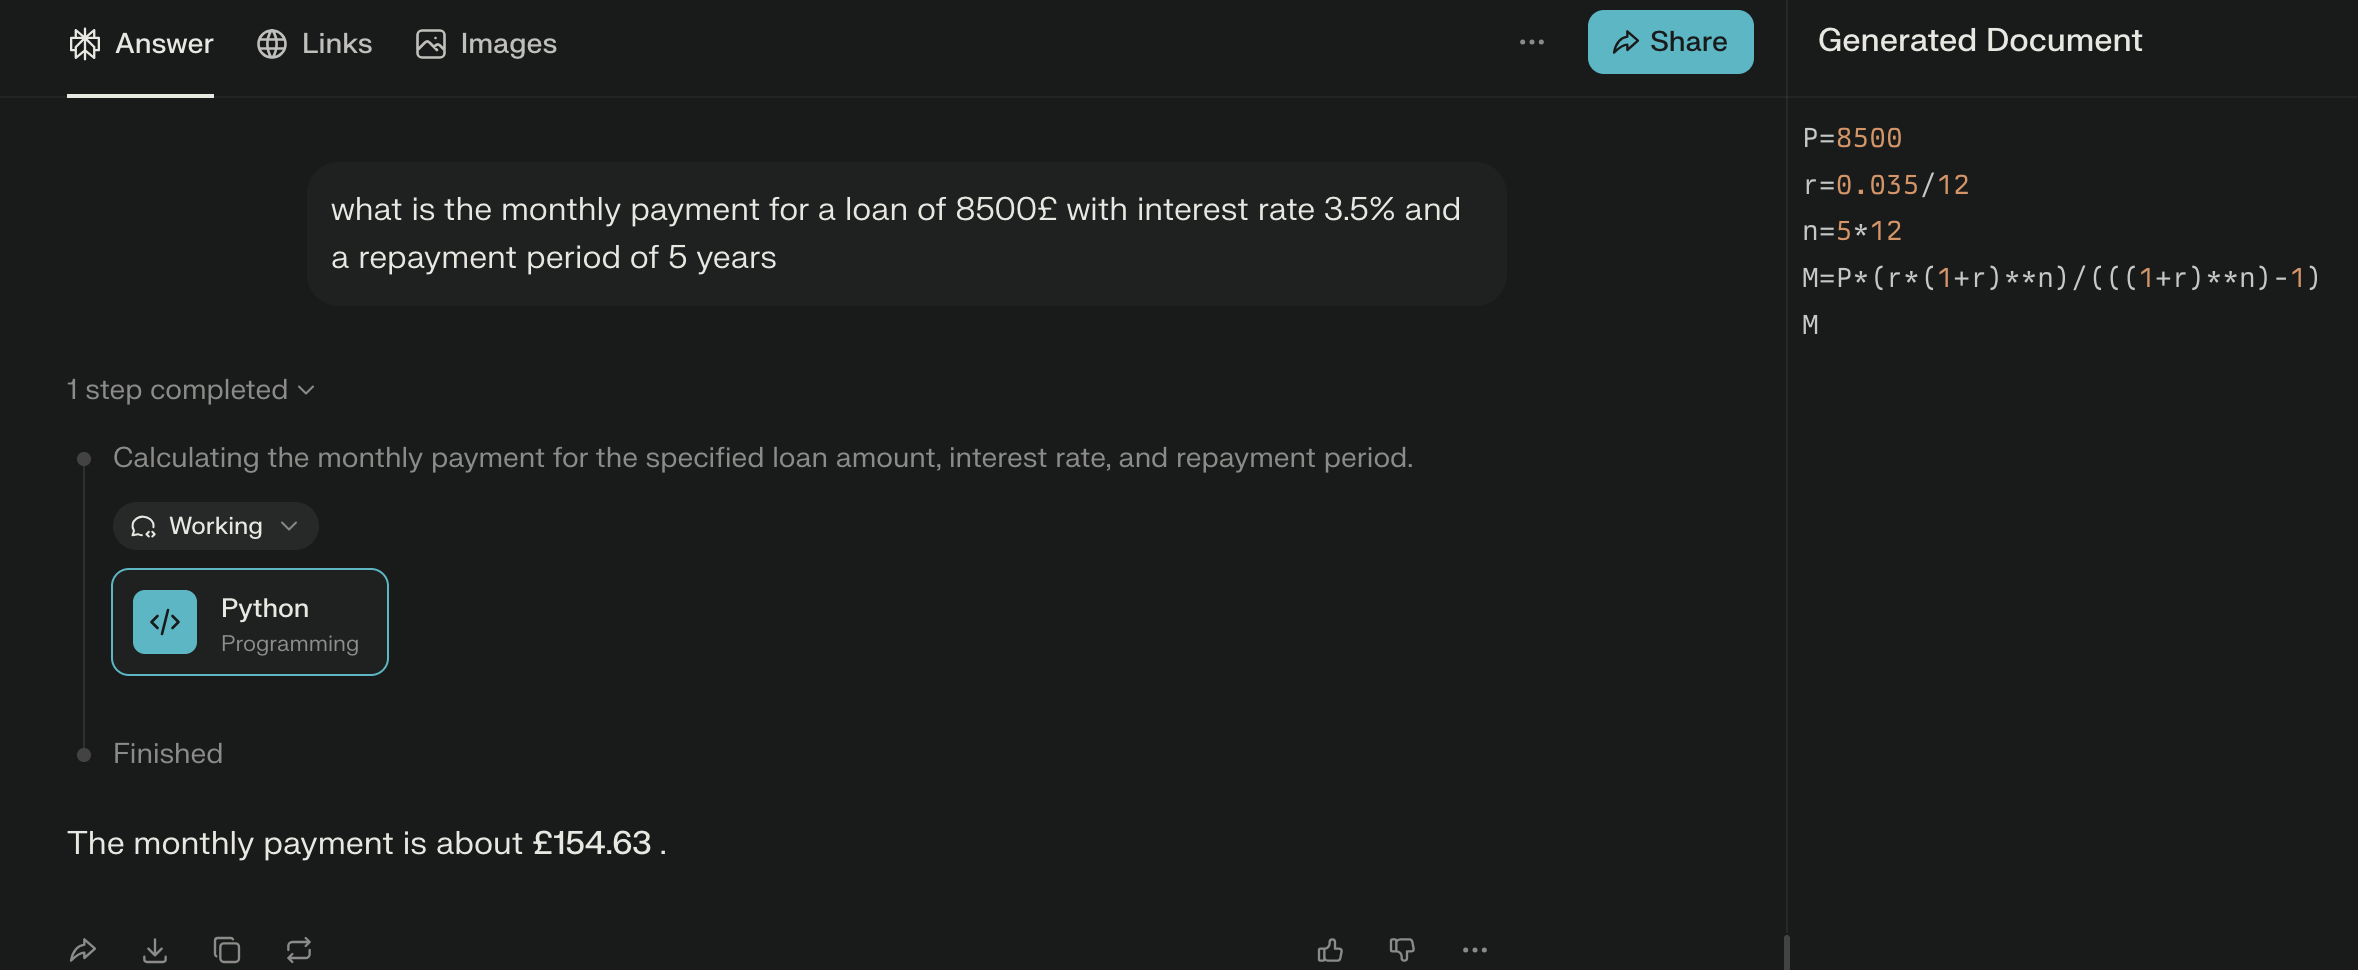
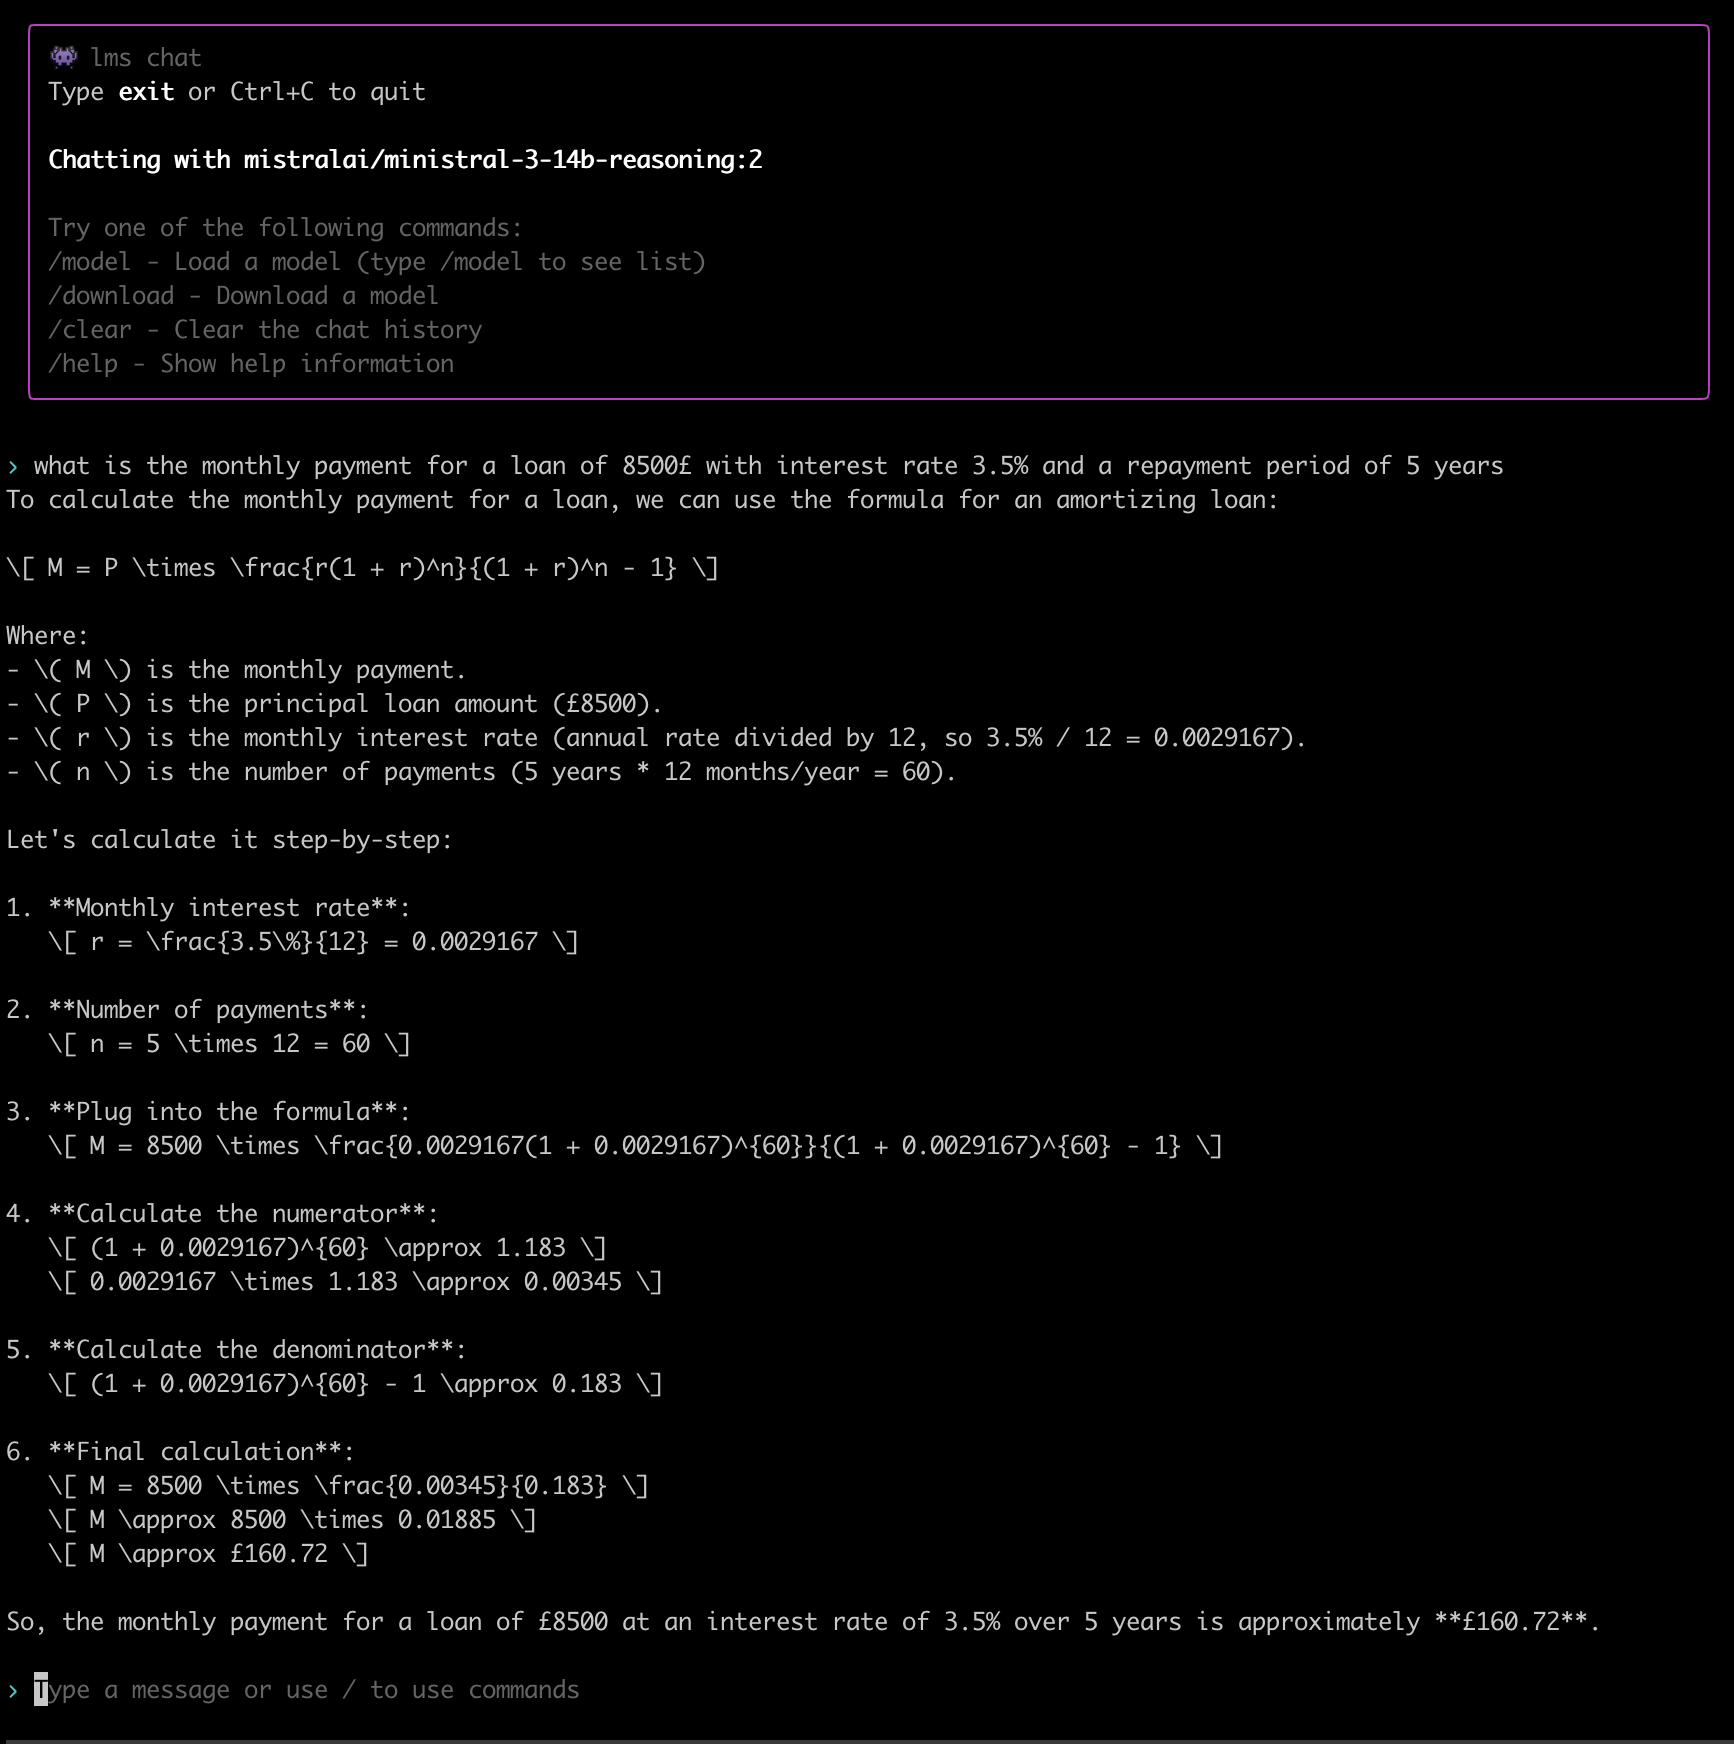
This is one of my classic test scenarios I use when I want to evaluate the quality of a financial tool, calculator, spreadsheet, or—in this case—AI.</p>

<p>The correct answer is not £160.72 as the AI suggested here. The correct answer is £154.63.</p>

<p>Here is what a cloud-based AI has to say about this:</p>

<p><img src="/assets/lm-studio/perplexity-mortgate-answer.png" alt="perplexity mortgate answer" width="800" /></p>

<p>This is a very clever trick where an AI will try to use a programming language to answer any math-oriented question. It reduces the chances of hallucination considerably.</p>

<p>But in order to be able to do this, it needs a runtime environment, and since it is dangerous to allow an AI to run scripts on a system, this has to be in a sandbox.</p>

<p>This functionality does not exist in the LM Studio CLI yet, but it exists in its UI.</p>

<h1 id="rag">RAG</h1>

<p>RAG in AI usually means <strong>Retrieval-Augmented Generation</strong>: a method where a language model first retrieves relevant information from an external knowledge source (like documents, a database, or search index) and then uses that retrieved content to generate its answer.</p>

<h3 id="what-it-does">What It Does</h3>
<p>RAG is used to make LLM outputs more accurate, up-to-date, and domain-specific by grounding responses in information outside the model’s training data.</p>

<h3 id="how-it-works-typical-flow">How It Works (Typical Flow)</h3>
<ul>
  <li>You ask a question.</li>
  <li>A retrieval step searches a knowledge base for the most relevant passages.</li>
  <li>Those passages are added to the prompt/context, and the model generates an answer using both the retrieved text and its general language abilities.</li>
</ul>

<p>In the backend, your additional files are converted into vectors and stored in a special database that allows the AI to search them and include them in its reasoning. We can see all of that diagrammatically in the following diagram:</p>

<p><img src="/assets/lm-studio/rag-workflow.jpg" alt="rag workflow" width="800" /></p>

<h3 id="why-people-use-it">Why People Use It</h3>
<p>RAG can reduce “hallucinations” and improve factual reliability because the model can base its response on retrieved source material rather than memory alone.</p>

<h3 id="availability">Availability</h3>

<p>RAG is supported by the LM Studio UI but is not supported by its CLI. Even the UI allows us to attach up to 5 documents in a chat and a maximum of 30MB.</p>

<p>Then we can use the AI to have a discussion about our documents.</p>

<p>Another way to use RAG is to use the OpenAI API that LM Studio supports. There are third-party tools that can act as a frontend and use LM Studio as a backend.</p>

<p>One of these tools is <a href="https://anythingllm.com">AnythingLLM</a>. AnythingLLM is a competitor of LM Studio. It does almost everything LM Studio does, and in some cases, its capabilities exceed those of LM Studio.</p>

<p>When it comes to RAG, for example, AnythingLLM does not have a restriction on how many files and how big you can attach to a discussion. Of course, all of these have to be supported by the backend—you need a big enough context window and enough memory and compute power.</p>

<p>It is also worth mentioning that although I am using LM Studio as my primary example here, almost everything mentioned in this article can also be achieved by using AnythingLLM and <a href="https://ollama.com">Ollama</a>, with Ollama being the backend and AnythingLLM the frontend.</p>

<h1 id="mcp">MCP</h1>

<p>The Model Context Protocol (MCP) is an open standard and open-source framework introduced by Anthropic in November 2024 to standardize the way artificial intelligence systems like large language models integrate and share data with external tools, systems, and data sources.</p>

<p>MCP provides a universal interface for reading files, executing functions, and handling contextual prompts. Following its announcement, the protocol was adopted by major AI providers, including OpenAI and Google DeepMind.</p>

<p>MCP is supported by both LM Studio and AnythingLLM. It allows us to define integrations between various services/components.</p>

<p>An LLM may use a search engine to retrieve fresh information about a topic, or connect to a database or an API in order to retrieve and analyze data.</p>

<p>This is one of the ways we can offload data parsing from our context to an external optimized service.</p>

<p>Instead of embedding the data to be processed in the context, we allow the model to retrieve it from an external service that supports MCP and then analyze it.</p>

<p>This is also how agentic AI works. It uses MCP to interact with other systems/agents and perform actions.</p>

<p>It is also where any potential hallucinations become reality if the AI is left to run without supervision.</p>

<p>Many companies who handed over their customer service to unsupervised AI agents discovered why this is a bad idea.</p>

<h1 id="conclusion">Conclusion</h1>

<p>In this article, we presented the various concepts that come into play when we are using an AI model and presented how we can combine them in order to fine-tune a model to be used for local execution.</p>

<p>We also presented various tools and explained how they can be used in an optimal way to query a local AI model or as part of a wider pipeline that combines both local models as well as cloud-based ones.</p>

<p>As we move forward in time and agentic AI becomes more prominent and more costly, being able to use optimized models—both local and cloud-based—will be key in order to keep our costs low and our quality high.</p>]]></content><author><name></name></author><category term="technology" /><category term="ai" /><category term="english" /><summary type="html"><![CDATA[Table of contents]]></summary></entry><entry><title type="html">To AI or not to AI</title><link href="http://nickapos.oncrete.uk/2026/02/05/to-ai-or-not-to-ai.html" rel="alternate" type="text/html" title="To AI or not to AI" /><published>2026-02-05T05:00:00+00:00</published><updated>2026-02-05T05:00:00+00:00</updated><id>http://nickapos.oncrete.uk/2026/02/05/to-ai-or-not-to-ai</id><content type="html" xml:base="http://nickapos.oncrete.uk/2026/02/05/to-ai-or-not-to-ai.html"><![CDATA[<p><strong>Table of contents</strong></p>
<ul id="markdown-toc">
  <li><a href="#introduction" id="markdown-toc-introduction">Introduction</a></li>
  <li><a href="#an-attempt-to-see-through-the-smoke-screen" id="markdown-toc-an-attempt-to-see-through-the-smoke-screen">An Attempt to See Through the Smoke Screen</a>    <ul>
      <li><a href="#is-it-actually-useful" id="markdown-toc-is-it-actually-useful">Is It Actually Useful?</a></li>
      <li><a href="#is-it-actually-sentient" id="markdown-toc-is-it-actually-sentient">Is It Actually Sentient?</a></li>
      <li><a href="#will-it-take-our-jobs" id="markdown-toc-will-it-take-our-jobs">Will It Take Our Jobs?</a></li>
    </ul>
  </li>
  <li><a href="#environmental-and-ethical-concerns" id="markdown-toc-environmental-and-ethical-concerns">Environmental and ethical concerns</a>    <ul>
      <li><a href="#environmental-issues" id="markdown-toc-environmental-issues">Environmental Issues</a></li>
      <li><a href="#ethical-concerns" id="markdown-toc-ethical-concerns">Ethical Concerns</a></li>
    </ul>
  </li>
  <li><a href="#cloud-based-and-local-ai" id="markdown-toc-cloud-based-and-local-ai">Cloud-Based and Local AI</a></li>
  <li><a href="#open-source-ai" id="markdown-toc-open-source-ai">Open Source AI</a></li>
  <li><a href="#conclusion" id="markdown-toc-conclusion">Conclusion</a></li>
</ul>

<h1 id="introduction">Introduction</h1>

<p>AI is one of the hottest topics for discussion over the last few years. It has been a prominent subject at major technological conferences and has driven sales worth billions of dollars in stock markets worldwide.</p>

<p>It is being hailed as one of the major breakthroughs of our time, and many people believe that computers will soon gain consciousness and stand alongside humans as fully sentient beings.</p>

<p>The long-promised Generative AI (GenAI) is expected to usher in a new era of prosperity for humanity.</p>

<p>Or is it?</p>

<p>This is what we will try to analyze in this article:</p>
<ul>
  <li>Is AI really what it’s advertised to be?</li>
  <li>Will it deliver on all these promises?</li>
  <li>What can we use it for?</li>
</ul>

<h1 id="an-attempt-to-see-through-the-smoke-screen">An Attempt to See Through the Smoke Screen</h1>

<p>First of all, we need a clarification: there is no such thing as <em>AI</em> as a distinct technology—it’s not a singular entity or a finished product. Rather, <strong>AI (Artificial Intelligence)</strong> is an umbrella term—a marketing label—that groups
together a wide range of computational techniques aimed at mimicking aspects of human-like cognition.</p>

<p>For decades, we have used machines to perform <strong>non-deterministic</strong> computational tasks—tasks where outcomes aren’t fully predictable from the input alone. Over time, different terms have emerged to describe these capabilities: expert
systems, neural networks, deep learning, machine learning, and so on—all significant milestones in the evolution of what is now branded <em>AI</em>.</p>

<p>Each of these technologies has its own significance and has contributed meaningfully to today’s AI revolution. The underlying approaches have evolved continuously: algorithms have become more sophisticated, data availability has surged, and
hardware has scaled dramatically—yet substantial variation remains across methods, architectures, and use cases.</p>

<p>That said, the surge in public interest—and the popularization of the term <em>AI</em>—has largely been driven by <strong>Large Language Models (LLMs)</strong>. These systems are capable of simulating human-like conversation in natural language, generating
coherent text, code, and more.</p>

<p>LLMs—and AI systems broadly—come in many forms: some are general-purpose, others highly specialized. Some require massive computational resources (e.g., training or running billion-parameter models), while others can run efficiently on a
standard laptop—even a mobile device.</p>

<p>There is still enormous variation among these systems in terms of:</p>
<ul>
  <li>underlying architecture (e.g., transformers vs. decision trees),</li>
  <li>trained capabilities (e.g., reasoning vs. pattern recall),</li>
  <li>data requirements,</li>
  <li>and computational footprint.</li>
</ul>

<p>Yet, despite all these differences, we collectively refer to them as <em>AI</em>.</p>

<h2 id="is-it-actually-useful">Is It Actually Useful?</h2>

<p>Absolutely yes.</p>

<p>As we mentioned in the previous section, we have been using it for years. AI or ML (Machine Learning) has been in continuous use for many, many years.</p>

<p>It has been used for detecting trends (market or social), for optimizing search results, for predicting our next word and providing alternatives and spelling suggestions, for transcribing audio, and for translating text.</p>

<p>It has been used in improving our photos and beautifying our selfies.</p>

<p>It has been used everywhere. We just did not call it AI then; we usually called it “the algorithm.”</p>

<p>The algorithm of Facebook, of Google, of TikTok, of Snapchat, and so on and so forth.</p>

<p>It was built into almost all online platforms and almost all phones. All financial institutions used it to create profiles for their customers; all trading houses used it to predict the behavior of the markets.</p>

<p>All retail and hospitality used it to predict what the next best trend would be.</p>

<p>All advertising companies used it both to profile people and to sell ads.</p>

<p>It will eventually be used everywhere, from consumer devices such as mobile phones (already happening), all the way to industrial equipment where it will be used as part of production, quality assurance and manufacturing.</p>

<p>If you are a farmer you could have a <a href="https://www.fwi.co.uk/machinery/technology/carbon-robotics-ramps-up-output-of-weed-zapping-laserweeder">weeding robot detecting individual weed plants and zap them</a>.</p>

<p>The influence of AI in modern professional environments can not be ignored.</p>

<h2 id="is-it-actually-sentient">Is It Actually Sentient?</h2>

<p>Absolutely not.</p>

<p>All AI does is try to identify the most likely answer to a question, within a certain level of uncertainty, using some initial training datasets.</p>

<p>This also applies to all scientific fields that use statistics to do their jobs, from social sciences to engineering, medicine, etc.</p>

<p>When working with stochastic models, you can never guarantee a 100% success rate. You can often provide pretty good results, though.</p>

<p>But in order to do so, you need to control all the parameters of the experiment.</p>

<p>If you have garbage in, you will most likely have garbage out. Many of the AI models available today were trained on unsafe datasets—datasets that contained factually incorrect information and implicit or explicit bias.</p>

<p>As such, even though the technology may be sound and could potentially produce good results, the final result cannot be trusted.</p>

<p>This means that the original promise of many AI companies—that it could replace their workforce—is false, and those people were hyping and mis-selling what AI could do.</p>

<p>AI is not sentient, and it cannot be held accountable for its actions. If it gives false health advice to people and those people are harmed because they followed the AI’s advice, it cannot be held accountable for its actions.</p>

<p>Even though these weaknesses can be addressed, and there are quite a few clever tricks a model can use to minimize the uncertainty of its answers, the above statement cannot be bypassed.</p>

<h2 id="will-it-take-our-jobs">Will It Take Our Jobs?</h2>

<p>Unfortunately, the answer to this question is a partial yes.</p>

<p>It is the same question that people asked during the Industrial Revolution and also when the first automated loom was introduced.</p>

<p>AI is most likely the next major productivity enhancer, which means that it will allow a user to do more with less.</p>

<p>This inevitably means that someone is losing business. Someone’s sales will drop, which means that someone will lose their job because of this drop in sales.</p>

<p>Is this a bad thing?</p>

<p>Of course it is.</p>

<p>How do we avoid it?</p>

<p>The answer is still the same as with all those previous times this question was asked. We need to adopt AI in our workflows and focus on training to do what AI cannot do.</p>

<p>Focus on solving problems people have that AI cannot solve independently.</p>

<p>Retrain and refocus.</p>

<h1 id="environmental-and-ethical-concerns">Environmental and ethical concerns</h1>

<h2 id="environmental-issues">Environmental Issues</h2>

<p>AI companies are being accused of consuming too much power and too many resources.</p>

<p>This is absolutely true.</p>

<p>But then again, this is true of many industrial enterprises. It is interesting that it is only now that people have started wondering about datacenter power consumption.</p>

<p>They did not think to challenge the power consumption an Amazon, Google, or Microsoft datacenter was using five years ago, when it was still using AI—but under a different label.</p>

<p>People calculate today how much energy an AI-based Google search has consumed but never bothered calculating this 5 years ago, even though Google was using AI even then to optimize search results.</p>

<p>Or they never asked how much energy went into curating their algorithmic Facebook or Twitter feed.</p>

<p>But then again, Machine Learning was not a hot topic then. AI—which, I might add, will become sentient any time now—is hot today.</p>

<p>Even non-technical people know of its existence, so it is a good topic for a newspaper article.</p>

<p>Having said all that, the foundation of this argument is true. Industrial enterprises such as AI, cryptocurrencies, large-scale datacenters, or even scientific enterprises such as the Large Hadron Collider need a lot of power, and we should make sure that the environmental impact of such enterprises is as low as possible.</p>

<p>It is in times like these, when the industry turns its attention to a problem for its own needs, that they are fully motivated to find interesting solutions.</p>

<p>In this particular case, I believe that the push for AI will also mean a boost for green energy.</p>

<p>We cannot discover new oil fields whenever and wherever we want, but we can easily take a previously unused industrial estate and plant a solar farm in it and make it produce the energy we need.</p>

<p>In case solar panels are not efficient enough, hey, we have a newfangled productivity enhancer called AI that we could use to make things better.</p>

<p>We can also use it to improve the efficiency of other green energy sources, including nuclear energy.</p>

<p>I believe that even though government policy introduced the migration to a carbon-neutral economy because of climate change, the need for extra energy for AI will accelerate the evolution of green technologies and eventually benefit the whole society.</p>

<h2 id="ethical-concerns">Ethical Concerns</h2>

<p>Oh boy, this is a real stinker.</p>

<p>I am not sure if there has ever been any significant technological advancement with as many ethical concerns as AI.</p>

<p>LLMs started their life by plagiarizing the whole internet, even without consent from the owners and creators of the content.</p>

<p>Major tech companies have taken advantage of terms and conditions agreements designed ages ago to allow people to scan their email and personal data for spam detection and security purposes to train their models.</p>

<p>Artists find their works of art ungracefully scraped by AI companies and then reused without license or permission to create other works of art.</p>

<p>Journalists and authors find their work also scraped without license or permission and used for training these models.</p>

<p>People find their images edited without their consent and then posted again on the internet, with or without clothes on.</p>

<p>Scammers are using all of the AI tools to impersonate people, steal their identity, and money.</p>

<p>Only recently I read about a scam where scammers impersonated people’s voices using AI in order to make money transfers or place orders using phone services that use voice recording as proof that the owner actually requested these transfers or orders.</p>

<p>There are even more concerns when it comes to AI-enabled social media that use psychological manipulation to increase engagement at the detriment of their users’ health, mental or physical.</p>

<p>I could go on and on and on, but the fundamental question is: who is responsible for the use of a tool—the tool itself or the user?</p>

<p>The answer is the user. Always.</p>

<p>So all of the above could have been avoided if the owners of these models took a more responsible approach.</p>

<p>But alas, this was never meant to be.</p>

<p>This is a gold rush, and in a gold rush, you do not have a calm discussion about where to dig. You have a stampede.</p>

<p>It is part of human nature.</p>

<p>But it didn’t have to be this way. The companies that participated in this gold rush are not half-starved diggers. They have balance sheets that are bigger than the national budgets of some countries.</p>

<p>They could behave as responsible adults, but they didn’t.</p>

<p>There is no excuse for that.</p>

<p>Unfortunately, the situation is still evolving, and there is no indication that the protagonists of the story are taking into account the risks of what they do at this breakneck pace.</p>

<p>People will be hurt because of this sloppy and haphazard approach, and the AI companies will have to answer for it. But I suppose they don’t care. They have enough cash to challenge anyone in court, and in the worst case, pay whatever fines they get slapped with.</p>

<p>Everyone in the AI race is busy making money.</p>

<h1 id="cloud-based-and-local-ai">Cloud-Based and Local AI</h1>

<p>AI and machine learning do not necessarily have to be cloud-based. Nevertheless, in the last few years, they have been dominated by cloud-based operations.</p>

<p>It was simply too expensive to buy and own the necessary hardware to make LLM training possible.</p>

<p>As the technology evolves, however, we see models emerging optimized for local execution. These are often referred to as edge-optimized models.</p>

<p>Where cloud-based AI is often criticized for its high environmental footprint, local AI execution does not have this problem. It can be part of our local computational operations, which means that power consumption and overall environmental impact are considerably lower.</p>

<p>I do not believe that local AI models will replace cloud-based AI compute, because some things are just too large to run locally, even for big companies. These use cases—industrial and environmental simulations, protein/medical research—will still require cloud-based AI.</p>

<p>However, as technology evolves, local models should be able to cover the needs of most people. The ability to use a local model as an expert system exists today.</p>

<p>We can run local AI models that are multimodal, which means that they can understand multiple forms of input. Text, video, or audio inputs are quite powerful and standalone. They do not depend on any external resources.</p>

<p>They can, of course, be extended by the use of external resources, but they can also operate offline.</p>

<p>This last property makes them ideal for isolated/sensitive environments.</p>

<p>When the other major concern of cloud-based AI—apart from environmental impact—is privacy, and the very well-documented past history of not respecting creators’ licenses and just scraping content anyway, many people believe that any information submitted to any online AI system will eventually become part of its training set.</p>

<p>This is not the case for local AI models. These models are isolated, and as the phrasing goes, “what happens in your local AI stays in your local AI.”</p>

<p>So these models are ideal for environments that require discretion and privacy.</p>

<p>Another potential use case for these local models is their use in embedded devices. I fully expect, in a few years, to see AI-enabled embedded systems, either in the form of household/industrial devices or in the form of personal computing/communication devices such as phones, tablets, etc.</p>

<p>I expect a lot of the AI work to happen on-device for most major phones, thus preserving the privacy of their owners. The same thing will apply to smart home devices and to smart computing devices such as routers, firewalls, etc.</p>

<p>But we will also have AI-enabled field devices, like the robot weeder I mentioned previously, but also AI-enabled drones, AI-enabled irrigation systems, and so on and so forth.</p>

<p>Eventually, we will see specialized AI models in embedded devices that will partially replace the hardcoded logic that we see today and allow for more flexible operation in the field.</p>

<p>A good example of this is firewall rules in embedded firewall and router devices. Using an AI model that can do attack pattern recognition could potentially provide us with more flexibility than the hard-coded block lists we use today.</p>

<h1 id="open-source-ai">Open Source AI</h1>

<p>At the periphery of the AI giants, we gradually see an AI open source community emerging.</p>

<p>This is not a new thing. Even OpenAI was initially meant to be a non-profit organization. There are several major companies that have released versions of their models as open source, even though we often do not have full visibility of their training set and what has gone into that training.</p>

<p>Despite all that, the existence of these open source models is crucial.</p>

<p>In the same way that the open source movement allowed people to learn, experiment, innovate that eventually created the amazing technological wealth we see today, we need a robust open source community for AI as well.</p>

<p>It is the only way to heal the wounds of the past where AI evolution hurt people in the process. We need ethical AI and open AI.</p>

<p>It is also the only way that niche groups could support their use cases. The major AI players will always focus on where the money is, but that does not mean that fringe ideas are not important.</p>

<p>Most of today’s scientific breakthroughs started their life as fringe ideas, and quite often it took a long time for the original scholar or entrepreneur to make the world understand the value of their innovation.</p>

<p>One of the most recent examples of this is mRNA vaccines.</p>

<p>So we see various communities and tools emerging that support and encourage the development of open source AI models, tooling, tests, and data sets.</p>

<p>We can name a few here.</p>

<p><a href="https://huggingface.co">Hugging Face</a> is an online community where people can collaborate on building AI applications. From here, you can collaborate with people and download, upload, design, and host AI models, applications, tests, and data sets.</p>

<p>It reminds me of how GitHub has helped communities form around specific projects.</p>

<p><a href="https://lmstudio.ai">LM Studio</a> is a free tool that allows you to download and run open source models. It supports the Hugging Face format, several models, offers a graphical interface for interacting with the model, supports MCP integrations as well as RAG, but it also allows you to use it as a server offering both a CLI mode as well as OpenAI API compatibility.</p>

<p>You can run it in headless operation, and it can work with both GPUs or CPUs.</p>

<p>You can also use it as an interface to online AI models if you have an API key for them and a subscription.</p>

<p><a href="https://anythingllm.com">AnythingLLM</a> is another tool that can be used as an interface to either local or online models. It can run models on its own, or it can be combined with <a href="https://ollama.com">Ollama</a> as its backend for local execution of models.</p>

<p>Ollama’s purpose is to allow us to run automations using local AI models, so it can be used as the backend for various automation tasks.</p>

<p>Another tool focusing on automation and potentially local execution is <a href="https://github.com/openclaw/openclaw">OpenClaw</a>. OpenClaw is a personal AI assistant that you can run on your own devices, and you can use it to create integrations across a number of services.</p>

<p>It is primarily designed to work with Anthropic and OpenAI models, but the important thing to remember here is that most of the tools we mentioned previously support the OpenAI API. So we could use OpenClaw with any one of those local models instead of the cloud based ones.</p>

<p>With OpenClaw, someone could use an AI model to drive automations—for home or otherwise—using messaging systems as control planes, in the same way we can use Slack bots to trigger remote actions.</p>

<p>Of course, it can also be used to receive notification events from your various automated systems.</p>

<h1 id="conclusion">Conclusion</h1>

<p>I understand that some people—quite a lot of people—are hurt by the use of AI, either directly or indirectly.</p>

<p>AI is a technology that can be used for good or bad. At the very minimum, some people will lose their jobs; it will be used extensively by scammers and crooks to impersonate people, steal their money, and steal their identities.</p>

<p>It will be used by bad actors to create fake videos and misinformation.</p>

<p>Not using AI for good purposes does not mean that these bad actors won’t use it for bad purposes.</p>

<p>My suggestion is that we should not let AI be used only by these bad actors. We can use it for good.</p>

<p>We can use it to improve our quality of life and create new solutions for existing hard problems.</p>

<p>We can also use it to detect and protect ourselves from any negative uses of AI.</p>

<p>The one thing we cannot do is ignore it. We cannot pretend it does not exist and go back to a pre-AI world.</p>

<p>The genie is out of the bottle.</p>]]></content><author><name></name></author><category term="technology" /><category term="ai" /><category term="english" /><summary type="html"><![CDATA[Table of contents]]></summary></entry><entry><title type="html">Garmin vs Garmin</title><link href="http://nickapos.oncrete.uk/2026/01/15/garmin-vs-garmin.html" rel="alternate" type="text/html" title="Garmin vs Garmin" /><published>2026-01-15T05:00:00+00:00</published><updated>2026-01-15T05:00:00+00:00</updated><id>http://nickapos.oncrete.uk/2026/01/15/garmin-vs-garmin</id><content type="html" xml:base="http://nickapos.oncrete.uk/2026/01/15/garmin-vs-garmin.html"><![CDATA[<p><strong>Table of contents</strong></p>
<ul id="markdown-toc">
  <li><a href="#introduction" id="markdown-toc-introduction">Introduction</a></li>
  <li><a href="#in-olden-times" id="markdown-toc-in-olden-times">In Olden Times</a></li>
  <li><a href="#the-new-shiny" id="markdown-toc-the-new-shiny">The New Shiny</a></li>
  <li><a href="#modes-of-operation" id="markdown-toc-modes-of-operation">Modes of Operation</a></li>
  <li><a href="#optimizing-for-battery-longevity-1" id="markdown-toc-optimizing-for-battery-longevity-1">Optimizing for Battery Longevity 1</a>    <ul>
      <li><a href="#apple-watch" id="markdown-toc-apple-watch">Apple Watch</a></li>
      <li><a href="#generic-smartwatch" id="markdown-toc-generic-smartwatch">Generic Smartwatch</a></li>
      <li><a href="#garmin-instinct-2-solar-regular-mode" id="markdown-toc-garmin-instinct-2-solar-regular-mode">Garmin Instinct 2 Solar Regular Mode</a></li>
      <li><a href="#garmin-instinct-2-solar-power-save-mode" id="markdown-toc-garmin-instinct-2-solar-power-save-mode">Garmin Instinct 2 Solar Power-Save Mode</a></li>
    </ul>
  </li>
  <li><a href="#optimizing-for-battery-longevity-2" id="markdown-toc-optimizing-for-battery-longevity-2">Optimizing for Battery Longevity 2</a></li>
  <li><a href="#conclusion" id="markdown-toc-conclusion">Conclusion</a></li>
</ul>

<h1 id="introduction">Introduction</h1>

<p>Often in reviews, we see comparisons between big brands or even models of the same brand, so it is easy to find articles that compare Apple smartwatches vs. Garmin, Coros, or Casio, and it would be easy to do one of those as well.</p>

<p>But in this article, we will do something different. I want to highlight the different ways you can use the same watch and explain why it may make sense to do so. We will use the Garmin Instinct 2 Solar for this.</p>

<h1 id="in-olden-times">In Olden Times</h1>

<p>Back in the day when watches were first invented, they could do one thing. They could tell time, and often even that was done poorly. So things were simple, and there was only one way to use your watch. Gradually, as time went by, watches became more elaborate, and complications started appearing.</p>

<p>So a date function was added, then a chronograph complication was added, and eventually GMT watches appeared that allowed people to track a second timezone if they wanted or even track daylight saving time in their own timezone.</p>

<p>Things went completely crazy when digital watches were introduced because of the flexibility of the LCD display. So now we can buy a simple digital watch that supports a perpetual calendar, multiple time zones with separate DST support for each one, multiple alarms, countdown and stopwatch timers with intervals or lap support — and on top of all of this, it can be solar- and potentially radio- or Bluetooth-calibrated for less than $100.</p>

<h1 id="the-new-shiny">The New Shiny</h1>

<p>When smartwatches were introduced, they took all that digital watches could do and evolved them to a different scale. You can do all of the above and much, much more. So the complexity has increased exponentially, and each new feature only adds to this.</p>

<p>Where there used to be only one way to use your watch, you can now pick from the plethora of features your watch supports and use them as you see fit. I can argue that today it is impossible to use all the features.</p>

<p>Smartwatches with sports profiles have such a large collection of sports profiles that it is impossible to do them all. You will only choose a handful. But this does not apply to sports-related features but to the health-related features and the main watch features as well.</p>

<p>All of this complexity and power, of course, needs to be satisfied by using fast CPUs and large batteries. Where in the past a watch would keep ticking for decades with some maintenance, the modern landscape is filled with obsolete smartwatches that have reached the end of their life because their non-replaceable battery died or their manufacturer stopped supporting them — and without their support, some of their features are disabled.</p>

<p>So one might ask: is there a way to combine the longevity of the past with the flexibility of the present?</p>

<p>This is the topic of this article.</p>

<h1 id="modes-of-operation">Modes of Operation</h1>

<p>The first thing that fails with these sealed, non-repairable devices is the battery. It is a consumable with a limited lifespan; it is supposed to fail after a certain number of recharge cycles, and it does. The second part that fails is the charging port. This is a mechanical component that is continuously connected and disconnected, and eventually it wears out.</p>

<p>The third most common failure is when the manufacturer stops supporting the device. Some devices can operate standalone, and others cannot. With Garmin, we are in luck because all the basic information can be accessed on-device, even though in order to get the full benefit of the supported features, you really need to link it with the Garmin Connect app and friends.</p>

<p>So assuming the third most popular failure mode is not a problem, how can we mitigate the first two and ensure that our device lives as long as possible?</p>

<p>The answer is simple: you preserve battery life as much as possible, and this means running your watch with the absolute minimum you need. Garmin allows us to fine-tune our watches to such an extent that with the Garmin Instinct 2 Solar and full health monitoring on — plus 3-4 training sessions per week — I can get more than 20 days between charges.</p>

<p>If I switch the watch to power-save mode and enable it only for training, plus step tracking and the occasional contactless payment, I get more than 60 days. All of this without any serious exposure to the sun, which means that you can get the same results with the Garmin Instinct 2 without the solar panel.</p>

<p>The Garmin Instinct 3 has even better battery life, and more premium models are even better than the Instinct 3.</p>

<p>All this is great, but so far we have not done much to prolong battery life beyond enabling power-save. Is there anything else we can do?</p>

<p>The answer is yes: we can preserve the charging port by not using it.</p>

<p>Many people think that the solar panel used in models like the Garmin Instinct 2 Solar is a gimmick because you have to be outdoors more than 4 hours per day under strong sun in order for this to make a difference. Not many people are, and even if we were, the sun in Scotland is not strong at all.</p>

<p>But there is another way.</p>

<p>During my experiments with my watches, I discovered that instead of waiting for the sun to make an appearance behind the clouds, you can actually use a desk LED lamp. If it is close enough to the solar panel, then the light intensity is significantly stronger than outdoor sunshine on a bright Mediterranean day — and without the heat.</p>

<p>This means that you can leave your Garmin under the desk lamp overnight, and it will charge right up and be ready to be picked up again in the morning.</p>

<p>In addition to preserving the charging port, this also preserves battery health.</p>

<p>Let’s break down how this works.</p>

<h1 id="optimizing-for-battery-longevity-1">Optimizing for Battery Longevity 1</h1>

<p>Modern lithium rechargeable batteries start deteriorating after about 300-500 full charge cycles, at which point their capacity is reduced to 80% or even lower.</p>

<p>Let’s see how fast a battery will reach that point. For our comparison, we can use three watches: an Apple Watch that needs daily charging, an average smartwatch that needs to be charged every week, and a Garmin Instinct 2 Solar with its two modes of operation — normal and power-save — that provide battery life of 20 days and 60 days, respectively.</p>

<h2 id="apple-watch">Apple Watch</h2>

<p>With daily recharging, an Apple Watch battery will start deteriorating at the 300-day mark — that’s less than a year.</p>

<h2 id="generic-smartwatch">Generic Smartwatch</h2>

<p>A generic smartwatch with weekly charging will start deteriorating in \(\frac{300}{7} \approx 5\) years — not bad at all.</p>

<h2 id="garmin-instinct-2-solar-regular-mode">Garmin Instinct 2 Solar Regular Mode</h2>

<p>A Garmin Instinct 2 Solar gives us 20+ days battery life in normal mode operation with heart rate tracking, 4-5 training sessions per week, but not much GPS usage. As such, we will get \(\frac{300}{\frac{365}{20}} \approx 16.5\) years out of it. Now we are getting somewhere.</p>

<h2 id="garmin-instinct-2-solar-power-save-mode">Garmin Instinct 2 Solar Power-Save Mode</h2>

<p>With power-save mode, Instinct will give us \(\frac{300}{\frac{365}{60}} \approx 49.3 years\). Not bad at all.</p>

<h1 id="optimizing-for-battery-longevity-2">Optimizing for Battery Longevity 2</h1>

<p>Is there anything else we can do?</p>

<p>Sure, this is where things get really interesting. You see, in the original phrase above about battery charge cycles, the operative word was <em>full</em> charge cycles. This means the battery goes from 100% to 0% and then back.</p>

<p>But most people don’t let their devices go down to 0%; they charge them earlier, so they do partial charges. So what happens if we assume we are charging our watches when the battery is at 75%? This means we are only doing a 0.25 charge. We just need to multiply our previous results by 4.</p>

<p>In this scenario, we have the following results:</p>

<table>
  <thead>
    <tr>
      <th>Watch</th>
      <th>Years for 100% Charge</th>
      <th>Years for 25% Charge</th>
    </tr>
  </thead>
  <tbody>
    <tr>
      <td>Apple Watch</td>
      <td>0.82</td>
      <td>3.28</td>
    </tr>
    <tr>
      <td>Generic smartwatch</td>
      <td>5</td>
      <td>20</td>
    </tr>
    <tr>
      <td>Garmin Instinct 2 Solar regular mode</td>
      <td>16.43</td>
      <td>65.75</td>
    </tr>
    <tr>
      <td>Garmin Instinct 2 Solar power-save mode</td>
      <td>49.31</td>
      <td>197.24</td>
    </tr>
  </tbody>
</table>

<p>And that is how we take a device with a known fixed lifespan and optimize it to be usable for way longer than expected.</p>

<p>At this point, I would like to point out that the Garmin Instinct numbers can also be achieved without the solar panel, but in this case, the charging port will eventually wear out long before the battery does.</p>

<h1 id="conclusion">Conclusion</h1>

<p>The tl;dr is: if you have a Garmin Instinct 2 Solar, charge it using the solar panel under a desk lamp every 15 days, and the battery will last several lifetimes and your charging port will be in pristine condition for several decades.</p>]]></content><author><name></name></author><category term="technology" /><category term="fitness" /><category term="english" /><summary type="html"><![CDATA[Table of contents]]></summary></entry><entry><title type="html">Debugging a DMR hotspot</title><link href="http://nickapos.oncrete.uk/2026/01/02/Debugging-a-dmr-hotspot.html" rel="alternate" type="text/html" title="Debugging a DMR hotspot" /><published>2026-01-02T10:00:00+00:00</published><updated>2026-01-02T10:00:00+00:00</updated><id>http://nickapos.oncrete.uk/2026/01/02/Debugging-a-dmr-hotspot</id><content type="html" xml:base="http://nickapos.oncrete.uk/2026/01/02/Debugging-a-dmr-hotspot.html"><![CDATA[<p><strong>Table of contents</strong></p>
<ul id="markdown-toc">
  <li><a href="#introduction" id="markdown-toc-introduction">Introduction</a></li>
  <li><a href="#getting-a-hotspot" id="markdown-toc-getting-a-hotspot">Getting a Hotspot</a></li>
  <li><a href="#what-does-wpsd-look-like" id="markdown-toc-what-does-wpsd-look-like">What Does WPSD Look Like?</a>    <ul>
      <li><a href="#configuration-changes" id="markdown-toc-configuration-changes">Configuration Changes</a></li>
      <li><a href="#logging" id="markdown-toc-logging">Logging</a></li>
      <li><a href="#configuration-structure" id="markdown-toc-configuration-structure">Configuration Structure</a></li>
    </ul>
  </li>
</ul>

<h1 id="introduction">Introduction</h1>

<p><a href="https://en.wikipedia.org/wiki/Digital_mobile_radio">DMR</a> stands for Digital Mobile Radio and is one of several digital modes available to amateur radio operators. Digital modes use encoding to convert either voice or data to a format that can be transmitted over the air via radio and then received and decoded by another radio.</p>

<p>Digital modes have some benefits over analog modes and, under certain circumstances, can deliver superior quality or even allow communication under very difficult conditions. They are usually more efficient than analog radio and allow multiple channels per frequency.</p>

<p>In addition to all the above, digital modes are also designed to use internet-enabled gateways that allow us to connect two remote gateways via the internet and enable users connected to one gateway to communicate with users connected to the other.</p>

<p>This can be done on a commercial as well as an amateur level.</p>

<p>For amateur networks, we have several digital modes, DMR being one of them. We have several digital mode networks all over the world, with <a href="https://brandmeister.network">BrandMeister</a> being the biggest one. If you open the BrandMeister website, you will see some statistics. You will see how many network masters exist, how many repeaters, and how many hotspots.</p>

<p>The repeaters connect to the masters, who are responsible for call routing. You can connect directly to a repeater with your DMR radio and participate in the discussion if you are in range.</p>

<p>However, if you are not in range, you can roll your own single-user repeater called a hotspot.</p>

<p>This is a very common use case because a lot of people are not close to a repeater, and having a hotspot allows them to participate in digital mode amateur radio. With the cost of a Raspberry Pi and a HAT, you can make contacts across the world.</p>

<p>These hotspots are the focus of this article. We will cover how they can be configured to access digital mode radio networks and how to debug them if things go wrong.</p>

<h1 id="getting-a-hotspot">Getting a Hotspot</h1>

<p>Acquiring a hotspot is not complicated. There are several off-the-shelf products that you can buy, and this topic has been covered extensively by several people who have written blog posts or published extensive video tutorials. See <a href="https://www.dmrfordummies.com/hotspots/">here</a>, <a href="https://www.besthamradio.com/how-to-build-a-dmr-mmdvm-hotspot/">here</a>, <a href="https://www.retevis.com/blog/the-ultimate-guide-to-dmr-hotspots-build-or-buy">here</a> and <a href="https://hagensieker.com/2024/04/13/best-dmr-hotspot/">here</a> for example.</p>

<p>A DIY-minded person can just purchase a Raspberry Pi and an MMDVM Pi HAT, flash it with one of the specialized distributions that exist — such as <a href="https://w0chp.radio/wpsd/">WPSD</a> — and hey presto, you have a digital modes hotspot. These hotspots support more digital modes than just DMR, but we will focus on DMR in this article.</p>

<p>A hotspot can connect to many DMR networks simultaneously, and the user can configure the hotspot to use specific prefixes for each network to indicate which one they want to access. In addition to multiple networks of a specific mode, you can have multiple modes enabled with multiple networks for each mode.</p>

<p>If you overdo it, things might become complicated, and it is very easy for a change to mess up the configuration of the hotspot.</p>

<p>In this article, we will explain how we can debug the hotspot service on a Raspberry Pi running WPSD, where to find its logs, and how to identify what is wrong with a particular setup.</p>

<h1 id="what-does-wpsd-look-like">What Does WPSD Look Like?</h1>

<p>After installation, WPSD will present its user with a dashboard that provides information about how many networks it is connected to, what modes are enabled, and information about which channel it is listening to, along with current traffic for that channel.</p>

<p>Each call is identified by the caller callsign. We can also see some statistics about their call.</p>

<p>We can see that in the following screenshot:</p>

<p><img src="/assets/dmr-hotspot-debugging/wpsd-dashboard.png" alt="WPSD dashboard" width="800" /></p>

<p>We can see the mode and network details on the left-hand side of the dashboard. If a mode is enabled but a specific configuration is invalid, you will see it here as inactive.</p>

<h2 id="configuration-changes">Configuration Changes</h2>

<p>In addition to the main dashboard, we can see that we have the option of accessing the administrative dashboard, which looks like the following screenshot:</p>

<p><img src="/assets/dmr-hotspot-debugging/wpsd-admin-dashboard.png" alt="WPSD admin dashboard" width="800" /></p>

<p>In this dashboard, we can see various editors and tools that can be used to configure different components of our hotspot. These editors are a bit restrictive and do not allow us to edit all sections of the configuration.</p>

<p>These restrictions are removed when we access the Full Editor under the advanced section, which allows us to edit everything but at the risk of breaking our hotspot.</p>

<p>This is why when we click on the Full Editor option, we get the following warning:</p>

<p><img src="/assets/dmr-hotspot-debugging/wpsd-admin-full-editor-warning.png" alt="WPSD Full Editor warning" width="800" /></p>

<p>The Full Editor allows us to edit the configuration files in free-form text.</p>

<p><img src="/assets/dmr-hotspot-debugging/wpsd-admin-full-editor.png" alt="WPSD Full Editor" width="800" /></p>

<p>This gives us full power to add or remove sections. Please keep in mind that if you use the Full Editor, save your configuration, and then go back to use the form-based editor, your changes will be overwritten, and this will break your hotspot configuration.</p>

<p>If you use the Full Editor once, all future changes have to be done with the Full Editor.</p>

<h2 id="logging">Logging</h2>

<p>When something goes wrong, our first step is to check the logs. WPSD allows us to view the service logs from its web interface.</p>

<p><img src="/assets/dmr-hotspot-debugging/wpsd-log-viewer.png" alt="WPSD log viewer" width="800" /></p>

<p>But if we try to access a log file that has too many entries, we get the message we see in the screenshot that the file is too large.</p>

<p>Of course, this is not really an issue because this is a Linux system. We usually don’t connect to its terminal, but it comes fully configured with SSH access.</p>

<p>There is a default user called <code class="language-plaintext highlighter-rouge">pi-star</code> with a default password of <code class="language-plaintext highlighter-rouge">raspberry</code>.</p>

<p>With these credentials, we can connect to the system:</p>

<div class="language-bash highlighter-rouge"><div class="highlight"><pre class="highlight"><code><span class="o">&gt;</span> ssh pi-star@pi-star.local
pi-star@pi-star.locals password: 
X11 forwarding request failed on channel 0

This is...
 _      _____  _______ 
| | /| / / _ <span class="se">\/</span> __/ _ <span class="se">\</span>
| |/ |/ / ___/<span class="se">\ \/</span> // /
|__/|__/_/  /___/____/

Version Status
<span class="nt">---------------</span>
  • WPSD Dashboard Web Software:
      Ver. <span class="c"># 07cef4a9c8</span>
  • WPSD Support Utilites and Programs:
      Ver. <span class="c"># 45da274eae</span>
  • WPSD Digital Voice and Related Binaries:
      Ver. <span class="c"># 20ab213163</span>

<span class="o">[</span>?] Your WPSD dashboard can be accesed from:
    • http://pi-star.local/
    • http://pi-star/
    • http://192.168.0.53/

<span class="o">[</span>i] WPSD command-line tools are all prefixed with <span class="s2">"wpsd-"</span><span class="nb">.</span>
    Simply <span class="nb">type </span>wpsd- and <span class="k">then </span>the TAB key twice to see a list.

WPSD Project: <span class="o">(</span>C<span class="o">)</span> Chip Cuccio, W0CHP <span class="nt">--</span> Made <span class="k">in </span>Winona, Minn. USA
<span class="o">[!]</span> WPSD is Free Software, and comes with ABSOLUTELY NO WARRANTY.

Last login: Fri Jan  2 14:12:58 2026 from 192.168.0.72
pi-star@pi-star:~<span class="nv">$ </span>
</code></pre></div></div>

<p>As the welcome message suggests, we can do a lot from the command line. There is a whole collection of WPSD commands that can be accessed by typing <code class="language-plaintext highlighter-rouge">wpsd-</code> and hitting Tab:</p>

<div class="language-bash highlighter-rouge"><div class="highlight"><pre class="highlight"><code>pi-star@pi-star:~<span class="nv">$ </span>wpsd-
wpsd-backup              wpsd-detectmodem         wpsd-gensslcert          wpsd-mode-manager        wpsd-modemreset          wpsd-p25link             wpsd-switch-profile      wpsd-update              wpsd-ysflink             
wpsd-bmapi               wpsd-dmr_jittertest      wpsd-hostfile-update     wpsd-modemcalibrate      wpsd-modemupgrade        wpsd-sendcw              wpsd-system-manager      wpsd-version             
wpsd-dapnetapi           wpsd-dstar-link          wpsd-mmdvmremote         wpsd-modem-flash_custom  wpsd-nxdnlink            wpsd-services            wpsd-tgifapi             wpsd-xlx_dmr_link        
pi-star@pi-star:~<span class="nv">$ </span>wpsd-
</code></pre></div></div>

<p>But in this article, we are focusing on debugging our service, so we want to find the logs. The logs for the WPSD service can be found in <code class="language-plaintext highlighter-rouge">/var/log/pi-star/</code>, and in there we can see the following files:</p>

<div class="language-bash highlighter-rouge"><div class="highlight"><pre class="highlight"><code>i-star@pi-star:pi-star<span class="nv">$ </span><span class="nb">ls</span> <span class="nt">-l</span>
total 2364
<span class="nt">-rw-r--r--</span> 1 mmdvm mmdvm    1001 Jan  1 03:46 APRSGateway-2026-01-01.log
<span class="nt">-rw-r--r--</span> 1 mmdvm mmdvm    1232 Jan  2 19:14 APRSGateway-2026-01-02.log
<span class="nt">-rw-r--r--</span> 1 mmdvm mmdvm     615 Jan  3 02:00 APRSGateway-2026-01-03.log
<span class="nt">-rw-r--r--</span> 1 mmdvm mmdvm       0 Jan  1 02:46 DMRGateway-2026-01-01.log
<span class="nt">-rw-r--r--</span> 1 mmdvm mmdvm     102 Jan  2 22:35 DMRGateway-2026-01-02.log
<span class="nt">-rw-r--r--</span> 1 mmdvm mmdvm       0 Jan  3 02:01 DMRGateway-2026-01-03.log
<span class="nt">-rw-r--r--</span> 1 mmdvm mmdvm 1145712 Jan  1 23:59 MMDVM-2026-01-01.log
<span class="nt">-rw-r--r--</span> 1 mmdvm mmdvm 1059026 Jan  2 23:59 MMDVM-2026-01-02.log
<span class="nt">-rw-r--r--</span> 1 mmdvm mmdvm  195292 Jan  3 04:38 MMDVM-2026-01-03.log
pi-star@pi-star:pi-star<span class="nv">$ </span><span class="nb">tail </span>DMRGateway-2026-01-02.log 
W: 2026-01-02 22:35:41.190 BM_2341_United_Kingdom, Login to the master has failed, retrying login ...
pi-star@pi-star:pi-star<span class="nv">$ </span>

</code></pre></div></div>
<p>As we can see, the log files are broken down according to the subsystem. We can review each one of these files for potential issues. In this particular case, we can see that there was a connection issue to the British BrandMeister Gateway. Eventually, it was able to reconnect, so the service recovered.</p>

<p>MMDVM files keep extensive logs of all the activity happening in the hotspot, including statistics for every connection.</p>

<h2 id="configuration-structure">Configuration Structure</h2>

<p>Explaining the configuration of the WPSD service is beyond the scope of this article, but I would like to briefly explain the structure of the configuration file.</p>

<p>The configuration file is divided into sections. Each section sets up a different aspect of the service, and some are meant to be extended to include more networks or enable more modes.</p>

<p>We can see a snippet in the following example:</p>

<div class="language-plaintext highlighter-rouge"><div class="highlight"><pre class="highlight"><code>[General]
RptAddress=127.0.0.1
RptPort=62032
LocalAddress=127.0.0.1
LocalPort=62031
RuleTrace=0
Daemon=1
Debug=0
RFTimeout=20
NetTimeout=20
Suffix=R
Primary=1

[Log]
DisplayLevel=0
FileLevel=4
FilePath=/var/log/pi-star
FileRoot=DMRGateway

[Voice]
Enabled=1
Language=en_GB
Directory=/usr/local/etc/DMR_Audio

</code></pre></div></div>

<p>These sections are fairly static, and once you set them up, they won’t change. But when it comes to the DMR Gateway section, you can have several entries that look like the following:</p>

<div class="language-plaintext highlighter-rouge"><div class="highlight"><pre class="highlight"><code>[DMR Network 5]
Id=*****
Address=apollo.dmr.uk.pe
Password="*****"
Port=62031
Name=SystemX_Apollo
Enabled=0
TGRewrite0=2,4,2,9,1
PCRewrite0=2,44000,2,4000,1001
PCRewrite1=1,4009990,1,9990,1
PCRewrite2=2,4009990,2,9990,1
PCRewrite3=1,4000001,1,1,999999
PCRewrite4=2,4000001,2,1,999999
TypeRewrite1=1,4009990,1,9990
TypeRewrite2=2,4009990,2,9990
TGRewrite1=1,4000001,1,1,999999
TGRewrite2=2,4000001,2,1,999999
SrcRewrite1=1,9990,1,4009990,1
SrcRewrite2=2,9990,2,4009990,1
SrcRewrite3=1,1,1,4000001,999999
SrcRewrite4=2,1,2,4000001,999999
Location=0
Debug=0

[DMR Network 4]
Enabled=0
PCRewrite1=1,5009990,1,9990,1
PCRewrite2=2,5009990,2,9990,1
TypeRewrite1=1,5009990,1,9990
TypeRewrite2=2,5009990,2,9990
TGRewrite1=1,5000001,1,1,999999
TGRewrite2=2,5000001,2,1,999999
SrcRewrite1=1,9990,1,5009990,1
SrcRewrite2=2,9990,2,5009990,1
SrcRewrite3=1,1,1,5000001,999999
SrcRewrite4=2,1,2,5000001,999999
Location=0
</code></pre></div></div>

<p>These entries indicate where to connect, credentials/IDs if the network is enabled or not, and some rewriting rules that define how you can access each network.</p>

<p>In DMR, we have several talk groups under the same frequency, and a hotspot can subscribe to more than one at the same time. That allows you to listen to incoming traffic for one or more talk groups.</p>

<p>However, if you want to answer one of them, you need to be able to differentiate between two talk groups with the same ID number that belong to different networks.</p>

<p>That is where the rewriting rules come into play: by assigning a prefix to each network. So if <code class="language-plaintext highlighter-rouge">Network 5</code> has the prefix <code class="language-plaintext highlighter-rouge">5</code> and <code class="language-plaintext highlighter-rouge">Network 4</code> has the prefix <code class="language-plaintext highlighter-rouge">4</code>, and you have a talk group with number <code class="language-plaintext highlighter-rouge">2021</code> in both, then you can access talk group <code class="language-plaintext highlighter-rouge">2021</code> in <code class="language-plaintext highlighter-rouge">Network 4</code> by dialing <code class="language-plaintext highlighter-rouge">42021</code> and <code class="language-plaintext highlighter-rouge">Network 5</code> by dialing <code class="language-plaintext highlighter-rouge">52021</code>.</p>

<p>This is where a misconfiguration is most likely to happen, so by combining the logic explained here with any errors found in the logs, we can find the potential issue and fix our hotspot.</p>]]></content><author><name></name></author><category term="technology" /><category term="ham" /><category term="english" /><summary type="html"><![CDATA[Table of contents]]></summary></entry><entry><title type="html">To self host or not to self host, that is the question</title><link href="http://nickapos.oncrete.uk/2025/12/31/self-hosting.html" rel="alternate" type="text/html" title="To self host or not to self host, that is the question" /><published>2025-12-31T17:00:00+00:00</published><updated>2025-12-31T17:00:00+00:00</updated><id>http://nickapos.oncrete.uk/2025/12/31/self-hosting</id><content type="html" xml:base="http://nickapos.oncrete.uk/2025/12/31/self-hosting.html"><![CDATA[<p><strong>Table of contents</strong></p>
<ul id="markdown-toc">
  <li><a href="#introduction" id="markdown-toc-introduction">Introduction</a></li>
  <li><a href="#why-self-hosting" id="markdown-toc-why-self-hosting">Why Self-Hosting?</a>    <ul>
      <li><a href="#privacy" id="markdown-toc-privacy">Privacy</a></li>
      <li><a href="#independence" id="markdown-toc-independence">Independence</a></li>
      <li><a href="#common-patterns" id="markdown-toc-common-patterns">Common Patterns</a></li>
    </ul>
  </li>
  <li><a href="#hosting" id="markdown-toc-hosting">Hosting</a>    <ul>
      <li><a href="#data-hosting" id="markdown-toc-data-hosting">Data Hosting</a>        <ul>
          <li><a href="#synology" id="markdown-toc-synology">Synology</a></li>
          <li><a href="#qnap" id="markdown-toc-qnap">QNAP</a></li>
          <li><a href="#freenastruenas" id="markdown-toc-freenastruenas">FreeNAS/TrueNAS</a></li>
        </ul>
      </li>
      <li><a href="#name-resolution" id="markdown-toc-name-resolution">Name Resolution</a>        <ul>
          <li><a href="#pi-hole" id="markdown-toc-pi-hole">Pi-hole</a>            <ul>
              <li><a href="#why-blocking-telemetry-and-ads-is-a-good-idea" id="markdown-toc-why-blocking-telemetry-and-ads-is-a-good-idea">Why Blocking Telemetry and Ads Is a Good Idea</a></li>
            </ul>
          </li>
        </ul>
      </li>
      <li><a href="#media" id="markdown-toc-media">Media</a>        <ul>
          <li><a href="#why-not-use-online-streaming" id="markdown-toc-why-not-use-online-streaming">Why Not Use Online Streaming?</a></li>
          <li><a href="#plex" id="markdown-toc-plex">Plex</a>            <ul>
              <li><a href="#plex-issues" id="markdown-toc-plex-issues">Plex Issues</a></li>
            </ul>
          </li>
          <li><a href="#jellyfin" id="markdown-toc-jellyfin">Jellyfin</a></li>
        </ul>
      </li>
      <li><a href="#managing-your-services" id="markdown-toc-managing-your-services">Managing Your Services</a></li>
      <li><a href="#accessing-your-services" id="markdown-toc-accessing-your-services">Accessing Your Services</a>        <ul>
          <li><a href="#the-old-way" id="markdown-toc-the-old-way">The Old Way</a></li>
          <li><a href="#the-better-way" id="markdown-toc-the-better-way">The Better Way</a></li>
        </ul>
      </li>
      <li><a href="#website" id="markdown-toc-website">Website</a></li>
    </ul>
  </li>
</ul>

<h1 id="introduction">Introduction</h1>

<p>I was recently asked about some technologies usually related to self‑hosting and, after I answered that I am already using most of these things, I was asked why I do not write about them. This made me start thinking about it.</p>

<p>The problem is that self‑hosting means something different for each of us, depending on each person’s needs, so a detailed article about what I use would probably be of interest only to technical people and not so much to people with a non‑technical background, but who might still need to self‑host some services.</p>

<p>So instead of going deeply into the technical details of what I use, I will explain which technologies I use and how I combine them, and I will try to keep the focus on some issues that most people face, in order to make this article as useful as possible, starting with the main question: why self‑hosting?</p>

<h1 id="why-self-hosting">Why Self-Hosting?</h1>

<p>The definition of self‑hosting varies depending on who you ask. For some people, it means self‑hosting a website. For others, it means significantly more. We can self‑host almost everything — we can replace most major cloud providers with locally hosted services. This includes data storage, multimedia, email, social media, photo‑sharing apps, collaboration apps — you name it.</p>

<p>Not everyone needs all of these, and a lot of people are quite happy using the services provided by the major tech companies. They might want to have only one or a few of these services locally hosted.</p>

<p>First of all, we need to answer the question: why would anyone want to host their own services?</p>

<h2 id="privacy">Privacy</h2>

<p>We will start by mentioning that, in almost every case, when we are using a publicly offered solution, our expectation of privacy should be zero. Even though some cloud providers support encryption, most major consumer solutions are not end‑to‑end encrypted.</p>

<p>This means that any government in the world can request that your cloud provider decrypt your files and hand them over. It also means that your favorite email provider (Google, Microsoft, Apple) is reading your email. Facebook is reading your private chats.</p>

<p>This includes data files, chat histories, photos, videos, and books. Everything stored in a public cloud can be handed over to the authorities. Of course, as an upstanding citizen, you might think, “I have nothing to hide; I am not afraid of the authorities.”</p>

<p>Things are not that simple. First of all, not all governments are democratic, and quite a few profile their citizens in order to control them. So if you say that you have nothing to be afraid of, then you are lucky to live in one of the countries where there is no racism or discrimination based on skin color, political ideas, or religion.</p>

<p>Last time I checked, there are only a handful of countries that fall into this category.</p>

<p>So I would suggest you reconsider and look around you. See if there are any incidents of racism and discrimination in your communities — if there are, then you are also vulnerable. It does not matter what color your skin is or your religion.</p>

<p>Trends change, and the people who hold the keys to power change as well. Today, you might not be targeted by those in power, but tomorrow you might be.</p>

<p>So one of the reasons you might want to self‑host is to have true privacy.</p>

<h2 id="independence">Independence</h2>

<p>Another reason is that you may want to be independent. We have seen public cloud providers locking in their users and then asking for money — the users cannot leave and go to another platform, so they have to pay up. We have seen that major players in the tech industry (i.e., Google) do not allow you to delete all of your photos in one go in order to move to another service.</p>

<p>You have to download them in batches, and if you used to host your data with Google and have several dozen GB, then you are out of luck. If you are technical, you can script the process. If you are not, then you are locked in.</p>

<p>Similarly, Flickr suddenly changed their pricing model and started asking for money from people who had photos on their platform. Anyone who had set up their workflow to upload their photos to Flickr automatically was effectively locked in and done for.</p>

<p>They kept threatening to delete my account and photos for months. I just ignored them, but I was so annoyed by this that I stopped taking photos for a long time. Eventually, I found that there was a <a href="https://github.com/brownphotographic/Flickr2Any-Tool">tool</a> that could export a Flickr library and import it to other platforms. This was the first step toward hosting my own <a href="https://livi.oncrete.uk/i/web">Pixelfed instance</a>.</p>

<p>Another fairly common issue is when someone is locked out of their own account.</p>

<p><img src="/assets/self-hosting/apple-locked-account.png" alt="A screenshot of a discussion in Apple support about locked accounts" width="600" /></p>

<p>We have seen several cases where the major tech companies lock people out of their accounts for various reasons. When this happens, you are screwed. You lose access to all of your apps, all your email, and all of your data.</p>

<p>It is a really good idea to keep your own copy of your data.</p>

<h2 id="common-patterns">Common Patterns</h2>

<p>These are common patterns that apply to everyone. Everyone has email, everyone has data, and everyone does messaging. Some people might be doing more, but every single person who uses modern technologies has a collection of data that they need to access and a group of people that they need to connect with, collaborate with, or talk to.</p>

<p>This is the first step toward self‑hosting: owning your own data.</p>

<h1 id="hosting">Hosting</h1>

<h2 id="data-hosting">Data Hosting</h2>

<p>This part of self‑hosting is actually the easiest of all. There are several major companies that offer Network Attached Storage (NAS) solutions.</p>

<p>Some of these are turnkey solutions. You just plug a box into power and network, and you have a full solution that can be used to store data, view photos, read emails, host web pages, write text files, use spreadsheets, back up phones, and collaborate with other people.</p>

<p>They are multi‑tenant solutions, which means that one device can be used for a whole family — each person with their own account — or an office/company.</p>

<h3 id="synology">Synology</h3>

<p>The most prominent of these companies is <a href="https://www.synology.com/en-uk">Synology</a>. Synology offers a full range of solutions — for both consumers and companies. I am a proud Synology owner/customer and have been for more than a decade.</p>

<p>Synology is not very cheap, but it offers a lot of value for your money. Another problem Synology solves is data access. It offers the <a href="https://kb.synology.com/en-uk/DSM/help/DSM/AdminCenter/connection_quickconnect?version=7">QuickConnect service</a>, which allows users to connect to their NAS from anywhere in the world.</p>

<p>Please remember that Synology offers apps for mobile device photo and data backup. These two combined offer similar functionality to native Android and iOS cloud support for media and backups — without the privacy and lock‑in issues mentioned earlier.</p>

<p>In addition to its main purpose as data storage, Synology offers beefier models that can be used to run services, either directly on the NAS itself or as containers. This means that you can host workloads on a Synology as if it were a public cloud provider.</p>

<p>My Synology systems are not powerful enough for this, so I am using an alternative method. We will come to that shortly.</p>

<h3 id="qnap">QNAP</h3>

<p>Another prominent company in this space is <a href="https://www.qnap.com/en-uk">QNAP</a>. QNAP offers a similar range of products to Synology — from small systems oriented toward consumers and home users all the way to systems oriented toward companies and offices.</p>

<p>They also provide an integrated solution, and they are better priced than Synology. The reason I have chosen Synology over QNAP is that their platform is better tested and more stable. You really do not want to risk messing up your data store with an unstable OS upgrade.</p>

<h3 id="freenastruenas">FreeNAS/TrueNAS</h3>

<p><a href="https://www.truenas.com/freenas/">FreeNAS/TrueNAS</a> is the open source/free software community’s response to the proprietary solutions offered by various companies. Originally developed back in 2005 based on FreeBSD, FreeNAS grew and matured into TrueNAS, an enterprise NAS solution with support for OpenZFS, jails, and more.</p>

<p>TrueNAS can be a more budget‑friendly solution but may require technical knowledge and/or an investment in time that might or might not be an option for the user.</p>

<h2 id="name-resolution">Name Resolution</h2>

<p>The second most common service for self‑hosting is a private name resolver. It may not be obvious because the way name resolution works is transparent — no one who is not technical wonders how this service works — but the truth is that whoever controls name resolution controls where you connect to.</p>

<p>There are specific attacks that can redirect a user to a fake site, and a whole lot of infrastructure in place that allows us to check if a site is who it claims to be. Usually, we use our ISP’s name resolution service.</p>

<p>This allows them to control where we connect to, and it is a fact that one of the first types of blacklisting on a country level happens on this service. If your ISP or your government wants to prevent you from accessing a service, this is one of the first things they will do.</p>

<p>They will blacklist their domain. In addition to this, often the ISP DNS servers are not very stable, so it might be a good idea to not use them anyway.</p>

<p>Luckily, it is easy to work around this issue by using one of the DNS services available from major providers (Google, Cloudflare, etc.). This solves the potential performance issues but moves the control from your ISP to a major tech company that might have their own agenda.</p>

<p>The solution to this is to run your own DNS server. If you have one of those fancy Synology NAS systems that can run workloads, you can use it to deploy a custom DNS server. Alternatively, you can use a cheap Raspberry Pi.</p>

<h3 id="pi-hole">Pi-hole</h3>

<p>There is a user‑friendly DNS software package called <a href="https://pi-hole.net">Pi-hole</a>. Pi-hole is designed to mostly act as a caching nameserver and ad blocker. It can be deployed as a container or a regular Linux service on a Raspberry Pi or in a VM.</p>

<p>This means that it expects you to send your requests to it, and it will ask the official upstream DNS servers for an answer and then cache this answer for any future similar requests. In addition to that, it also supports blocking common known domains that are used to serve ads.</p>

<h4 id="why-blocking-telemetry-and-ads-is-a-good-idea">Why Blocking Telemetry and Ads Is a Good Idea</h4>

<p>Pi-hole was originally designed as an ad blocker. It takes a leaf out of your ISP’s book and, instead of letting them control which domains resolve for you, lets you do it yourself. This means that you can blacklist certain domains that are used to track you or show you ads.</p>

<p>Online tracking and advertising go hand in hand. All of our interactions on the internet are being monitored by the major tech players. This is one of the reasons why you might not want to use one of their DNS servers. This telemetry is then used to profile you and serve you ads.</p>

<p>You might ask, why should you bother doing this?</p>

<p><strong>Privacy</strong></p>

<p>Well, you can scroll up a few paragraphs and read the section about privacy again. Why should Facebook or Google know who you are, what your favorite color is, or your shoe size? Why should they know what your favorite restaurant or sports team is?</p>

<p>It is very difficult to avoid this kind of tracking, but one of the ways you can get some privacy is by blocking trackers and ads.</p>

<p>But there is a second reason you might want to block ads.</p>

<p><strong>Security</strong></p>

<p>It is called <a href="https://en.wikipedia.org/wiki/Malvertising">malvertising</a>. Ads are a known method used to spread malware. It is one of the most common ways — most likely the second most common after phishing — of how malware spreads.</p>

<p>It is very easy for a non‑technical person to be tricked into clicking either intentionally or unintentionally on an ad and then, instead of taking the user to the advertising company’s website, have malware installed.</p>

<p>The major ad companies (again, Google, Facebook, and friends) do not really do any validation of the ad payload. They sort of assume that all of their advertisers are legitimate companies promoting a product, but this is not the case.</p>

<p><strong>Performance</strong></p>

<p>A final reason why you may want to block ads is performance. Ads consume resources. They consume memory, CPU, and bandwidth. Quite often, they overload an otherwise simple page. Most people notice an improvement in performance and browsing experience after blocking ads for this reason.</p>

<h2 id="media">Media</h2>

<p>Another common use case for self‑hosting — but not as common as data and DNS — is media hosting. There are a lot of people who own collections of digital media, either films or music (or both). Some people own audiobooks. So it is quite common for all these people to want to access their media on all of their devices.</p>

<p>Managing media collections across several devices is a tedious thing, especially when you want metadata like cover images, actor biographies, etc. So a lot of people self‑host a service for this.</p>

<h3 id="why-not-use-online-streaming">Why Not Use Online Streaming?</h3>

<p>Of course, most people will ask why they should bother hosting a service for media when they can just use Netflix.</p>

<p>The answer is that Netflix, Disney+, and Audible cost money, and they do not always have what you want. They have limited licenses to the majority of titles they host, which means you cannot watch your favorite series whenever you want (in my case, the series that started all this is <em>Star Trek: The Next Generation</em>).</p>

<p>Also, some of the platforms are quite busy enshittifying the whole experience by introducing ads even though you are already paying for the service. I have lost count of how many times my <em>X-Files</em> viewing was interrupted by Amazon Prime ads.</p>

<p>On the other hand, if you buy your movies as second‑hand DVDs from eBay, rip them, and watch them as many times as you want, you can do so freely. You can also download your podcasts locally and listen to or watch them on any of your devices without depending on YouTube, Spotify, or any other major platform.</p>

<p>You can even automate this.</p>

<p>There are several older films/movies or even presentations/instructional videos that are public domain or that you have paid for, and you can download them for your own pleasure/training needs.</p>

<h3 id="plex">Plex</h3>

<p>This is exactly what I have done. I have a collection of DVDs of favorite movies/series; I have ripped them and host them in my <a href="https://www.plex.tv/sign-in/?forwardUrl=https%3A%2F%2Fwww.plex.tv%2F">Plex</a>. Again, if you are the happy owner of a fancy Synology, you can host the service and the data on your Synology.</p>

<p>If you do not have a powerful enough Synology, then again you can host Plex either on a Raspberry Pi or a Linux system (either physical or virtual). The process is fairly straightforward and well documented.</p>

<p>You can use it for all your videos, music, and audiobooks, and it will automatically detect the metadata of each of your files and show it to you when you want to view or listen to it.</p>

<p>It supports playlists and collections for the organization of your files.</p>

<h4 id="plex-issues">Plex Issues</h4>

<p>Not everything is rosy in the Plex world. Even though they offer apps for all platforms and you can also use the service from a browser, the apps are not free. You have to pay a subscription or buy a lifetime pass.</p>

<p>I paid for a lifetime Plex Pass many years ago and have been using it ever since.</p>

<p>In addition to this initial cost, Plex is gradually moving away from an open ecosystem that allows third‑party plugins toward a walled ecosystem that is ad‑supported. It will not show ads on your own media, but it allows you to stream movies from their own catalog while they show you ads.</p>

<p>As you might have noticed, I am not a fan of ads, so what applies to Google and Facebook also applies to Plex. If you block the ads, the service is not otherwise affected. It is hosted locally on your own system, after all.</p>

<p>Another potential issue you may have is that the metadata detection might be a bit finicky. It requires specific naming of your files; otherwise, it might not work as expected, and you may end up with misidentified films.</p>

<h3 id="jellyfin">Jellyfin</h3>

<p>An alternative solution to Plex is <a href="https://jellyfin.org">Jellyfin</a>. It is an open source, volunteer‑built media solution that does exactly what Plex tries to do — without the corporate agenda.</p>

<p>Jellyfin is younger than Plex, and it did not exist when I started setting up my personal media collection; otherwise, I would most likely have chosen it.</p>

<p>It uses a server/client architecture in the same way Plex does, where the server holds the collection and all metadata, and the clients connect to it and stream data from it. There is extensive support for clients on all major platforms.</p>

<h2 id="managing-your-services">Managing Your Services</h2>

<p>So far, we have provided examples of three different services that someone might be interested in self‑hosting and given the reasons why they might want to. The list is non‑exhaustive, and most people host even more services.</p>

<p>After a while, even a technical person might find the management of all these services a chore, so the next question is: is there any way to make management of these services easier?</p>

<p>The answer is yes, and there are several solutions to this problem. One of these solutions is <a href="https://yunohost.org">YunoHost</a>.</p>

<p>YunoHost is a service management platform that can be used to automate and manage the lifecycle of services. It supports a large number of services, including Pi-hole, Plex, Jellyfin, and more.</p>

<p>It can be used to deploy the services, update them, create users, take backups, and finally uninstall the services.</p>

<p>It supports a Single Sign‑On (SSO) page, which means that you can access all your services by using one username and password.</p>

<p>You can also read more about YunoHost and self‑hosting in Elena Rossini’s very nice blog posts <a href="https://blog.elenarossini.com/a-newbies-guide-to-self-hosting-with-yunohost-part-1-reasons-requirements/">here</a> and <a href="https://blog.elenarossini.com/a-newbies-guide-to-self-hosting-with-yunohost-part-2-installation-setup/">here</a>.</p>

<h2 id="accessing-your-services">Accessing Your Services</h2>

<p>All right, so now you have quite a few services hosted at home: you have your Pi-hole that protects you from spammers and advertisers, you have your data on your NAS with your self‑hosted productivity suites, and your media library with Jellyfin or Plex.</p>

<p>But you can only access them when you are home. What happens when you are commuting or traveling abroad for work or holidays? Do you need to replicate your podcast setup on a different podcast player? Copy your films to your phone or your iPad so you can watch them when away?</p>

<p>Of course you could do that, but you do not really have to unless you happen to be somewhere without internet access, such as an airplane.</p>

<h3 id="the-old-way">The Old Way</h3>

<p>In the past, in order for people to use their services, they had to use Dynamic DNS and open and forward ports in their ISP router to allow incoming connections to their services. This approach did not always work great, had a lot of moving parts, and involved some technical difficulty.</p>

<p>There is a better way today.</p>

<h3 id="the-better-way">The Better Way</h3>

<p>The better way to do this is to use <a href="https://tailscale.com">Tailscale</a>. Tailscale is a company that offers consumer and business VPN solutions. It is based on WireGuard point‑to‑point VPN technology. In a nutshell, it allows us to connect all of our devices together using a virtual private network called a tailnet.</p>

<p>Tailscale supports all major platforms, including Linux. After enabling Tailscale on your mobile device and your Plex/Jellyfin instance, you can access it as if you were at home.</p>

<p>The installation is straightforward, and Tailscale offers a free tier that allows you to connect more than 100 devices to your tailnet. This way, you can easily access all of your services without having to mess with Dynamic DNS or port‑forwarding rules on your router.</p>

<p>You can even configure one of your systems at home to act as a gateway, which means you can use Tailscale on your phone and iPad while away to browse the internet and appear as if you are connecting from home.</p>

<p>The whole communication is encrypted, so you can use this instead of a VPN. The main difference is that you do not have many exit points to choose from. But it is a cracking feature since it means that by using your domestic connection, you can access all of your regular services even if they are geo‑fenced.</p>

<p>While regular VPN solutions might be blocked, your own network connection will not be, because it is a residential IP and not an IP owned by a VPN company. So if you want to access any streaming services or other geo‑fenced services when abroad, you will not have any issues.</p>

<h2 id="website">Website</h2>

<p>So far, we have covered services that someone needs and they can host in their own home for their own use, but how about hosting a service not for their own personal use but for other people? A good example of this is a website.</p>

<p>If you read <a href="https://blog.elenarossini.com/a-newbies-guide-to-self-hosting-with-yunohost-part-1-reasons-requirements/">Elena’s blog post</a>, you might have noticed that she is using YunoHost with a Virtual Private Server (VPS). This is most of the time the correct way to go about it if you want to host a website, especially if it is a commercial one.</p>

<p>But would it be possible to host a website at home, not open any ports on your router for the outside world, and yet make it available to everyone?</p>

<p>The answer is yes.</p>

<p>Cloudflare offers a free service called <a href="https://github.com/cloudflare/cloudflared">cloudflared</a> (Cloudflare Tunnel client). It is an agent that allows us to create a tunnel between our own system and Cloudflare systems.</p>

<p>It is designed to use Cloudflare’s proxy service to forward any HTTP requests coming to their side to our system without us having to expose any of our internal network to either the outside world or to Cloudflare itself.</p>

<p>In order to use this service, you need a domain registered with Cloudflare that will be used to establish the tunnel and the agent running on the system that is going to accept the connections. Then you can use this tunnel to host any HTTP service.</p>

<p>If you combine this with YunoHost and virtual hosting, you can use one system to host multiple services — your own Pixelfed, your own website, your own Mastodon — from one Cloudflare tunnel and one system in your closet, for free.</p>]]></content><author><name></name></author><category term="technology" /><category term="self-hosting" /><category term="english" /><summary type="html"><![CDATA[Table of contents]]></summary></entry><entry><title type="html">DIY home automation</title><link href="http://nickapos.oncrete.uk/2025/12/19/diy-home-automation.html" rel="alternate" type="text/html" title="DIY home automation" /><published>2025-12-19T18:00:00+00:00</published><updated>2025-12-19T18:00:00+00:00</updated><id>http://nickapos.oncrete.uk/2025/12/19/diy-home-automation</id><content type="html" xml:base="http://nickapos.oncrete.uk/2025/12/19/diy-home-automation.html"><![CDATA[<p><strong>Table of contents</strong></p>
<ul id="markdown-toc">
  <li><a href="#introduction" id="markdown-toc-introduction">Introduction</a></li>
  <li><a href="#the-ism-radio-bands" id="markdown-toc-the-ism-radio-bands">The ISM Radio Bands</a>    <ul>
      <li><a href="#433-mhz-band" id="markdown-toc-433-mhz-band">433 MHz Band</a></li>
      <li><a href="#zigbee" id="markdown-toc-zigbee">Zigbee</a></li>
    </ul>
  </li>
  <li><a href="#decoding-the-gadgets" id="markdown-toc-decoding-the-gadgets">Decoding the Gadgets</a>    <ul>
      <li><a href="#reading-the-signals" id="markdown-toc-reading-the-signals">Reading the Signals</a></li>
      <li><a href="#decoding-zigbee" id="markdown-toc-decoding-zigbee">Decoding Zigbee</a></li>
      <li><a href="#decoding-433mhz" id="markdown-toc-decoding-433mhz">Decoding 433 MHz</a></li>
      <li><a href="#mqtt" id="markdown-toc-mqtt">MQTT</a></li>
    </ul>
  </li>
  <li><a href="#using-the-data" id="markdown-toc-using-the-data">Using the data</a>    <ul>
      <li><a href="#architecture-1" id="markdown-toc-architecture-1">Architecture 1</a></li>
      <li><a href="#architecture-2" id="markdown-toc-architecture-2">Architecture 2</a></li>
    </ul>
  </li>
  <li><a href="#eye-candy" id="markdown-toc-eye-candy">Eye Candy</a></li>
  <li><a href="#potential-issues" id="markdown-toc-potential-issues">Potential Issues</a></li>
  <li><a href="#conclusion" id="markdown-toc-conclusion">Conclusion</a></li>
  <li><a href="#references" id="markdown-toc-references">References</a></li>
</ul>

<h1 id="introduction">Introduction</h1>

<p>Smart homes, or home automation as a concept, have existed for a few decades now. The final result of the evolution of this market is that we have ended up with a patchwork of devices and protocols that may or may not talk to each other.</p>

<p>We have competing ecosystems, and you can find devices that use technologies such as Zigbee or Z‑Wave to talk to each other, but these two networks are incompatible with each other.</p>

<p>In addition to that, we may have devices that use proprietary protocols that we cannot use or control unless we buy into their ecosystem.</p>

<p>In this article I will present a DIY approach to how we can interact with these devices.</p>

<p>I will focus on devices using ISM radio bands (433 MHz, Zigbee). The same approach could be used for other home automation technologies as long as they are open and not proprietary.</p>

<h1 id="the-ism-radio-bands">The ISM Radio Bands</h1>

<p>Many devices use what is called ISM radio bands for their communication, and within those bands they use specific protocols to talk to each other. According to Wikipedia:</p>

<blockquote>
  <p>The ISM radio bands are portions of the radio spectrum reserved internationally for industrial, scientific and medical (ISM) purposes, excluding applications in telecommunications.</p>
</blockquote>

<p>and</p>

<blockquote>
  <p>Cordless phones, Bluetooth devices, near-field communication (NFC) devices, garage door openers, baby monitors, and wireless computer networks (Wi-Fi) may all use the ISM frequencies, although these low-power transmitters are not considered to be ISM devices.</p>
</blockquote>

<p>These devices are going to be the focus of this article.</p>

<h2 id="433-mhz-band">433 MHz Band</h2>

<p>433 MHz is one of the bands reserved for ISM applications. But as we will see, it is also used for domestic applications and it is a very convenient way to expand your home automation if you are DIY-inclined and a bit handy with a soldering iron.</p>

<p>This band is a favourite with many manufacturers, hobbyists, engineers and IoT enthusiasts because it hits the sweet spot between range, signal penetration, power consumption and cost. It also does not require a licence for the manufacturer in most countries or is part of the ISM bands in others.</p>

<p>There are a huge number of devices that use this band, from temperature and humidity sensors, lighting, switches, remote controls—you name it. Apart from the off-the-shelf appliances that use this band, there are RF modules both for reception and for transmission that can be purchased for use in DIY projects.</p>

<p>Any Arduino enthusiast can acquire a couple of these modules and the sensor of their preference and build their own standalone, wireless-enabled appliance.</p>

<p>We can see one of these transceivers in the screenshot below.</p>

<p><img src="/assets/diy-home-automation/433-transceiver-module.png" alt="433MHz transceiver module" width="600" /></p>

<p>This is in fact what led me down this road in the first place. I wanted to create a custom light detector in order to monitor the hours of sunshine at home. I wanted to use this to understand if there was any point in me installing solar panels.</p>

<p>Eventually I did not build this particular sensor because I found the data I was looking for from a friend who already has solar panels, but in the meantime I had built the architecture I am going to present already.</p>

<p>There are Arduino libraries that can easily allow us to encode and decode data using the 433 MHz band, such as <a href="https://docs.arduino.cc/libraries/rf433any/">RF433any</a> and <a href="https://electronics-diy.com/complete-guide-for-rf-433mhz-transmitter-receiver-module-with-arduino.php">DIY articles</a> with step-by-step instructions on how to use them.</p>

<h2 id="zigbee">Zigbee</h2>

<p>Zigbee is a more modern, more powerful and more complicated technology than the ones used in the 433 MHz band. It also uses some of the ISM bands; the exact frequencies used vary from country to country.</p>

<p>From Wikipedia:</p>

<blockquote>
  <p>Zigbee is a low-power wireless mesh network standard delivering low-latency communication, and targeted at battery-powered devices in wireless control and monitoring applications. Zigbee chips are typically integrated with radios and with microcontrollers.</p>
</blockquote>

<p>and</p>

<blockquote>
  <p>Zigbee operates in the industrial, scientific and medical (ISM) radio bands, with the 2.4 GHz band being primarily used for lighting and home automation devices in most jurisdictions worldwide.</p>
</blockquote>

<p>It allows for more complicated methods of communication, a mesh network, higher transfer rates than the 433 MHz band and encryption.</p>

<p>It supports star, tree and mesh network topologies. Every network must have one coordinator device.</p>

<p>On the DIY side of things, Zigbee support exists for <a href="https://docs.espressif.com/projects/arduino-esp32/en/latest/zigbee/zigbee.html">ESP boards</a>.</p>

<p>Zigbee transceivers can be acquired in a similar manner to 433 MHz modules, although as we can see they are about 693% more expensive.</p>

<p><img src="/assets/diy-home-automation/zigbee-transceiver.png" alt="Zigbee transceiver module" width="600" /></p>

<p>There is extensive support for Zigbee in the IoT and home automation market, so it may very well be that you already have Zigbee devices and you don’t know it.</p>

<h1 id="decoding-the-gadgets">Decoding the Gadgets</h1>

<p>In this article we will not focus on how to build your own Zigbee or 433 MHz-enabled devices, but we will assume that you have already acquired a few of them even though it is quite possible you did not do it intentionally. Maybe you got a couple of weather stations or a smart switch.</p>

<p>This article will present a method of tapping into the network of your existing smart appliances and getting a copy of the data for yourself.</p>

<p>I will present two topologies that will allow you to monitor the data as well as enrich and transform data coming from multiple devices.</p>

<p>An extension of these topologies could potentially allow you to control your home automation.</p>

<p>We will cover both technologies but will provide examples only for the 433 MHz band.</p>

<h2 id="reading-the-signals">Reading the Signals</h2>

<p>At this point we have established that you have signals flying over your head that are either transmitted at the 433 MHz band or alternatively use the Zigbee technology.</p>

<p>You may wonder if it would be possible in some way to intercept and decode that traffic.</p>

<p>As it happens, this is indeed possible. It can be done by using a receiver connected to some kind of computer that will be able to decode whatever traffic exists. There are specialised receivers for this kind of thing, or alternatively you can use a wideband receiver such as RTL-SDR for both.</p>

<p>One word of warning: if you want to decode Zigbee signals at the 2.4 GHz band you will need some additional hardware as mentioned <a href="https://www.rtl-sdr.com/tag/zigbee/">here</a>. RTL-SDR maximum frequency is less than 2.4 GHz.</p>

<p>This makes it ideal for a number of applications. You can use the same device to decode ADS-B signals for aeroplane traffic, listen to radio, decode terrestrial over-the-air TV, decode sub-1 GHz Zigbee signals or decode the 433 MHz band.</p>

<p>RTL-SDR is not considered to be a particularly good receiver. It is wide open to a big range of frequencies, and as such sensitive to interference.</p>

<p>So if you wanted to use it to watch TV, for example, you could find a lot better receivers.</p>

<p>On the other hand, for the purpose of all-in-one receivers for a small amount of money it is indeed value for money. We can see one of those RTL-SDRs in the following screenshot.</p>

<p><img src="/assets/diy-home-automation/rtl-sdr.png" alt="RTL SDR dongle" width="600" /></p>

<p>After acquiring the SDR, all we need is a computer to decode it. A Raspberry Pi 3 is powerful enough for this. All we need to do is connect our dongle to the Pi, install the appropriate software and off we go.</p>

<h2 id="decoding-zigbee">Decoding Zigbee</h2>

<p>To decode Zigbee signals, we can use a tool such as <a href="https://github.com/Rtone/sdr4iot-zigbee-rx">sdr4iot-zigbee-rx</a>. This tool allows us to capture and decode the signals for further processing.</p>

<h2 id="decoding-433mhz">Decoding 433 MHz</h2>

<p>To decode 433 MHz band signals, we can use a tool such as <a href="https://github.com/merbanan/rtl_433">rtl_433</a>. rtl_433 can decode signals from multiple bands, not just 433 MHz, and supports a wide range of protocols and devices.<br />
This is the tool I have the most experience with and actively use in my setup.</p>

<p>When executed manually, we see something like the following screenshot:</p>

<p><img src="/assets/diy-home-automation/rtl_433.png" alt="rtl_433 manual execution" width="800" /></p>

<p>The output shows how many signal types the tool can decode and begins decoding them automatically.</p>

<p>It reports the various sensors and data it receives in real time. This is useful when verifying that the setup works as expected, but we cannot do much post-processing while the data remain in this raw form.</p>

<h2 id="mqtt">MQTT</h2>

<p>rtl_433 can decode signals and write them to stdout, a file, or alternatively forward them to an <a href="https://en.wikipedia.org/wiki/MQTT">MQTT server</a>.</p>

<p>MQTT is the go-to standard publish/subscribe (pub/sub) machine-to-machine IoT message broker. It follows a publisher/subscriber architecture — in this case, the publisher is the rtl_433 decoder.</p>

<p>It submits its data under specific topics for each sensor, which can then be consumed by another tool for further processing.</p>

<p>One of the most popular MQTT brokers is called <a href="https://mosquitto.org">Mosquitto</a>. It is lightweight and can be set up either on the same Raspberry Pi that performs signal decoding or on another system used for general monitoring.</p>

<p>Either way, the rtl_433 process can be configured to publish its data to Mosquitto with a command similar to:</p>

<div class="language-plaintext highlighter-rouge"><div class="highlight"><pre class="highlight"><code>/usr/bin/rtl_433 -vv -F mqtt://127.0.0.1:1883
</code></pre></div></div>

<p>which will produce output similar to the following:</p>

<pre>
<code>
Dec 14 16:42:30 wsjtx-pi rtl_433[25671]: rtl_433 version 22.11 (2022-11-19) inputs file rtl_tcp RTL-SDR SoapySDR
Dec 14 16:42:30 wsjtx-pi rtl_433[25671]: Use -h for usage help and see https://triq.org/ for documentation.
Dec 14 16:42:30 wsjtx-pi rtl_433[25671]: Trying conf file at "rtl_433.conf"...
Dec 14 16:42:30 wsjtx-pi rtl_433[25671]: Trying conf file at "(null)/.config/rtl_433/rtl_433.conf"...
Dec 14 16:42:30 wsjtx-pi rtl_433[25671]: Trying conf file at "/usr/local/etc/rtl_433/rtl_433.conf"...
Dec 14 16:42:30 wsjtx-pi rtl_433[25671]: Trying conf file at "/etc/rtl_433/rtl_433.conf"...
<b>Dec 14 16:42:30 wsjtx-pi rtl_433[25671]: Publishing MQTT data to 127.0.0.1 port 1883</b>
<b>Dec 14 16:42:30 wsjtx-pi rtl_433[25671]: Publishing device info to MQTT topic "rtl_433/wsjtx-pi/devices[/type][/model][/subtype][/channel][/id]".</b>
Dec 14 16:42:30 wsjtx-pi rtl_433[25671]: Publishing events info to MQTT topic "rtl_433/wsjtx-pi/events".
Dec 14 16:42:30 wsjtx-pi rtl_433[25671]: Publishing states info to MQTT topic "rtl_433/wsjtx-pi/states".
Dec 14 16:42:30 wsjtx-pi rtl_433[25671]: Registering protocol [1] "Silvercrest Remote Control"
Dec 14 16:42:30 wsjtx-pi rtl_433[25671]: Registering protocol [2] "Rubicson, TFA 30.3197 or InFactory PT-310 Temperature Sensor"
Dec 14 16:42:30 wsjtx-pi rtl_433[25671]: Registering protocol [3] "Prologue, FreeTec NC-7104, NC-7159-675 Temperature Sensor"
Dec 14 16:42:30 wsjtx-pi rtl_433[25671]: Registering protocol [4] "Waveman Switch Transmitter"
Dec 14 16:42:30 wsjtx-pi rtl_433[25671]: Registering protocol [8] "LaCrosse TX Temperature / Humidity Sensor"
Dec 14 16:42:30 wsjtx-pi rtl_433[25671]: Registering protocol [11] "Acurite 609TXC Temperature and Humidity Sensor"
Dec 14 16:42:30 wsjtx-pi rtl_433[25671]: Registering protocol [12] "Oregon Scientific Weather Sensor"
</code>
</pre>

<p>As shown, rtl_433 publishes its decoded data to MQTT, indicating which topic structure it follows and which protocols it supports.</p>

<h1 id="using-the-data">Using the data</h1>

<p>The next step is to decide what to do with the data. In my case, I just wanted to visualize the data, but at this point, you could do much more. I’m going to present two alternative architectures that will allow you to do this.</p>

<p>One is simpler than the other. The more complex architecture allows data enrichment, transformation, and the addition of logic that can trigger specific actions.</p>

<p>I previously used the more complex architecture, which supported data transformation, but due to a hardware failure, I chose the simpler approach the second time around.</p>

<h2 id="architecture-1">Architecture 1</h2>

<p>The first architecture uses a Prometheus MQTT exporter to read data from MQTT and expose it for scraping by <a href="https://prometheus.io/docs/introduction/overview/">Prometheus</a>. Then <a href="https://grafana.com">Grafana</a> can connect to Prometheus for data visualization.</p>

<p>This is the simplest possible architecture with the fewest moving parts, but it does not allow for data transformation or enrichment. If your data does not conform to the desired format, there isn’t much you can do without adding additional components.</p>

<p>All this is shown in the following diagram:</p>

<p><img src="/assets/diy-home-automation/Rtl-433-1.png" alt="Rtl 433 first architecture with Prometheus" width="800" /></p>

<h2 id="architecture-2">Architecture 2</h2>

<p>A more powerful architecture that uses a different approach is shown in the following diagram:</p>

<p><img src="/assets/diy-home-automation/Rtl-433-2.png" alt="Rtl 433 second architecture with InfluxDB and Node-RED" width="800" /></p>

<p>In this case, we are not using Prometheus. Instead, we use <a href="https://www.influxdata.com">InfluxDB</a>. InfluxDB has a push architecture, whereas Prometheus uses a pull architecture. This means that Prometheus expects to read values from an exporter, while InfluxDB expects an agent to push data to it.</p>

<p>In this setup, the service acting as the InfluxDB agent is <a href="https://nodered.org/">Node-RED</a>.</p>

<p>Node-RED is a powerful low-code, event-driven middleware platform that can be used to create event-driven workflows. It can collect, transform, and visualize data, as well as drive devices by sending events to them.</p>

<p>In this particular case, Node-RED reads sensor data from MQTT, transforms it, and submits it to InfluxDB. Grafana then reads the data from InfluxDB for visualization.</p>

<p>This architecture is more capable than the previous one because Node-RED can read data from multiple sources, transform it, and even publish it back to MQTT for further processing. In the past, I used this approach to process data from my ZigBee-based smart meter and my ADS-B receiver, which does not support MQTT or InfluxDB by default but provides an API that can be queried.</p>

<p>Eventually, all data were visualized in Grafana.</p>

<p>In addition, Node-RED can be extended with the <a href="https://flows.nodered.org/node/smart-nodes">smart-nodes library</a> to control smart devices and create more complex workflows based on incoming data—beyond simple visualization—but that is outside the scope of this document.</p>

<h1 id="eye-candy">Eye Candy</h1>

<p>After all of this, you can visualize your data like so:</p>

<p><img src="/assets/diy-home-automation/grafana-filtered-sensors.png" alt="A screenshot of a Grafana graph with environment sensors" width="800" /></p>

<p>Of course, you can define thresholds and create alerts when certain conditions occur — for example, if the temperature falls below a set threshold — and if you are using the Node-RED architecture, you can trigger actions such as turning on the heating.</p>

<p>There’s no limit to what you can do.</p>

<h1 id="potential-issues">Potential Issues</h1>

<p>From time to time, you might encounter some issues. For example, there’s always the chance of a sensor failure or a sensor going haywire. These sensors are factory-calibrated, but you still need to keep an eye out for misbehavior — especially if you’re triggering actions based on their input.</p>

<p>In addition, you may experience interference from other sources — either from nearby sensors running on the same frequency or from other equipment operating in the same range. It’s quite likely that your rtl_433 decoder will pick up signals that don’t belong to you.</p>

<p>We can see this happening here:</p>

<p><img src="/assets/diy-home-automation/grafana-unfiltered-sensors.png" alt="A screenshot of an unfiltered Grafana graph with environment sensors" width="800" /></p>

<p>In this graph, we can see an unfiltered view of all the sensors my RTL decoder detects. Most of these aren’t mine — I don’t own a soil sensor, and I’m not entirely certain what this “TwinPlus” sensor reporting -25 °C is.</p>

<p>Maybe someone in the neighborhood has a smart freezer?</p>

<h1 id="conclusion">Conclusion</h1>

<p>The techniques presented in this article allow us to build our own DIY home automation systems and potentially re‑purpose and extend off‑the‑shelf commercial solutions in ways that go beyond their original design.</p>

<p>They empower us to take control of products and services that might otherwise be opaque and to understand exactly what is happening in our home environment.</p>

<p>As always, with power comes responsibility — it’s important to be considerate and respect other people’s privacy.</p>

<p>So act responsibly, and have fun with your home automation!</p>

<h1 id="references">References</h1>

<ul>
  <li><a href="https://en.wikipedia.org/wiki/ISM_radio_band">https://en.wikipedia.org/wiki/ISM_radio_band</a></li>
  <li><a href="https://en.wikipedia.org/wiki/Zigbee">https://en.wikipedia.org/wiki/Zigbee</a></li>
  <li><a href="https://thinkrobotics.com/blogs/learn/433-mhz-rf-module-communication-basics-a-complete-guide">https://thinkrobotics.com/blogs/learn/433-mhz-rf-module-communication-basics-a-complete-guide</a></li>
  <li><a href="https://www.onesdr.com/433-mhz-band/">https://www.onesdr.com/433-mhz-band/</a></li>
  <li><a href="https://docs.arduino.cc/libraries/rf433any/">https://docs.arduino.cc/libraries/rf433any/</a></li>
  <li><a href="https://electronics-diy.com/complete-guide-for-rf-433mhz-transmitter-receiver-module-with-arduino.php">https://electronics-diy.com/complete-guide-for-rf-433mhz-transmitter-receiver-module-with-arduino.php</a></li>
  <li><a href="https://docs.espressif.com/projects/arduino-esp32/en/latest/zigbee/zigbee.html"> https://docs.espressif.com/projects/arduino-esp32/en/latest/zigbee/zigbee.html</a></li>
  <li><a href="https://docs.arduino.cc/libraries/rf433any/">RF433any</a></li>
  <li><a href="https://github.com/Rtone/sdr4iot-zigbee-rx">sdr4iot-zigbee-rx</a></li>
  <li><a href="https://github.com/merbanan/rtl_433">rtl_433</a></li>
  <li><a href="https://mosquitto.org">moquitto</a></li>
  <li><a href="https://nodered.org/">NodeRed</a></li>
  <li><a href="https://flows.nodered.org/node/smart-nodes">smart-nodes library</a></li>
  <li><a href="https://www.influxdata.com">InfluxDB</a></li>
  <li><a href="https://prometheus.io/docs/introduction/overview/">Prometheus</a></li>
  <li><a href="https://grafana.com">Grafana</a></li>
</ul>]]></content><author><name></name></author><category term="technology" /><category term="automation" /><category term="electronics" /><category term="diy" /><category term="english" /><summary type="html"><![CDATA[Table of contents]]></summary></entry><entry><title type="html">Keeping infrastructure up to date with the Phoenix server pattern</title><link href="http://nickapos.oncrete.uk/2025/12/15/keeping-infrastructure-up-to-date-by-using-the-phoenix-server-pattern.html" rel="alternate" type="text/html" title="Keeping infrastructure up to date with the Phoenix server pattern" /><published>2025-12-15T21:30:00+00:00</published><updated>2025-12-15T21:30:00+00:00</updated><id>http://nickapos.oncrete.uk/2025/12/15/keeping-infrastructure-up-to-date-by-using-the-phoenix-server-pattern</id><content type="html" xml:base="http://nickapos.oncrete.uk/2025/12/15/keeping-infrastructure-up-to-date-by-using-the-phoenix-server-pattern.html"><![CDATA[<p><strong>Table of contents</strong></p>
<ul id="markdown-toc">
  <li><a href="#the-problem" id="markdown-toc-the-problem">The problem</a>    <ul>
      <li><a href="#pets-vs-cattle" id="markdown-toc-pets-vs-cattle">Pets vs cattle</a></li>
    </ul>
  </li>
  <li><a href="#the-phoenix-server-pattern" id="markdown-toc-the-phoenix-server-pattern">The Phoenix server pattern</a>    <ul>
      <li><a href="#the-benefits" id="markdown-toc-the-benefits">The benefits</a></li>
      <li><a href="#the-risks" id="markdown-toc-the-risks">The risks</a></li>
    </ul>
  </li>
  <li><a href="#building-the-infrastructure" id="markdown-toc-building-the-infrastructure">Building the infrastructure</a>    <ul>
      <li><a href="#traditional-architecture" id="markdown-toc-traditional-architecture">Traditional architecture</a>        <ul>
          <li><a href="#preparing-and-verifying-the-base-image" id="markdown-toc-preparing-and-verifying-the-base-image">Preparing and verifying the base image</a></li>
          <li><a href="#deploying-the-image" id="markdown-toc-deploying-the-image">Deploying the image</a></li>
        </ul>
      </li>
      <li><a href="#container-based-architecture" id="markdown-toc-container-based-architecture">Container-based architecture</a>        <ul>
          <li><a href="#preparing-and-verifying-the-base-container-image" id="markdown-toc-preparing-and-verifying-the-base-container-image">Preparing and verifying the base container image</a></li>
          <li><a href="#deploying-the-image-1" id="markdown-toc-deploying-the-image-1">Deploying the image</a></li>
        </ul>
      </li>
    </ul>
  </li>
  <li><a href="#final-thoughts" id="markdown-toc-final-thoughts">Final thoughts</a></li>
  <li><a href="#references" id="markdown-toc-references">References</a></li>
</ul>

<h1 id="the-problem">The problem</h1>

<p>One of the classic challenges any infrastructure team has is that they need to keep their infrastructure up to date and secure.</p>

<p>This is eventually achieved by using various scanning tools that detect vulnerabilities in the systems and by designing elaborate patching schedules that are meant to solve this problem.</p>

<p>Container-based workloads are also vulnerable to this issue, because most product teams focus on delivering their features and do not spend enough time thinking about the base containers they are using and how these can be kept up to date.</p>

<h2 id="pets-vs-cattle">Pets vs cattle</h2>

<p>The goal may seem simple, but it is hiding a lot of complexity. It has been discussed extensively and a lot of ideas have been put forward about potential solutions.</p>

<p>A classic idea is that we should be treating systems as cattle and not as pets.</p>

<p>This means that if a system is sick, we do not fix it. We just kill it and replace it with a new functional system. This idea has in itself given birth to the concept of immutable infrastructure, which in turn is the foundational idea of container-based computing that has given birth to modern cloud computing.</p>

<p>This is a great concept, but it covers only the use case of when a system is broken; it does not cover how to make sure that our infrastructure is always secure and patched.</p>

<p>The pets vs cattle discussion suggests that instead of spending time fixing a system we should be replacing it. But replacing it with what exactly?</p>

<p>Also, what do we do with infrastructure that is not stateless or immutable? How do we ensure that this is going to be secure as well?</p>

<p>In this article we will answer this question by explaining the Phoenix server pattern for traditional as well as container-based workloads.</p>

<h1 id="the-phoenix-server-pattern">The Phoenix server pattern</h1>

<p>The Phoenix server pattern is a flavour of the pets vs cattle idea. It suggests that instead of waiting for a system to break so we can replace it, we do this proactively.</p>

<p>We do this for our whole fleet in carefully defined intervals in such a way that every few months we will have replaced our whole fleet with zero downtime.</p>

<p>This concept can be applied to both traditional virtual machine or physical-systems-based infrastructure as well as container-based infrastructure.</p>

<p>The basic requirement in order to achieve this is to have a mature and robust automation framework with full testing and quality gates that will do some of the following in an automated way:</p>

<ul>
  <li>Build base images (virtual machines and containers)</li>
  <li>Test base images</li>
  <li>Certify base images by running tests for all the components of our product at build time (unit testing)</li>
  <li>Deploy base images to a staging environment, apply prod-like configuration and datasets, and run tests (integration/E2E testing)</li>
  <li>Tag and release new base images for general use</li>
  <li>Assuming everything is approved, start a gradual replacement of existing systems by using these new base image releases</li>
  <li>Ensure that by the end of a certain period the whole fleet has been updated and refreshed</li>
</ul>

<p>Of course, the exact implementation depends on the nature of the service, so this is an indicative list.</p>

<h2 id="the-benefits">The benefits</h2>

<p>The benefits of following the Phoenix pattern are many.</p>

<ul>
  <li>Your systems are always up to date with very few security issues.</li>
  <li>There is no snowflake configuration; everything is controlled.</li>
  <li>Your automation is exercised on a daily basis.</li>
  <li>Your testing suite and quality gates are top-notch.</li>
  <li>Your monitoring and alerting solutions are also top-notch.</li>
  <li>Your systems are always compliant.</li>
  <li>You can use the test results as part of your compliance submissions.</li>
  <li>Getting certified for PCI DSS is going to be a breeze.</li>
</ul>

<h2 id="the-risks">The risks</h2>

<p>As always, with great power there is also great responsibility, so in addition to the benefits there are also great risks. As mentioned in <a href="https://nickapos.oncrete.uk/2025/12/12/three-ways-of-devop-presentation.html#technical-practices-of-feedback">the three ways of DevOps</a>, if you make a mistake and your testing/monitoring/alerting is not robust enough to catch it, then the risk of a global outage is very high.</p>

<p>We have seen this happen to all top players in the field. It has happened to Amazon, it has happened to Cloudflare, it has happened to Twitter, Facebook, etc.</p>

<h1 id="building-the-infrastructure">Building the infrastructure</h1>

<p>In this section of the article I am going to present how I have done this in the past. But this is just one way of doing this. Also, as always, the devil is in the details, so your implementation may have to differ because the architecture of your service dictates it.</p>

<p>But the pattern should hold and the eventual benefits should persist. I will cover two scenarios: one for traditional workloads (VM/physical-based) and one for container-based workloads.</p>

<p>I will use a fairly simple architecture for illustration purposes, but in many cases in real multi-master highly available services, these examples will have to be redesigned in order to fit the needs of the specific service you want to maintain.</p>

<h2 id="traditional-architecture">Traditional architecture</h2>

<h3 id="preparing-and-verifying-the-base-image">Preparing and verifying the base image</h3>

<p>In a traditional architecture we usually have a service that has several components that are usually using the same underlying platform, and each component may have its own configuration management role as described in my <a href="https://nickapos.oncrete.uk/2025/12/11/automated-configuration-management-for-non-containerised-workloads.html">automated configuration management for non containerised workloads</a> article.</p>

<p>For the sake of this example, let us assume that this common platform is an Ubuntu Linux distribution.</p>

<p>In order to implement the Phoenix server pattern we need to be able to build images for our target architectures from scratch. I have done this in the past by using <a href="https://developer.hashicorp.com/packer">Hashicorp Packer</a>; our target architectures were Amazon, VMware and Xen.</p>

<p>We were using VMware for our production environment, Xen for our development environment and Amazon EC2 for our DR environment.</p>

<p>We can see this architecture in the following diagram.</p>

<p><img src="/assets/phoenix-server/phoenix-1.jpg" alt="Phoenix server base image creation" width="700" /></p>

<p>If the image is too small, please right click on the image and open it in a new tab so you can zoom in.</p>

<p>This is a base image creation and verification pipeline, but each step is meant to be a placeholder for domain-specific operations. This means that you can replace each step with the operations you need. For example, in the “run tests” step you can verify potential kernel drivers you need, and then run tests.</p>

<p>Even though this is a base image creation pipeline diagram, it can be extended further to produce complete appliance images that can be delivered to the customer as ready-to-install images to their platform of choice.</p>

<p>I have done this in the past when this pipeline contained integrations with Jira, contained steps for virus scanning and key signing of the various artefacts contained in it, up to the point where it even produced PDFs that were ready to be printed for DVD cases for the customers that required this image to be delivered on physical media.</p>

<h3 id="deploying-the-image">Deploying the image</h3>

<p>After the creation of the base image we are ready to start the gradual rollout.</p>

<p>This is the most sensitive step of the operation, since it requires automation to prevent the execution of the next replacement if one replacement has failed, and robust monitoring and alerting to notify the owners of the systems that a replacement has failed.</p>

<p>The rollout also depends on the nature of the service.</p>

<p>For example, in a highly available service with load balancing you can spin up a new service, do the deployment and configuration using your configuration management system (maybe using something similar to the method defined in my previous article <a href="https://nickapos.oncrete.uk/2025/12/11/automated-configuration-management-for-non-containerised-workloads.html">here</a>), and when everything is ready run tests to verify if the new system is healthy, then destroy one of the older instances.</p>

<p>Repeat the process until all the older instances have been replaced.</p>

<h2 id="container-based-architecture">Container-based architecture</h2>

<h3 id="preparing-and-verifying-the-base-container-image">Preparing and verifying the base container image</h3>

<p>If you are using containers instead of virtual machines or physical systems, then everything is a lot easier. You have only one target platform to worry about, and your application is meant to be stateless.</p>

<p>You can reuse the same pipeline to produce your base image with all the latest patches installed, run your tests and produce your base image to your artefact repo.</p>

<p>After testing, promote the snapshot version created to a released version which will then be used by other pipelines to produce the final artefact that contains your service.</p>

<h3 id="deploying-the-image-1">Deploying the image</h3>

<p>Kubernetes supports the rolling restart strategy out of the box, so all you need to do is bump the version of your artefact to the latest release and Kubernetes orchestration will do the rest for you.</p>

<h1 id="final-thoughts">Final thoughts</h1>

<p>Using this approach we move the focus of operations from day-to-day management of long-running systems to making sure our automation and monitoring are robust. In these situations automation, monitoring and alerting are key for the detection of faults as early as possible, ideally before even a base image is released.</p>

<p>There are huge benefits in doing so, because this means that all of our infrastructure is defined as code, there are no hidden configuration files that nobody knows anything about, and everything is peer reviewed and monitored.</p>

<p>This promotes standardisation and knowledge transfer with well-defined alerts and runbooks that will help resolve any issues with minimal disruption.</p>

<h1 id="references">References</h1>

<ul>
  <li><a href="https://www.thoughtworks.com/en-gb/insights/blog/moving-to-phoenix-server-pattern-introduction">Phoenix server pattern</a></li>
</ul>]]></content><author><name></name></author><category term="technology" /><category term="sre" /><category term="automation" /><category term="english" /><summary type="html"><![CDATA[Table of contents]]></summary></entry></feed>